How do I collect complementary t-shirt sizes from my registrants?
Last Updated: Sep 19, 2024 10:06AM PDT
To collect t-shirt sizes for your event, we recommend using an Attendee Item. This is one of our purchase questions, that is asked to each attendee. Attendee Items can be free or paid, required or optional, and you can set a specific inventory limit for each size. Even without set limits, inventory is tracked and can be viewed in the Purchase Summary tab of your event’s Data section. It is also available to be downloaded in your reporting when you need to know who gets what.
Here’s how you can add an Attendee Item into your registration form:
1. Log In to your Events.com account and open your event.
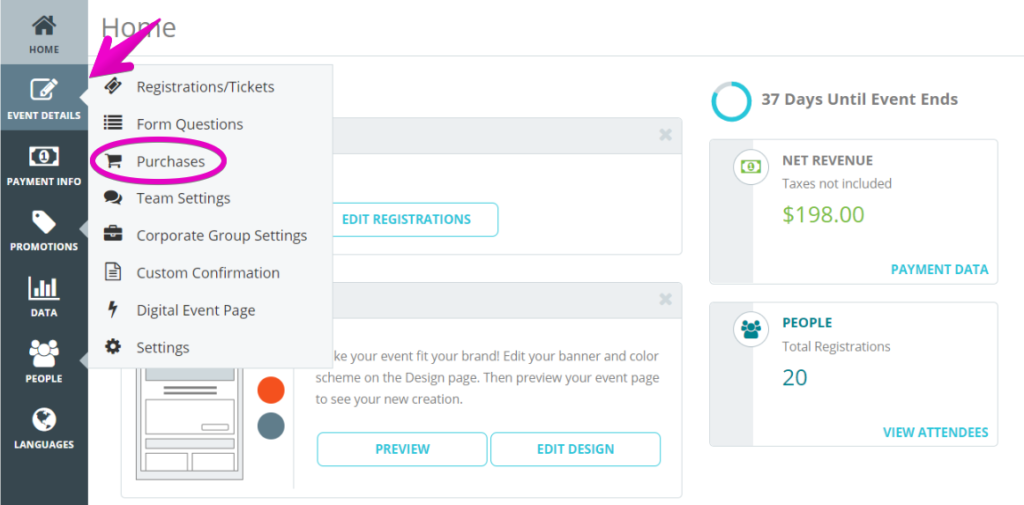
2. Click on EVENT DETAILS on the left side of the screen, and select Purchases.

3. Then, click on ADD ATTENDEE ITEM.

4. Give your t-shirt question a NAME¬†(e.g. ‚ÄúT-Shirt Size‚ÄĚ). OPTION NAME is one size. If you have limited stock for a size, set that limit under INVENTORY to avoid selling more than you have. Since this is a complementary item, you can keep the price at $0.

5. To add another size, click on the plus symbol. ¬†You can add as many sizes as you want, with individual inventory limits and pricing. If an option’s position needs to be adjusted you can use the arrows to the left of the Option Name to move it up or down in the list (This is the order how they will appear in the registration form).
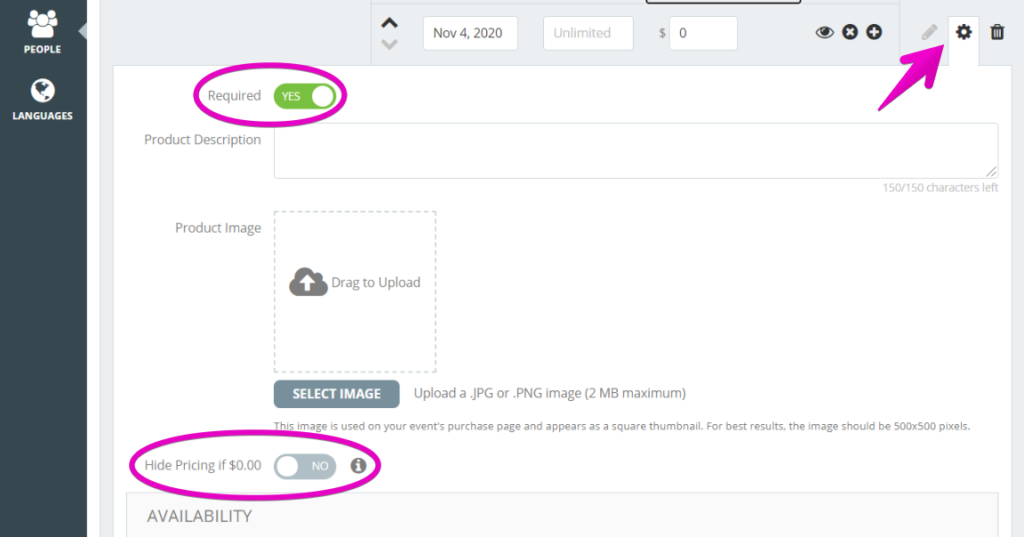
6. Click the gear icon to open Advanced Settings. Here you can choose to toggle Required to YES or NO, add Product Description, add a Product Image, the option to Hide Pricing, customize the Availability and add any Restrictions.

8. Click SAVE to save your changes.
Pro Tip: It is a good idea to add an image for any item that you offer or sell to get people excited about wearing your awesome brand. See How do I add an Image to Additional Purchases? for instructions.