Explore Topics for Event Organizers
*Keeping your Event Goers Safe (9)
Event Planning as it relates to Coronavirus (COVID-19)
As an organization whose mission is to bring people together to experience meaningful moments, we remain committed to ensuring the health and safety of Events.com employees, event organizers and attendees during this difficult time. Thank you for entrusting us with your events. We take this responsibility very seriously.
We understand the concern and uncertainty you are likely experiencing surrounding the coronavirus (COVID-19) outbreak. We are closely monitoring information from government agencies, medical professionals, the Centers for Disease Control (CDC) and the World Health Organization (WHO) to keep a pulse on the evolving situation.
Health & Safety
If you haven’t done so yet, let your event goers know you care about their health and well-being as soon as possible. Find out what the CDC is recommending for coronavirus (COVID-19) in your area. Check with provincial, federal, state and local authorities for any current or potential event restrictions. This may help inform the best decision for your community. As an industry, it is our responsibility to maximize the safety of our partners and participants and we want to support your focus on health and safety as you make decisions about your events.
Emergency Plan Options
There are some tactics you might consider for your event that can help you navigate through the challenges and may help participants contain the spread of the disease, while reducing your risk of chargebacks and refund requests.
Here are some immediate action steps and things you can do (some using Events.com technology and features) to help you through this. Click each link below for further instructions.
- Change your event from live to virtual.
- Postpone or reschedule your event to a later date.
- Offer a deferment option to attend next year’s event. This option can be offered to sponsors, participants as well as vendors.
- Turn on ticket protection with Fanshield if you haven’t already.
- Important note: We are in the process of automatically turning on Ticket Protection for all draft or live events selling tickets or registrations in our system. You may still turn off this feature in your settings, but we recommend that you keep it turned on.
- If your event is not permitted to occur on your event day or you cancel your event, it is a good idea to familiarize yourself in advance with your refund policy and plans, along with your insurance policies. We recommend you contact your insurance broker and/or advisor to review your policies. You may also want to review and enhance your legal waiver and associated text to ensure your protection as an organizer. If you do not currently have a legal waiver and refund policy, we suggest you implement one and add it immediately. We also recommend that you be very proactive with a communication plan with your attendees – reach out early.
Additional Resources
Many regions have restricted events of certain sizes to stop community spread of the virus. We expect to see more regions limit event activity in the coming weeks. When your event does occur, even after the restrictions are removed and we’ve all overcome the current challenges, consider measures you can take in the future to help prevent the spread of this and any other illness. Some examples include:
- Make it a no-handshaking event or create your own on-brand non-touch greeting
- Provide ample soap and handwashing stations
- Add medical staff on-site with no-touch thermometers
- Provide check-in staff with protective gear
- Provide refunds or deferrals to elderly or health-challenged participants
- Allow areas for people to spread out and enjoy the event rather than in close proximity
- Hire a professional cleaning crew to clean surfaces
Event organizers tend to be MVPs in the lives around them, and many people rely on them for direction and so much more. Enable your team in the event that you are temporarily unavailable and establish a chain of command.
Review the guidance the CDC has issued for mass gatherings and large community events. It contains a number of helpful guidelines on the basis of what to do before, during and after a COVID-19 outbreak.
Take a look at the recommendations from the US Center for Disease Control and Prevention in these articles: Event Organizers and Staff – Flu Prevention at Mass Gatherings and Coronavirus Disease 2019 (COVID-19).
U.S. Government Loan Program
On Wednesday, the U.S. government announced a fund to be run through the Small Business Association (SBA) to support small businesses impacted by the coronavirus. They are still working out the details and we don’t yet know how this will play out, but it may be worth applying as quickly as possible.
Terms of the Loan:
- Must be a small business with less than 500 employees
- Loan amounts are up to $2M
- Interest not to exceed 4%
You can also call the SBA directly at 1-800-659-2955. Monitor national, state, and local SBA sites for more information.
In Closing
We will be sending out more emails covering additional topics as we all navigate through this period.
We are in this together as we stand with you and the entire events community. Perhaps the most important thing to remember is that this is a temporary situation, it is not going to be forever, though it may feel like that now for some.
The event industry has led economic recovery in several cycles and has saved entire industries when they went through disruptions, such as music and even parts of the media industry. Our long term view of the event economy is still very positive, and we are quite hopeful for a fast recovery.
Your Events.com customer success manager is available to assist you during these challenging times. Feel free to reach out directly to your customer success manager or send us an email at hello@events.com.
Our hearts go out to everyone who has been impacted, and as always, thank you for being a part of the Events.com community.
Your Events.com Team
Attendee Protection offers attendees’ protection for some of the common personal reasons out of an individual’s control, that people have for cancelling their event attendance. If an attendee makes a successful claim, FanShield will issue a refund for the amount protected. We know that this can be helpful for an organizer, as you aren’t always able to offer refunds. If this is the case, Attendee Protection can be a solution for your attendees.
You can find the full terms and conditions of FanShield’s Standard Attendee Coverage Policy here.
The registration report contains who has accepted and declined Attendee Protection if you’re interested in reviewing your whole event. For help running a report, please visit our article – How do I view reports?
If you need to review an individual’s protection, there is information available in their registration/ ticket.
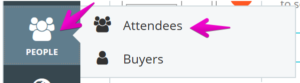
1. Open People and click Attendees.
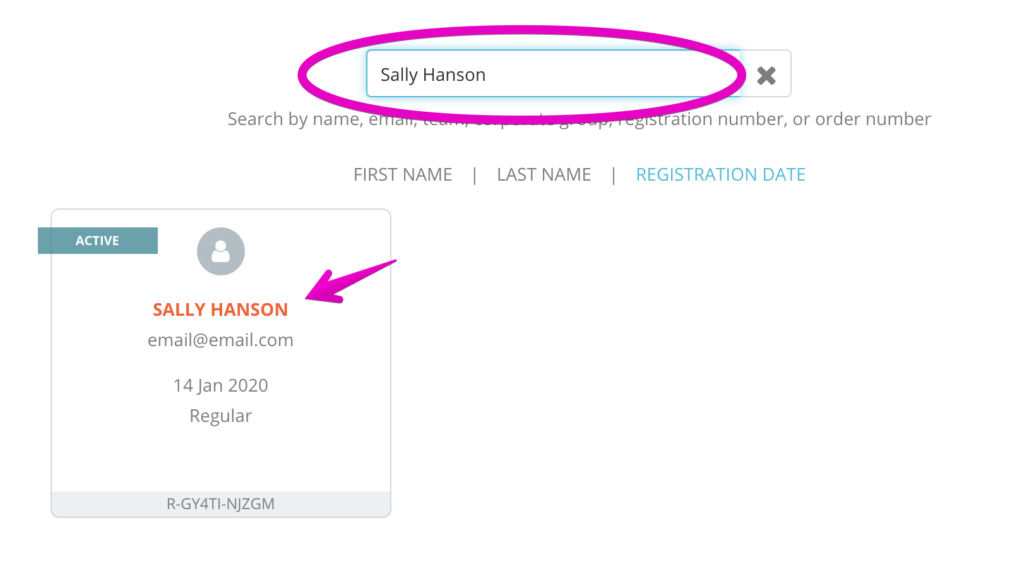
2. Search for the individual and click their card to open their registration/ ticket.
3. In the left corner, Attendee Protection will be listed with the summary of the order. A status message will indicate the Protection status.
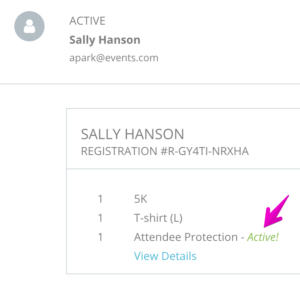
The example status is Active! which indicates that the Attendee successfully purchased Protection and could initiate a claim if applicable.
Other possible statuses are:
Inactive! – This can indicate there is a new policy associated with another ticket/registration.
Changed or cancelled! – This could indicate that a claim is in progress, or a change was made with their registration/ ticket.
Something went wrong with processing! – This usually indicates that the attendee’s payment was not success and the attendee should look for a FanShield email or email them directly.
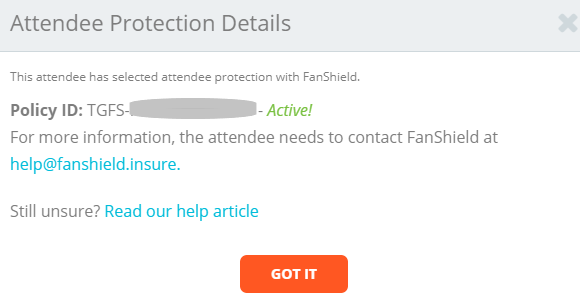
4. Clicking View Details will open a pop up containing the Attendee’s Protection Policy ID (this is needed to submit a claim) and a quick reference to FanShield’s support. The article referenced is this article. If you have additional questions for how you can best support your attendee, please contact our support at help@events.com
If at any time, there are additional questions about Attendee Protection, have the attendee contact FanShield at help@fanshield.insure
Creating a virtual option for your event can be as easy as adding an additional registration/ticket type! New sign ups can select it as their ticket of choice, and through our post registration tools, existing attendees can change their ticket to a virtual experience in just a few easy clicks.
Please visit this helpful article if you need the steps for creating a new registration – How do I create tickets or registrations?
If you’d prefer to add shipping (or international shipping) as a virtual add on, the best option is to set it up as a purchase. Please refer to this article for a walk through on setting up purchases – How do I set up purchases to upsell my event goers?
If you’re brand new to the virtual event space, here are some tips for creating a memorable virtual event!
- Create a printable bib or attendance/finisher certificates to eliminate shipping costs.
- Provide a package to be mailed, either include shipping in the registration fee, or have attendees add shipping to their order.
- Consider the items you would provide to be shipped – bibs, special cards or tickets, medals, t-shirts. Anything to add value.
- Use our custom confirmation email builder to coordinate the social media presence you’d like to see. (Event hashtags, selfie suggestions showing how you participated)
- Offer a discount to future events to anyone who posts about their virtual experience as an incentive for participation.
- Introduce a contest to encourage online participation and create excitement.
- Film short videos to share with your attendees, tips and tricks to prepare or to build on their skills for future experiences.
- Or anything you think will represent your brand and excite your attendees!
If you’d like to discuss your virtual event strategy or have any questions about getting it set up, contact your dedicated Customer Success Manager, or email us at help@events.com. We’ll be happy to help you finalize your virtual event today!
Unfortunately right now there are many things for an event organizer to consider. Depending on your community it might be beneficial to consider allowing people to choose between attending this year or deferring their registration to the following year in 2021.
Creating a deferral for your event can be as easy as adding an additional registration/ticket type! New sign ups can select it as their ticket of choice, and through our post registration tools, existing attendees can change their ticket to the future year in just a few easy clicks.
Please visit this helpful article if you need the steps for creating a new registration – How do I create tickets or registrations?
If you’d prefer to add it as an updated question (to record yes or no from everyone), the best option is to set it up as a purchase (with or without a cost). Please refer to this article for a walk through on setting up purchases – How do I set up purchases to upsell my event goers?
We also recommend emailing your attendees, as well as updating your website and social media. We suggest using an emailer like MailChimp (they offer a free account based on contacts and contacts can be synced with Events.com). Here are our helpful articles to guide you through getting started with MailChimp:
How do I contact my attendees? (Guide to syncing through Events.com)
How do I send an email in MailChimp?
Something else to keep in mind, when someone makes a change (either a new registration or new purchase answer), they will receive a new confirmation email. You can put a custom message onto your new deferral registration, or add a message into the existing confirmation email for when someone selects an answer to the new purchase question. Please check out this article for a guide on custom confirmations – How do I customize my confirmation emails?
If you’d like to discuss your deferral strategy or have any questions about getting it set up, contact your dedicated Customer Success Manager, or email us at help@events.com. We’ll be happy to help you put everyone’s mind at ease today!
If you’ve made the decision to move your event date, you should communicate with your event goers as soon as possible. We suggest you do this by updating your Events.com registration page, activating the Postpone Feature, emailing your attendees, updating your website, social media, and by resending everyone’s confirmation emails.
Updating your Event Registration Page
To change your date and description on your Events.com page, start by clicking the Edit tab to access these fields (or scroll down if you’ve just completed the step above). Here’s our help article for reference – How do I customize my event page? (Step 3)
We’ve created a few images you can easily add to your event page. Here are some placement ideas that would help direct attendees to your updated description and let them know your event is postponed.
- If you’re using the Branded template, add an image to your logo section
- We’ve provided 2 images for your banner. One is an image you can place on top of your banner image and the other is a full banner image you can replace your current one with.
- Add an alert image to your description to draw attention to your updated content.
Image Files for Download
Design Files for Download
Postponement Feature
There is a new section for postponed events. This will ensure that your attendees don’t miss that there is updated information on your event page. Click the Edit tab to access your event page details.
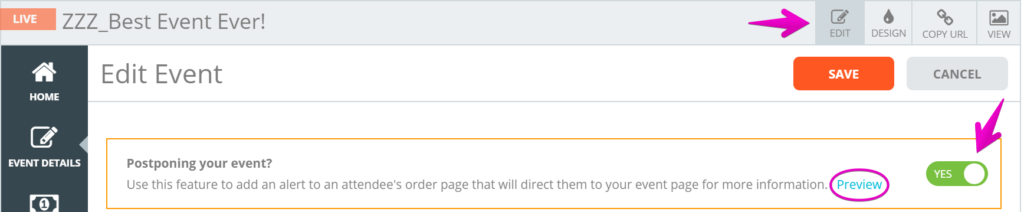
Here you can turn the toggle to YES in order to activate messaging to your attendees. The preview button will show you where your attendee will see the following alerts.
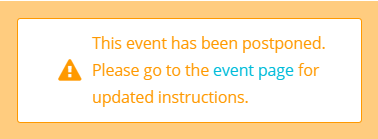

These alerts will show up on their My Events page and within their Order View. These alerts make the attendee aware the the event has been postponed and link to the event page where they can see your updated description.
Communicating with your Event Goers
We recommend using an emailer like MailChimp (they offer a free account based on contacts and contacts can be synced with Events.com). Here are our helpful articles to guide you through getting started with MailChimp (you need to have a MailChimp account set up first):
How do I contact my attendees? (Guide to syncing through Events.com)
How do I send an email in MailChimp?
Resending Confirmation Emails
We also recommend updating your confirmation email with a new custom message and resending confirmations to all of your participants. If you’d like a refresher on adding a custom message please check out this article – How do I customize my confirmation emails?
After you’ve saved your new message, you can scroll down and click – RESEND CONFIRMATION EMAIL. This is a one time click so make sure you’ve finalized your new message. The subject line is: Just a reminder. This is why we suggest that you communicate with your attendees before sending it out. It’s also good to make sure you’re contacting them in different ways so everyone receives the new date quickly. Here is our article on these steps – How can I resend confirmation emails to all attendees?
If you’d like to discuss your postponement strategy or have any questions on our suggestions, contact your dedicated Customer Success Manager, or email us at help@events.com. We’ll be happy to help you put everyone’s mind at ease today!
Creating a virtual event on Events.com is very similar to creating an in person event. Please follow along to get set up right away!
1. While on Events.com click Create Your Event.
2. In the Basic section, select a category that best represents the type of event you’re hosting.
3. In the Details section, you can consider including “Virtual” or “Webinar” in your Event Name to be consistent with your branding.
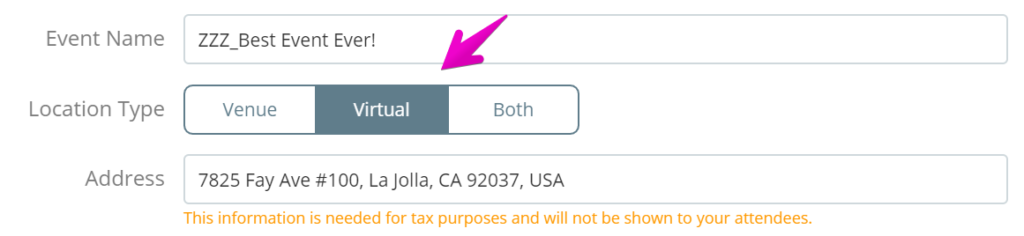
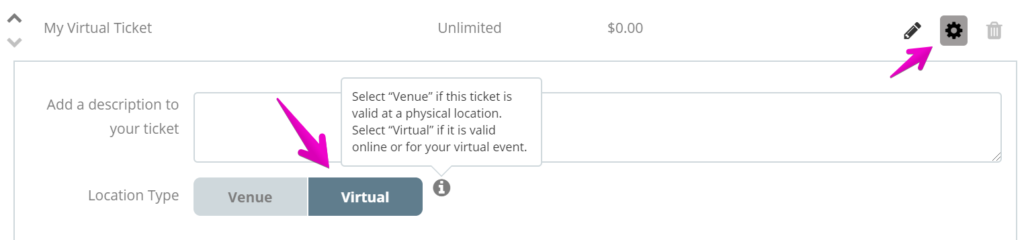
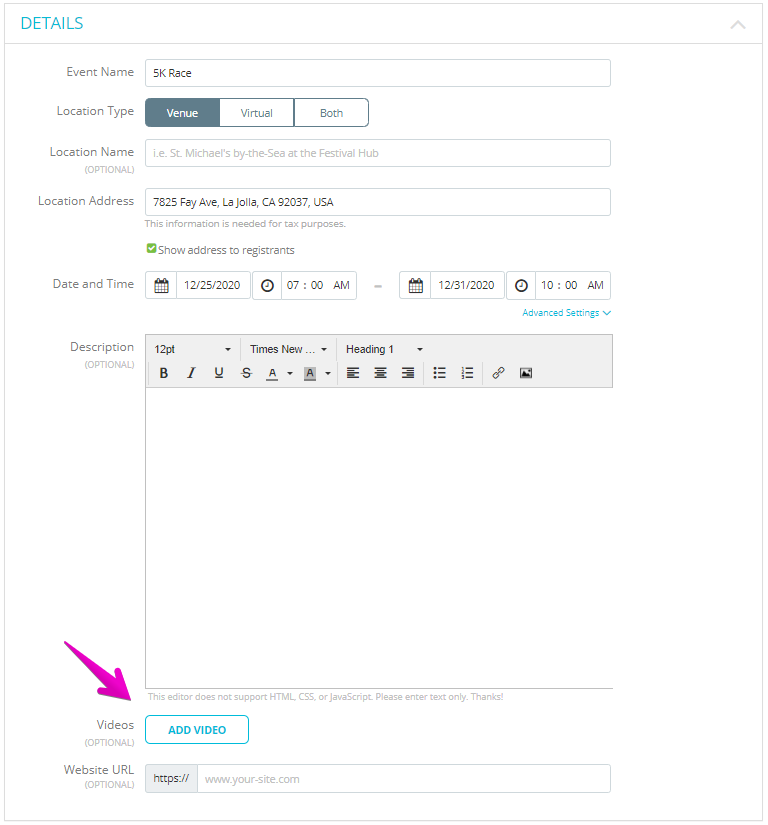
For Location Type, you can choose between Venue (indicating a physical location), Virtual or Both. Due to new Marketplace Facilitator regulations, the address needs to be collected for tax purposes even in the case of Virtual but it does not have to be shown on your event page.
When you select Virtual as your location type. This will display a Virtual tag to your event page.

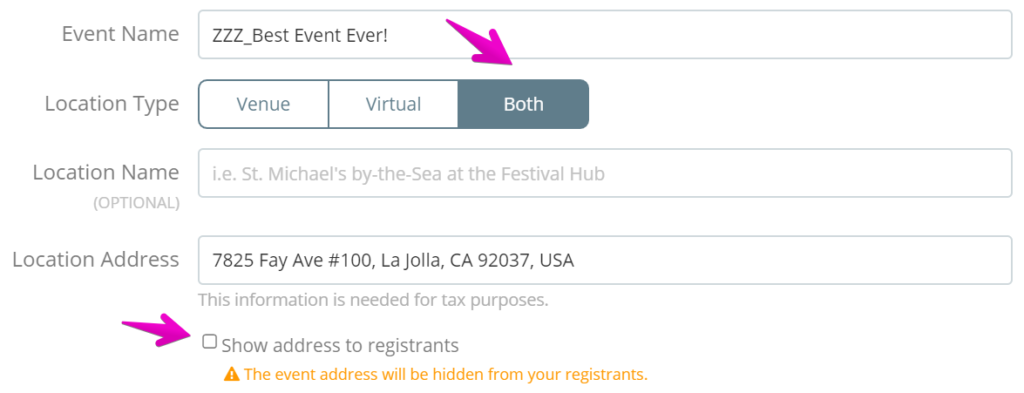
If you have a virtual and physical event taking place you can select Both. This gives you have the option to show your address or keep it hidden. You have the option to add a virtual tag directly onto the registration/ticket as discussed in step 5.
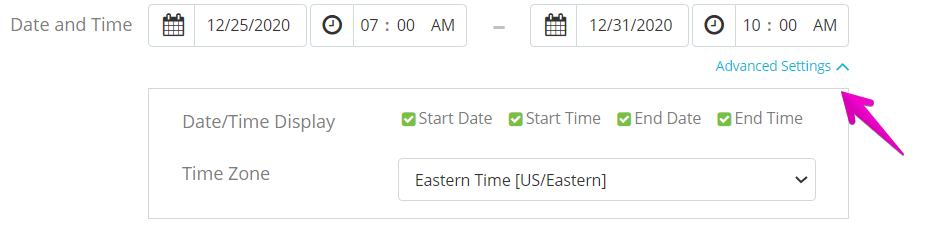
You can also select Advanced Settings on the date and time to hide specific dates and times for your event if you need.
Use the Event Description to be very clear what your attendees can expect and include as many details as possible:
- Are you mailing them a race kit?
- Will you be providing them with a link for webinar access?
- What does the kit contain?
- When will it be shipped out?
- How long will it take to receive?
- Who is speaking in the webinar?
- What topics will be covered?
- What are the live start and end times? (This may be important to mention the time zone if you expect international attendees)
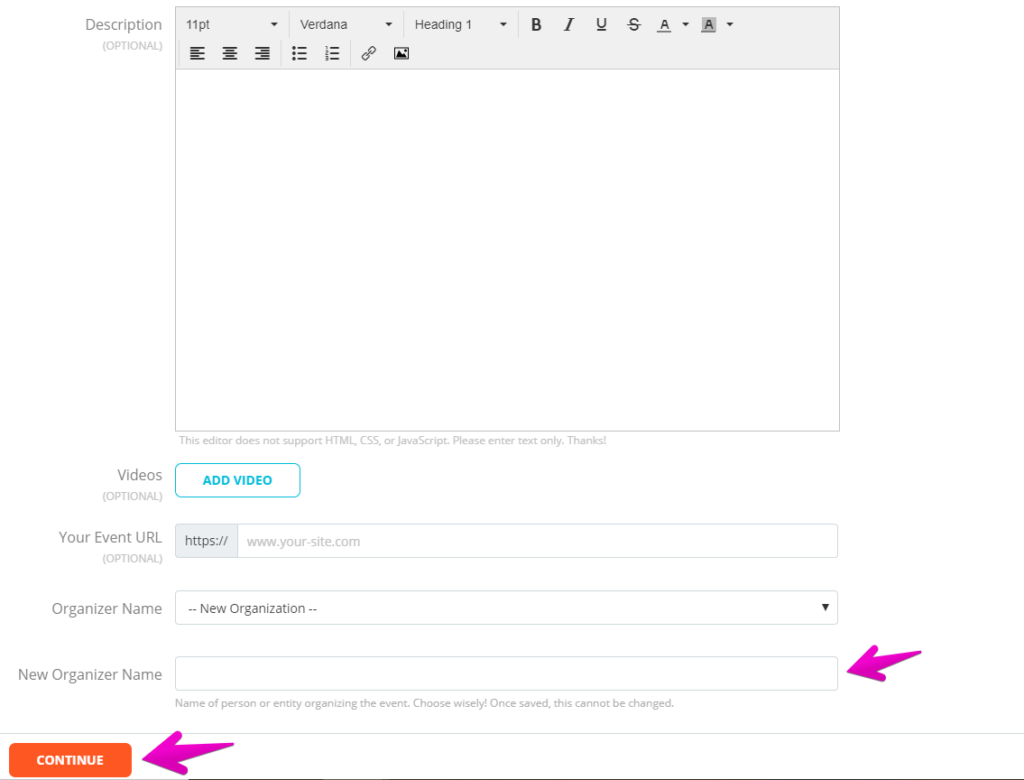
You can add hyperlinks, images and format your text. Get creative with important information by changing the color of your text, or size of your headlines.
If you have a welcome video this is the perfect place to add it, along with your website. It’s important to have your brand consistent and available throughout.
If this is your first event on Events.com, or if you’re branding your virtual events under a different organization name, here is where you can add your Organization Name. This can’t be easily updated, so choose wisely! Click CONTINUE when finished.
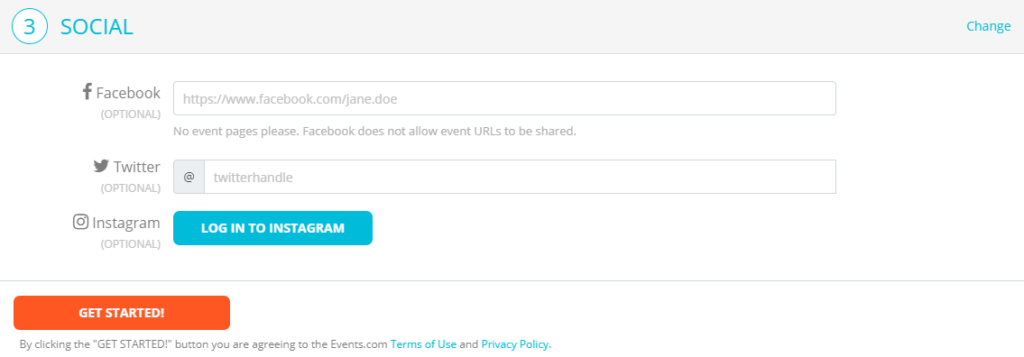
4. Enter in your social media. This is a great reference point to gain followers or encourage social participation. Plan to share important hashtags and campaigns with your attendees. Clicking GET STARTED! creates the framework of your event.
5. Creating Registrations/Tickets. Set up a registration/ ticket type best suited for your attendees.
If you selected Both as the Location Type, you will have a setting within your Registrations/Tickets to add a Virtual tag to your specific Virtual registration/ ticket.

You can still offer Teams, or Corporate Buying if they fit your audience. Here are some great articles for additional reference:
How do I set up registrations/tickets for my event?
Can I support teams or groups in my event?
What are corporate groups, and how can I use them?
Use Form Questions to collect any necessary info from your participants such as shipping address, or what industry they work in, why are they interested in your webinar – How do I add form questions? You may want to add a waiver for Rules & Policies having each person agree to the terms of your Virtual event (or acknowledge that it is a virtual event).
Consider what you’re including in your registration/ ticket price. If you are offering a race kit, will the shipping be included? International shipping? If you’d prefer to add an international shipping premium as an add on, the best option is to set it up as a purchase. Please refer to this article for a walk through on setting up purchases – How do I set up purchases to upsell my event goers?
6. You’ve covered all the info needed for your purchase form, now you should consider your post communication. One way is through your confirmation page message and confirmation email. Do you have links that you want your attendees to monitor (ie for access to your webinar)? Do you have a video community link to share? Do you want to give them the schedule so they know what to expect? Do you have any social groups for them to join? Or social media hashtags you want them to use?
How do I customize my confirmation emails?
The other way, and this can be done at any time, is to send them an invitation. This gives another opportunity to send a branded message to your attendees and send them any additional content to enhance their experience.
How do I use invitations?
7. Last but not least, ensure that you’ve connected your payment info. You’ll want to make sure that these details are in place for you to get paid! After you’ve finished here, you can Go Live! And Get Virtual!
How do I set up my own standard Stripe account?
If you’re brand new to the virtual event space, here are some tips for creating a memorable virtual event!
- Create a printable bib or attendance/finisher certificates.
- Consider items you could provide to be shipped – bibs, special cards or tickets, medals, t-shirts. Anything to add value.
- Use our custom confirmation email builder to coordinate the social media presence you’d like to see. (Event hashtags, selfie suggestions showing how you participated)
- Introduce a contest to encourage online participation and create excitement.
- Film short videos to share with your attendees, tips and tricks to prepare or to build on their skills for future experiences.
- Or anything you think will represent your brand and excite your attendees!
If you’d like to discuss your virtual event strategy or have any questions about getting it set up, contact your dedicated Customer Success Manager, or email us at help@events.com. We’ll be happy to help you finalize your virtual event today!
If you need to cancel an event it’s important to update your page and communicate with your attendees. You’ll want to consider the reason you’re cancelling and whether or not you’re offering an alternative, or a refund. And don’t forget about updating all of your social media!
To update your page, you’ll want to start by closing sales. Go to Event Details – Registrations/Tickets and click the Settings (gear icon) for each of your registrations/tickets. The second calendar is the close date. You’ll want to set it for a past date and time to have it closed immediately. Click SAVE.
Next you’ll want to update your description to communicate the cancellation to anyone that will land on the page. You can update your description by going to Edit and scrolling to the Description box.
For communicating with your attendees, we recommend using an emailer like MailChimp (they offer a free account based on contacts and contacts can be synced with Events.com). Here are our helpful articles to guide you through getting started with MailChimp (you need to have a MailChimp account set up first):
How do I contact my attendees? (Guide to syncing through Events.com)
How do I send an email in MailChimp?
As a final outreach we also recommend updating your confirmation email with a new custom message and resending confirmations to all of your participants. If you’d like a refresher on adding a custom message please check out this article –How do I customize my confirmation emails?
After you’ve saved your new message, you can scroll down and click –RESEND CONFIRMATION EMAIL. This is a one time click so make sure you’ve finalized your new message. Here is our article on these steps – How can I resend confirmation emails to all attendees?
If you plan on cancelling all of the tickets, an email is sent at that time. We suggest emailing them the announcement first so it’s not a surprise when they receive the cancellation email.
If you’d like to discuss your cancellation strategy or have any questions on our suggestions, contact your dedicated Customer Success Manager, or email us at help@events.com.
Right now, it’s an unknown time for the event industry. Event Organizers are facing many tough decisions. More and more event organizers are considering rescheduling their events. From the moment you realize there may be a reason that your event can’t go on, we recommend making a decision as soon as possible.
This is the time that you should talk to your team, your vendors, your sponsors and anyone else involved in your event. Review any policies or insurance associated with your event to see if there are guidelines you need to consider. Ask important questions: Can the venue accommodate the new date? Can your entertainment and staff? Put as much information together as you can to decide if you’ll be postponing or rescheduling if you’ve chosen a new date.
After you’ve made a decision, make the announcement to your partners to ensure that everyone can participate in the new date. Otherwise, you’ll need to be prepared to put more work into re-finalizing your checklist.
When you’ve got all of this in the works, communicate with your attendees. We suggest doing this through email, your social media accounts, and tools in the Events.com platform. This helpful article walks you through these options with more details: How do I communicate rescheduling or postponing my event?
After opening communication, the next challenge that an organizer faces from rescheduling is keeping their attendees engaged. Think of some fun activities for your attendees, encourage them to share their training photos, maybe create some new limited swag, or run a contest.
Rescheduling your event has not only lengthened your event lead time but created some opportunity to attract some new attendees. We encourage you to pick back up your efforts of spreading the word and to focus on being louder than ever. When the world is ready to go back to (its new) normal, event goers will be more enthusiastic than ever to participate in events and connect with others.
If you’ve made the difficult decision to defer your event you’re likely wondering the best way to update this on Events.com.
If you are not going to offer a new date for 2020, you can update the current event and all of your attendees can be easily sent a new confirmation with the updated date.
However, if deferment is one of the options, you’ll need to create a brand new event for the next year. We suggest copying the existing one and making some updates to be ready for the next year.
How do I copy an event?
Then the next step would be to move the attendees from this year to the new year. If you have people letting you know one by one, it might be the easiest to give them a promo code and send them to the new event to complete their registration. Or, if you anticipate having a large amount of attendees to move, an attendee upload will make this easy to finish.
How do I upload offline registrations/tickets?
If you’d like to discuss your deferral strategy or have any questions about getting it set up, contact your dedicated Customer Success Manager, or email us at help@events.com.
Calendar Partners (7)
This widget allows you to be able to add a small version of the calendar on any page outside of the calendar. This will help to promote your calendar on other pages and drive more traffic to the calendar. The sidebar widget will display a few events where users can see some popular upcoming events, go to the full calendar, or add an event directly from the widget.
To install this widget on any other pages outside of the calendar, you first need to gather your snippet by following these steps:
- Sign in to your Events.com account under ‘Events.com Calendar’

- Once signed in you will be brought to your accounts ‘Dashboard’ that will list all calendars associated to your account
- In the list of ‘Your Calendars’, locate the calendar for which you are looking for and click on the ‘EMBED CODE’ button under the
- Finally, under the ‘Small calendar’ you will click on ‘COPY’ to gather your embed code
Once you have copied your embed code, you will need to insert that script into your website for the desired area of the small widget.
After you have installed the script, if you need to change the ‘WIDTH’ and ‘HEIGHT’ to best fit the area you’d like to display the widget; we recommend the following combinations:
300×600
300×280
300×100
728×90
After creating your calendar, you may want to change some of the settings for your calendar, whether this is the website URL, the location, the radius, or which categories you allow on your calendar. These settings can be changed at any time. To make these changes, you can follow these steps:
- Sign in to your Events.com account under ‘Events.com Calendar’

- Once signed in you be brought to the calendar dashboard
- In the list of ‘Your Calendars’, locate the calendar that you would like to change.
- Once located, you will click on ‘MANAGE’ followed by ‘Edit in the drop down menu
- After you have finished making the changes to your calendar, click ‘Save changes’ to finalize
Once in there, you will be able to make changes to anything that you may need. Be sure that once you have made those changes you click save before leaving the page.
Your calendar will require you to have a Google API token so that the Google Map will display correctly. Once you have created your calendar, we will automatically provide you with a Google API token.
If you decide to use your own Google API token, you will need to create your own Google Maps API token and whitelist it on your website. You can use this article to help guide you through this process: https://developers.google.com/maps/documentation/javascript/get-api-key
Once you have created and enabled your token, you will need to replace it in the embed code. To do this you will place your token in the Google API’s line of script which will go on the <head> of the page for the calendar when embedding it:
<script src=”https://maps.googleapis.com/maps/api/js?key=“GoogleAPIToken Here”&libraries=places”></script>
During the creation or after you have created your calendar, you will be able to customize the categories that appear on it. This allows for you to be able to cater to the type of audience that is coming to your calendar or remove events that you do not want to appear on it automatically. To do this while creating your event calendar you can select the categories that you do not want to appear on your calendar as seen below
If you have already created your calendar and want to make this change, click on this help article to see how.
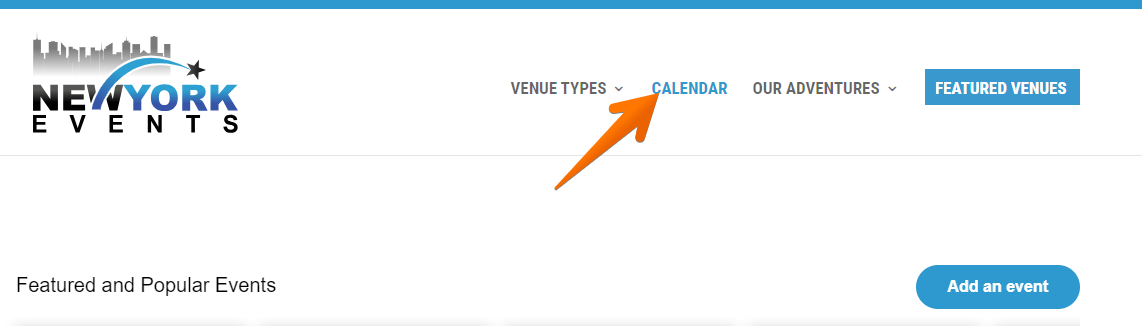
As required to be able to earn revenue from the revenue share program, you will need to add a navigation link that will take users directly to the event calendar page. You can prompt users to go to this page by calling it either “Event Calendar”, “Community Calendar”, “Local Events”, “Calendar” or some combination of this to alert them to this section. From there, users will be able to see events happening in the area or add an event to the calendar.
Once you have created your calendar, you will have access to your new embed code. This embed code will include a personalized Google API Token and calendar token. If you have your own Google API token, click on this article to see how to replace it. To find your embed code, follow these steps:
- Sign in to your Events.com account under ‘Events.com Calendar’
- Once signed in you will be brought to your accounts ‘Dashboard’ that will list all calendars associated to your account
- In the list of ‘Your Calendars’, locate the calendar for which you are looking for and click on the ‘EMBED CODE’ button under the
- Finally, under the ‘Full-size calendar’ you will click on ‘COPY’ to gather your embed code
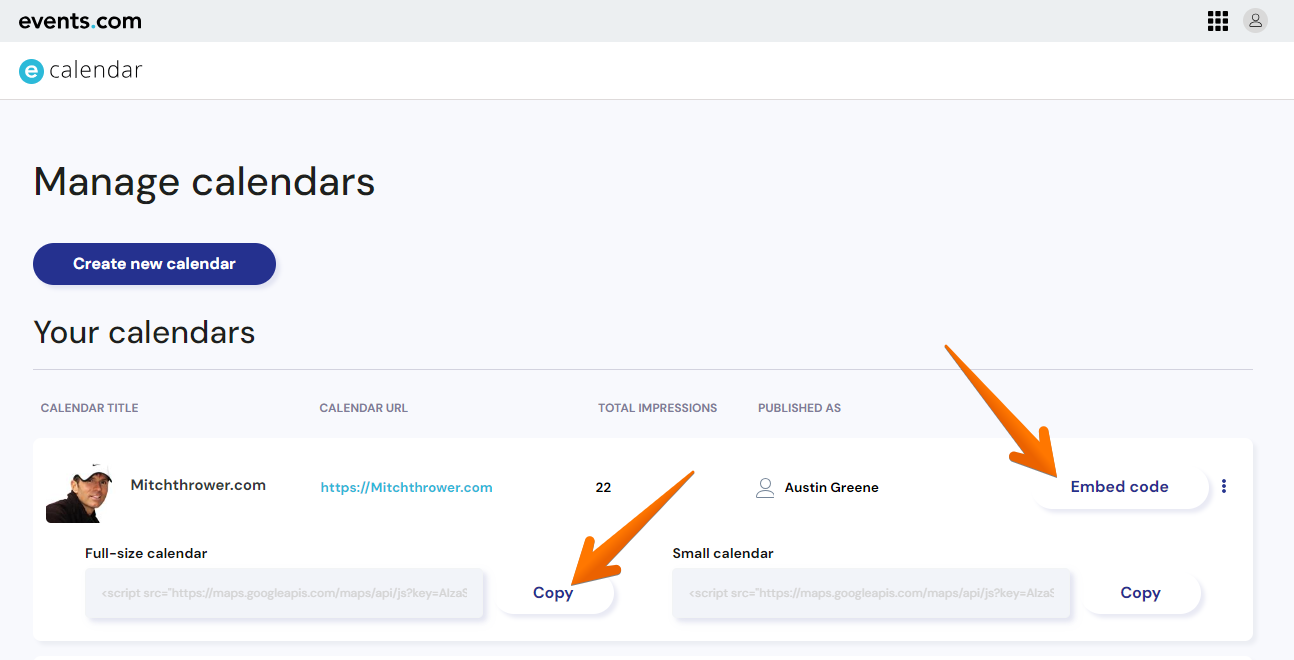
Now that you have your embed code, you will need to place this script on the page where your event calendar will be located. Watch this video for how to add embed code on WordPress.
If you need any assistance with adding this to your website, please reach out to our help desk for further instruction at help@events.com.
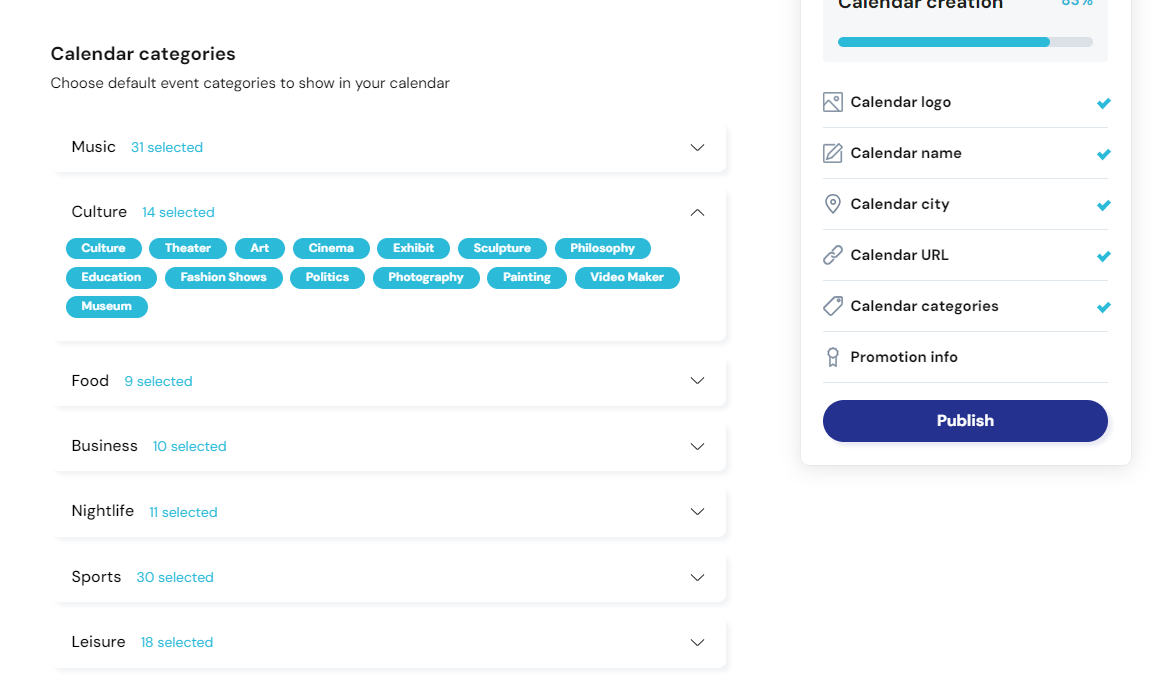
This article will walk you through the process of creating your event calendar, how to customize it to best fit your website, and how to white-label the calendar for users. Follow the steps below to get started:
- Navigate to the Events.com Calendar homepage where you can learn more about the product: events.com/calendar
- Once on the Calendar homepage, you will want to click the ‘Log In‘ button in the top right corner.
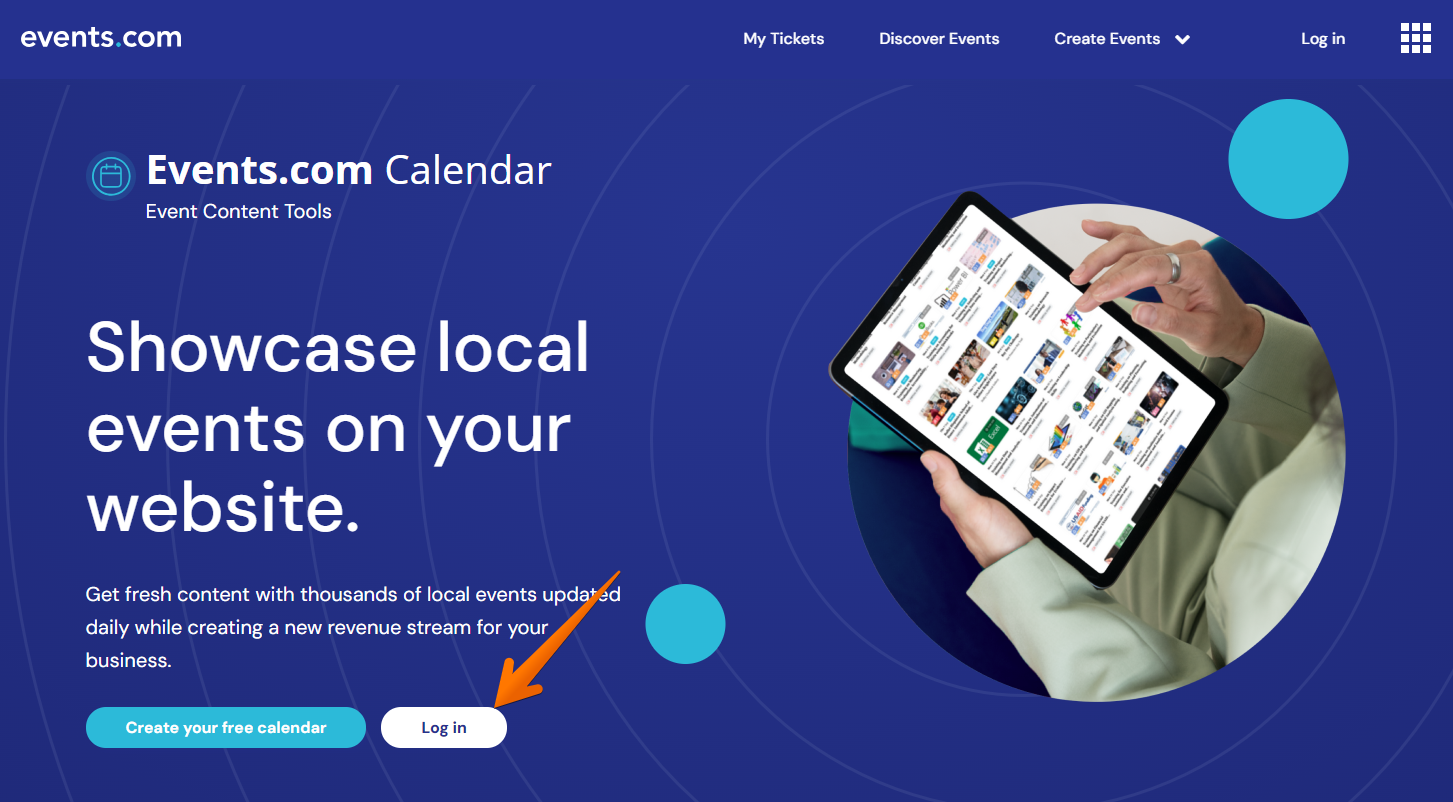
- If you do not have an Events.com Account, click the ‘Sign-up’ button in the top right corner, otherwise fill out your login credentials
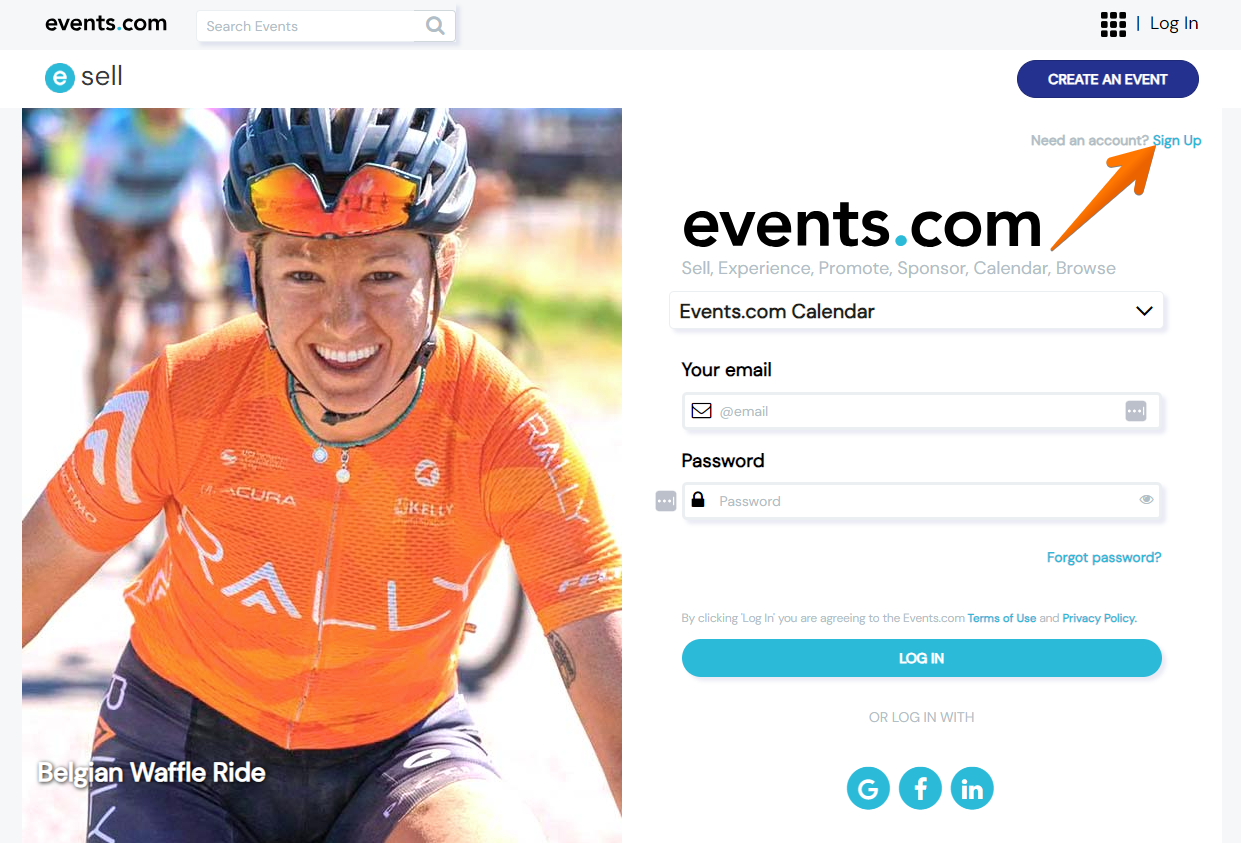
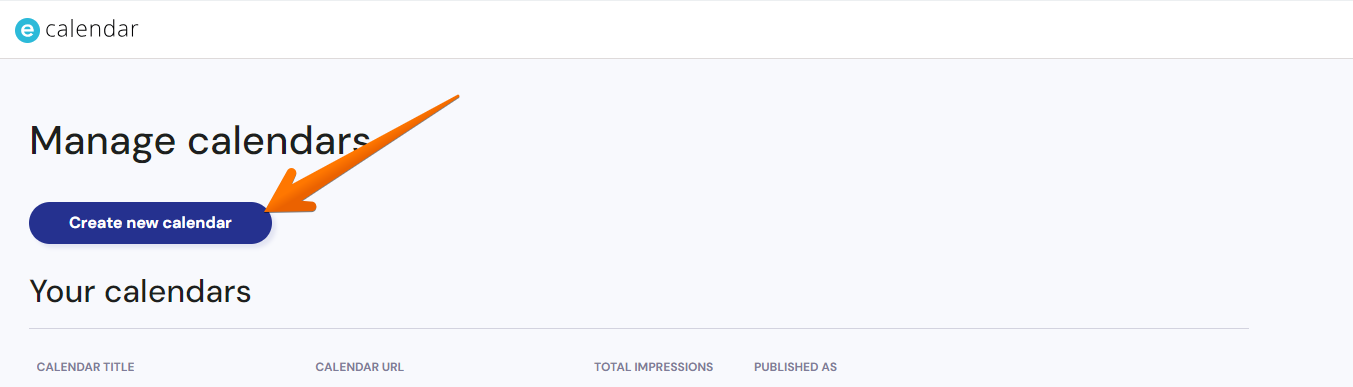
- Once logged in to your account, you will want to click on the ‘Create Calendar‘ button located in the right corner.
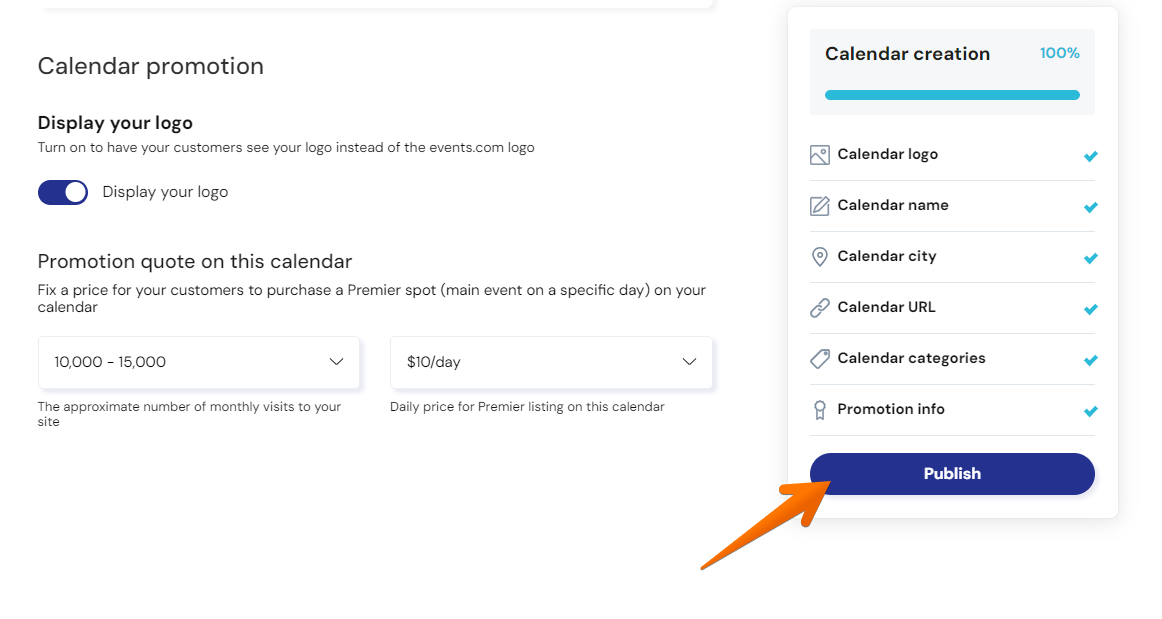
- When on the Create a Calendar page, you will want to add a logo that best represents your brand or company.
- Next, you will need to add a name for the calendar that will reflect your brand or company (ex. Events.com Calendar, Tucson Event Calendar, San Diego Community Calendar, etc)
- The ‘Publish as‘ field does not need to be changed as this just reflects it will be in your account

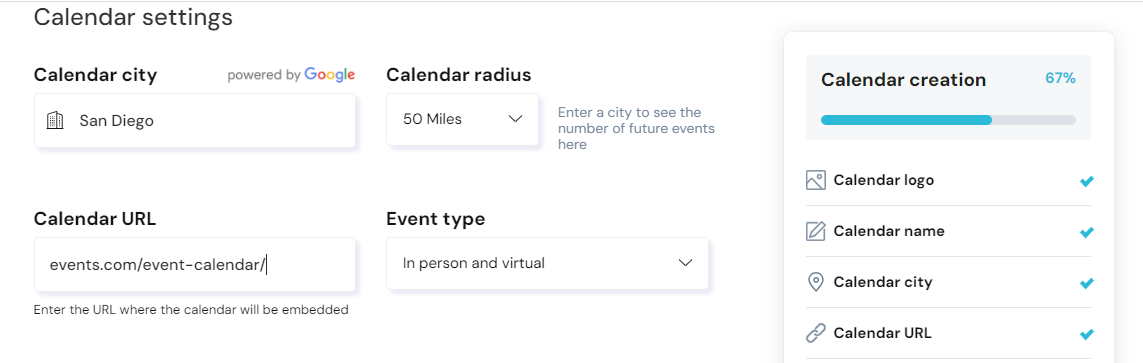
- When deciding on the Calendar City, you will want to enter the city where your brand or company is located to target events in that area
- The Calendar Radius will let you choose how far away you would like to pull in events from. We recommend 25-50 miles for this.
- For the Calendar URL, you will want to include the page URL for where the calendar will be on your website (ex events.com/event-calendar/)
- Event Type will allow for you to decide where you want to show either In-person Only, Virtual Only, or both types of events when users visit your calendar page.
- The Primary and Secondary colors should reflect the scheme of your website. The Primary will be used throughout the calendar (Add Event Button, Drop Down Arrows, Select A Date, etc). The Secondary color will be when users hover over the Add Event Button.

- For the Calendar Categories, you can select all of the tags in a specific category or pick and choose which tags you would like to have from each category. This selection will allow you to customize what type of events will be shown on your event calendar

- The Display Logo will be turned on by default as this will allow you to give users a white-labeled experience when they go to Events.com from your calendar to add or promote their events.
- In the promotion section, you will want to estimate the amount the traffic that goes to your website and how much you want a Premier Ad to cost. A Premier ad on your calendar will give users a bigger tile space in the featured events section and goes a per-day cost. When first starting out, we recommend that you stay between $10-$30 for this.
- After you have added all the necessary information, you can click ‘Publish‘ to create your calendar
Additional help articles on how to embed your calendar: Full Calendar Widget & Small Calendar Widget
Corporate Groups (8)
You now how a wonderful way to offer hassle free corporate purchases! We’re sure you’re wondering how to keep an eye on what’s sold, filled and waiting to be filled (or unfulfilled). This info is displayed within your Event Summary and you can get there with a few quick steps:
1. Log In to your Events.com account.
2. As an organizer your first screen will be your organization data. You can select between your LIVE, DRAFT and COMPLETED events and find the event for which you want to view your Corporate Group data.

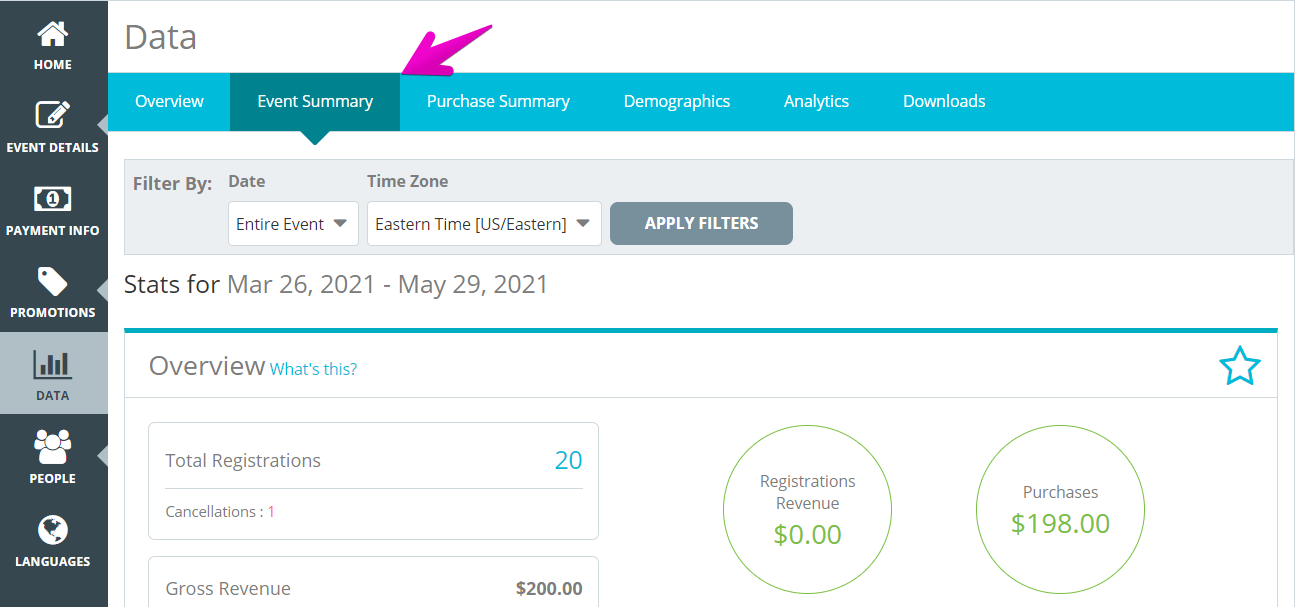
3. Within your event, click DATA from the tools on the left.

4. The Overview summary dashboard will appear by default (read about building your Overview Summary here). In the blue navigation tool bar, click Event Summary.
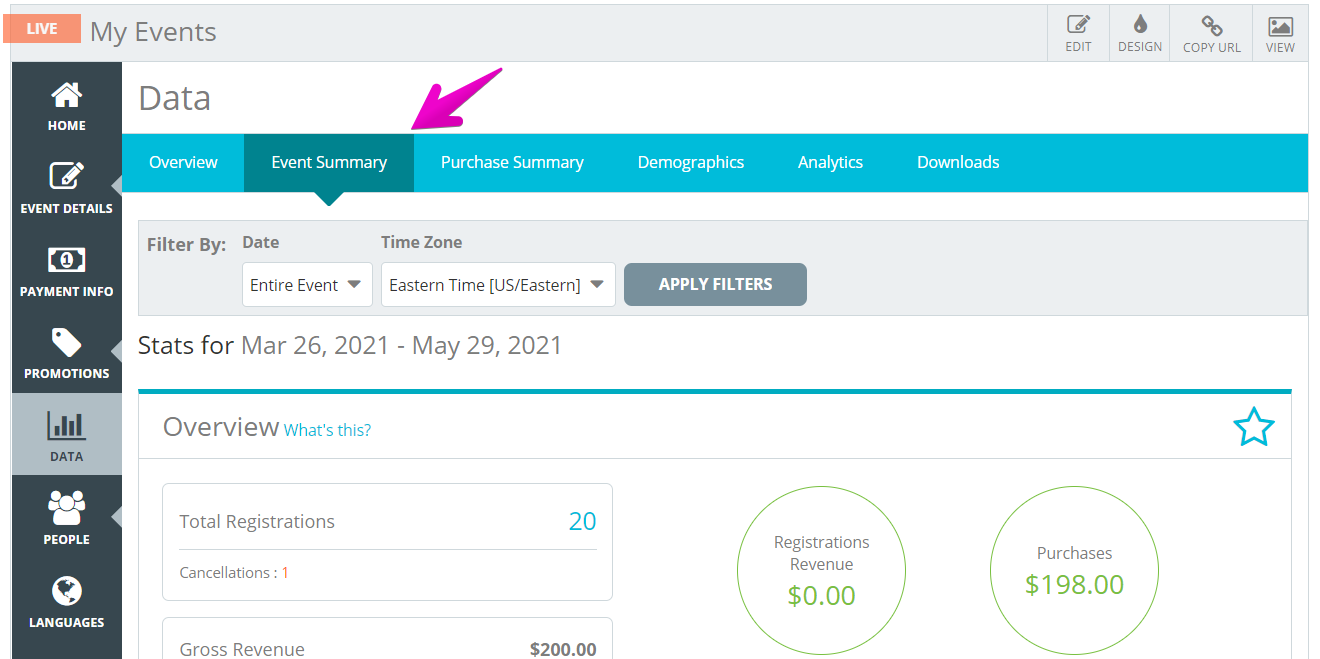
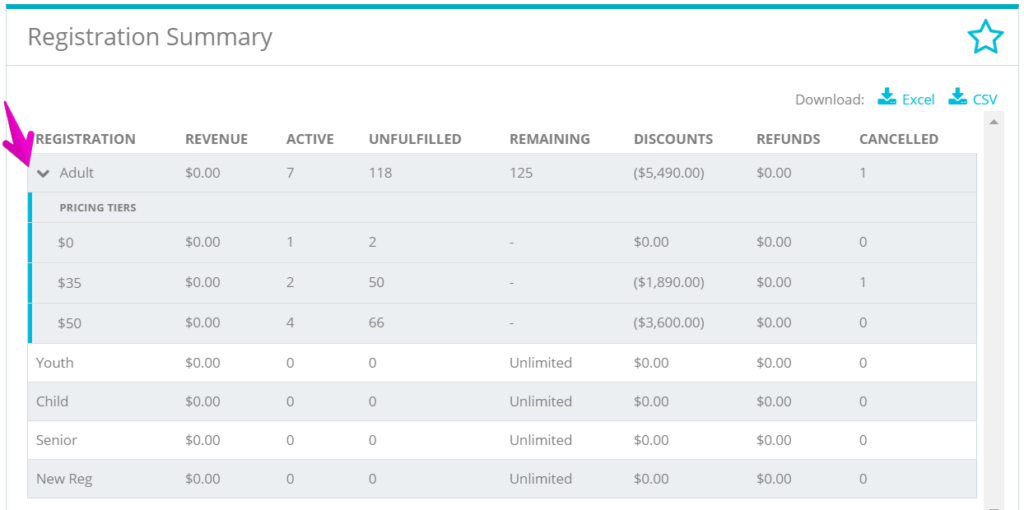
5. You will find the inventory and sales information in the Registration Summary.
Registration Summary
For each Registration/Ticket you’re able to see specific data relating to their sales – Revenue; Active; Unfulfilled (Corporate Groups); Remaining; Discounts; Refunds;Cancelled.
Keep in mind, the Active column displays the amount of registrations/ tickets that have been sold (including any fulfilled Corporate Group spots *if applicable). Unfulfilled only applies to prepaid Corporate Group spots that haven’t been completed. These are reflected in the Remaining inventory. If Corporate Groups are not being offered, this column will not be displayed.

For the full information on your Event Summary dashboard please check out this helpful article – How do I view a real-time snapshot of my event’s data and performance?
An attendee needs a refund for an item they ordered? No problem! As an organizer you can go in to refund it for them. Follow the steps below to find out how!
1. Log In to your Events.com account and go to the event for which you need to refund an attendee item.
2. Once in the event, click on PEOPLE in the left side navigation tool bar and select Attendees.

3. In the search bar enter in the attendee’s Name, Email, Corporate Group name, Registration Number or Order Number.

4. Click on the attendee’s name card.
5. Click MANAGE REGISTRATION/TICKET drop down menu and then select Process Refund.

6. Next to the right of the attendee item, a field will open for you to enter the amount of the refund. Enter the amount in the field (you can only enter up to the amount that was originally paid). If you need to include taxes, click the box on the left. You can also add notes for reference in your future reports. When finished click SUBMIT REFUND.

7. Confirm the Refund Order pop up to finalize. The purchaser will receive an email letting them know their refund was processed.

IMPORTANT INFORMATION ON FULL PLATFORM REFUNDS:
Events.com fees are non-refundable by Events.com. These are the order and processing fees for services rendered. As an organizer, you have the option to refund these fees to your attendees directly. Choosing to refund these fees will result in them being refunded from your revenue.
If your fees are added to the cost of your registrations/tickets: To process a full refund including the Events.com fees, you will need to contact us to facilitate. Please contact our help desk at help@events.com.
If your fees are absorbed (part of the registration/ticket cost): You will be able to refund them directly to your attendees within the registration/ticket amount using the steps above.
Please note: Platform refunds are dependent on fund availability
These instructions will help you cancel an unfulfilled registration from a Corporate Group’s order. The spot will be removed from the Corporate Group Center’s inventory and not be available for another attendee. If the spot has already been filled, you will need to remove the prepaid registration from the Corporate Group first, to place the spot back into the unfulfilled inventory. Or if you intend to remove a person from the Corporate Group so the Buyer can offer the registration to someone else, the steps in this article will help you with those – How do I remove an attendee from a Corporate Group?
Let’s get that registration cancelled!
1. Log In to your Events.com account.
2. As an organizer your first screen will be your organization data. You can select between your LIVE, DRAFT and COMPLETED events and click the event you wish to cancel an unfulfilled Corporate Group registration/ticket.
3. Click on PEOPLE, and then Buyers.
4. Search either by name, email, corporate group, order number, or Last 4 of CC of the Corporate Group order you wish to cancel a registration/ticket in, and click on their Buyer card.
5. From this view, click Manage Order, and you will see the option to Cancel Items. From here you can cancel the corporate group registrations by clicking the box to the left and selecting the desired number in the dropdown. When finished, click Submit Cancellation.


The system will always confirm that you do wish to cancel an order, so make sure to double check you are cancelling the correct one(s).
This cancelled spot will be removed from the Corporate Group Center. And the inventory adjusted.
Turning on Corporate Groups is quite easy to do and only takes a few steps to complete! Follow the steps below to find out how to turn this feature on!
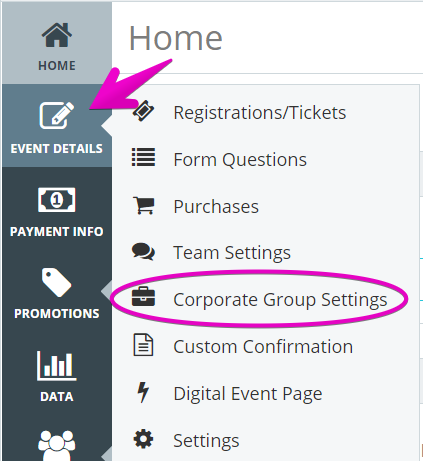
1. Log In to your Events.com account.
2. In the left hand navigation click EVENT DETAILS and select Corporate Groups Settings.
3. In the top right corner toggle the setting to ON. If you are unable to, you will first need to create Registrations/Tickets. Click here to see how to add Registration/Tickets to your event.

4. Once turned on, you may customize the name of the group by entering a name in the Customize Terminology field.
5. In the Apply To field, click on the drop down menu option to select the tickets that you want to apply to this group.

6. By default the Minimum Size of the group will be set to 1 and you may also set a Maximum Size or leave it blank to have an unlimited group size. The maximum is the sum of all the combined registrations /tickets.
7. You may also toggle Require Access Code to YES to require buyers to create a unique code that their group members will need to know to fill their spot. The individual purchasing the Corporate Group would create their group’s unique code during their order.

8. Press SAVE to finalize your choices! Corporate Group (or your custom terminology) will now be displayed as an option on your event page. *Individual and/ or Team will appear based on your Team Settings.

An attendee needs to make a change to the size of shirt they ordered? No problem! As an organizer you can go in to make changes to an attendee item. Follow the steps below to find out how!
1. Log In to your Events.com account and go to the event for which you need to change an attendee item.
2. Once in the event, click on PEOPLE in the left side navigation tool bar and select Attendees.
3. In the search bar enter in the attendee’s Name, Email, Corporate Group name, Registration Number or Order Number.
4. Click on the attendee’s name card.
5. Click MANAGE REGISTRATION/TICKET drop down menu and then select Edit Attendee Items.

6. Next to the attendee item, make the needed change and click SAVE CHANGES to finalize the process.
We at Events.com understand the importance of being able to manage your attendees post-registration. These instructions help you cancel a prepaid attendee and remove them from the Corporate Group. Their spot will become unfulfilled and be available for a new person. If you intend to have the spot completely cancelled from the Corporate Group, please refer to this article – How do I cancel unfulfilled Corporate Group registrations?
You’re just moments away from removing a prepaid Corporate Group attendee with these steps:
1. Log In to your Events.com account.
2. As an organizer your first screen will be your organization data. You can select between your LIVE, DRAFT and COMPLETED events and click the event you wish to cancel a prepaid Corporate Group registration/ticket.
3. Click on PEOPLE, and then Attendees.
4. Search either by name, email, corporate group, registration number, or order number of the person whose registration you wish to cancel, and click on their attendee card.
5. From this view, click Manage Registration/Ticket, and you will see the option to Cancel Items. From here you can cancel the corporate group registration or any of the items they’ve selected. Select the items of their order you wish to cancel by selecting the boxes on the left side. If it is the full order, you can click CANCEL ENTIRE ORDER. When you’re finished making your selection click Submit Cancellation.


*The system will always confirm that you wish to cancel an order, so make sure to double check you are cancelling the correct one(s). This only cancels the prepaid registration accepted by the attendee.
The attendee will be emailed and the registration will be added back to the unfulfilled registration inventory. The Corporate Group Buyer can give the link out again to have a new person register.
Need to process a refund for a single item or the registration? That’s no problem! With Events.com we make it simple and easy to process a refund. Follow the steps below to find out how!
1. Log In to your Events.com account and go to the event for which you need to process a refund.
2. Once in the event, click on PEOPLE in the left side navigation tool bar and select Buyers.

3. In the search bar enter in the attendee’s Name, Email, Team/Corporate Group name, Order Number or Last 4 of CC.

4. Click on the Buyer’s card.
5. Click MANAGE ORDER drop down menu and then select Process Refund.

6. Next to each purchased registration /ticket line a field will open for you to type in the amount that you want to refund. *You are only able to refund up to the amount paid.
7. Review your Order Summary, and click SUBMIT REFUND.

8. As one last step, a pop up will appear for your confirmation to ensure that you’ve intended to submit this refund. The Buyer will receive an email notifying them that the refund was processed.

Pro Tips: You can refund the associated tax by checking off the box for – Refund associated taxes.
IMPORTANT INFORMATION ON FULL PLATFORM REFUNDS:
Events.com fees are non-refundable by Events.com. These are the order and processing fees for services rendered. As an organizer, you have the option to refund these fees to your attendees directly. Choosing to refund these fees will result in them being refunded from your revenue.
If your fees are added to the cost of your registrations/tickets: To process a full refund including the Events.com fees, you will need to contact us to facilitate. Please contact our help desk at help@events.com.
If your fees are absorbed (part of the registration/ticket cost): You will be able to refund them directly to your attendees within the registration/ticket amount using the steps above.
Please note: Platform refunds are dependent on fund availability.
Have you ever had a corporation or company want to pay for event admission in advance? Or a sponsor? Often it’s because they want to guarantee entry but finalize the attendee details at a later time. With the Corporate Group option, you will be able to give them the opportunity to pay for all their spots up front and allow their attendees to fill in their info later!
The Corporate Group function is quick and easy, with the ability to update the registrants on the order on the fly. You can set them up quickly by following the instructions here: How do I turn on corporate groups?
Enabling the Corporate Group tool will add another option to your ticket buying page, where the group will be able to create a name for their entire party, then they can select a specific number of entries from the available registration /ticket categories. The purchasing page is then easier than ever, showing them the full total of each category to be purchased, while only asking for Buyer name and email although with payment details.
Once the order has been finalized, the buyer will be able to visit the Corporate Group Center to access:
- Purchased inventory, registered, and open spots.
- Special invitation links to be copied and sent out to joining members.
- Event day count down, date and location/map (if applicable).
- List of registered members (Name, Registration /Ticket Type and Email).

Take advantage of the Corporate Group option today, and give your buyers the opportunity to prepay!
Create an Event (6)
Yes, Events.com will make it easy for you to customize your event page and set up free tickets or RSVP options.
1. Once you’re done creating an event, select EVENT DETAILS on the left navigation, and select Registration/Tickets.
2. You chose whether to sell Registrations or Tickets during your event creation – What’s the difference? If you need to switch, you can click the change option.
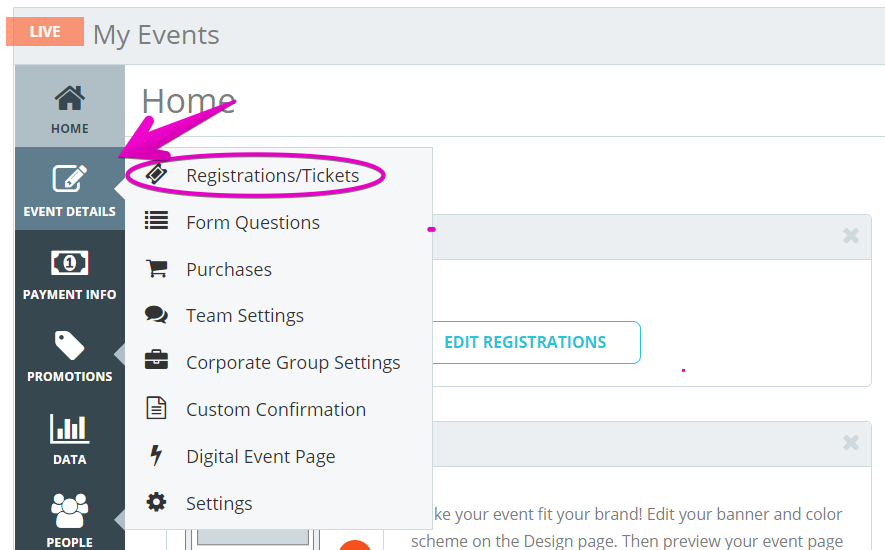
3. Next, add your first Registration/Ticket. You need to enter a name (VIP, General Admission, etc.), and the quantity available (if unlimited, leave blank). Finally set the price to $0 to make it a free event.

4. To hide the $0.00 pricing from the order page, open the Advanced Settings by clicking on the gear icon. From here toggle Hide Pricing if $0.00 to YES. You can also set Availability, and Restrictions on People such as Gender; Age; Max Purchase Per Order; Location and Access Code Required.

5. To add more registrations or tickets click on the ADD ANOTHER REGISTRATION/TICKET button at the bottom.
6. Click SAVE at the top or bottom to save your changes.
The best thing about creating an event on Events.com is that you don’t even need to have all the details to get started! After you create an event, it will automatically be saved as a draft and you can continue editing it.
Note: The event will remain a draft until you click GO LIVE.
1. Click CREATE AN EVENT in the top right corner of the page.
*You will need to have an Events.com User Account so that you can access your event later. You will be prompted for this information during the creation process. Or if you have an account, you can Log In first.

2. Follow Steps 1-3 to create your event. If you need to edit a step you have already filled out, click the “change” link at the top right of the step module.
*If this is your first time creating an event on Events.com, you’ll need to add an Organization Name as well.

3. When you are ready, click GET STARTED! and voilà!

At Events.com, we are constantly thinking of ways to make your event management tasks easier and more efficient. With our Copy Event feature, you will be able to easily copy the format and set up from a LIVE or recently completed event.
When should I use this feature?
This function is especially beneficial for organizations offering the same event in multiple locations. For example, an event series or an event that happens annually. Once you create the original event and are happy with its performance, you can copy that as many times as you’d like without having to recreate the entire event.
1. To get started, Log In and wait for your event card to load. If the event you intend to copy, doesn’t readily appear, select the tab that best applies (All, Live, Draft, Completed) and find the event you want to copy.
2. Click on the Copy Event icon located in the top right corner of the event card.

3. Once you copy an event
- Name your event. By default the name will show as “Copy of (event name)” you can edit this on the spot or after the fact through the Edit tab on the right hand side of the screen.
- Set your date and time. Dates & times will be calculated for you, based on last year’s past dates/times, but you can always change this at any time.
- Choose Organization. If you are an event organizer working on multiple organizations, you can chose to copy an event from one organization and adopt the setup and flow for the other organization. How cool is that?!?

What is copied from original event?
The Copy an Event option will copy the following fields, settings and info (when applicable):
- Registration/Tickets (including all advanced settings, inventory, pricing, restrictions, etc.)
- Form questions
- Waivers
- Languages
- Tax Settings
- Analytics tracking code
- Banner image
- Location
- Is event searchable on Events.com toggle
- Event description
- Event website URL
- Instagram URL
- Facebook URL
- Twitter URL
- Purchases (Attendee items and Other Stuff)
- Team settings
- User admin permissions (Owners will have full access to new events. Other roles will need to have the event added to them). User invitations are not resent.
*If an event is copied from a different organization, then the event copy will be associated to the new organization granting access to their users.
What is not copied from original event?
The following fields CANNOT be copied:
- Promo Codes (global and event specific)
- Receive funds/payment account (The account information is copied, but the account needs to be selected to use)
- Giving settings
- Confirmation messages
- Post-registration settings (for Event Goers)
- Start and End dates for Registrations/Tickets. You will need to manually change these within the Registration/Ticket section. Click the Settings (gear) icon to show this information within the Reg/Ticket page.
*If an event is copied from a different organization, the payment information is not copied over.
Pro Tip: Please keep in mind that copying an event does not automatically make the new event LIVE and ready for registrations. You will still need to confirm that the event details are all correct and manually take it LIVE.
Events.com makes it easy to link your event page to your website (or any website you want), as well as your Instagram, Facebook, and Twitter feeds. We don’t have to tell you how important social media can be when you’re trying to encourage the masses to share and promote your event. You can add Facebook, Twitter and Instagram when you Create an Event, or follow the steps below if you are already working on a draft.
1. Log In to your Events.com account and navigate to your event.
2. While in your event, click on EDIT in the upper right navigation.

3. Scroll to the SOCIAL section.

4. Enter your Facebook page name – pagename (the URL will display after clicking Save).
Note: Facebook does not allow “Event” pages to be shared, so please make sure this is your Facebook “Page”.

5. Enter your Twitter handle.

6. For Instagram integration, you will need to authorize that your images can be published publicly. To do this, you’ll need to log in to your Instagram account first. But no worries, it’s very simple and just a couple of extra steps. See below.

- Click on Log in to Instagram
- Login to Instagram and Authorize Events.com to access your photos and post them on a public site.
- Once you click Authorize, you will be taken back to your page to continue working on your event. That’s it!
7. Be sure to click SAVE when you’re done to capture all your hard work!
Adding a video to your event page is quick and easy! There are two places you can add a video that will show under the description on your event page.
Add a video while creating an event
1. Click the Create an Event button in the top right of your navigation
2. Follow steps 2-4 above.
3. Press SAVE

2. On the Create an Event page, in Step 2 Details, you’ll see an Add Video button.
3. After clicking this you’ll see a text box where you can add your video URL. The video must be hosted on YouTube or Vimeo.

4. If you want to add more videos click the Add Another Video button

5. Finish the rest of the steps, and click GET STARTED!
Add a video after you’ve created your event
1. While in your event, click on EDIT in the upper right, then go to the DETAILS section

2. Follow steps 2-4 above.
3. Press SAVE
Creating an event is quick and easy! After you create an event, it will automatically be saved as a draft and you can continue editing it. If you want your event to go live, simply click the Go Live button from within the event after you’ve completed the following steps.
1. Click CREATE AN EVENT in the top right corner of the page.
*You will need to have an Events.com User Account so that you can access your event later. You will be prompted for this information during the creation process. Or if you have an account, you can Log In first.

2. Follow Steps 1-3 to create your event. Step 1 asks what type of event it is. Step 2 gathers some of the details – Name, Location, Date and Description. Step 3 is for your social feeds. If you need to edit a step you have already filled out, click the Change link at the top right of the step module. If you’d rather skip the optional fields, don’t worry! You can add and edit the information later.
 *If this is your first time creating an event on Events.com, you’ll need to add an Organization Name. This is shown to your attendees. We recommend your company name, or event producer.

3. When you are ready, click GET STARTED! and voilà!
Data, Demographics and Tracking (10)
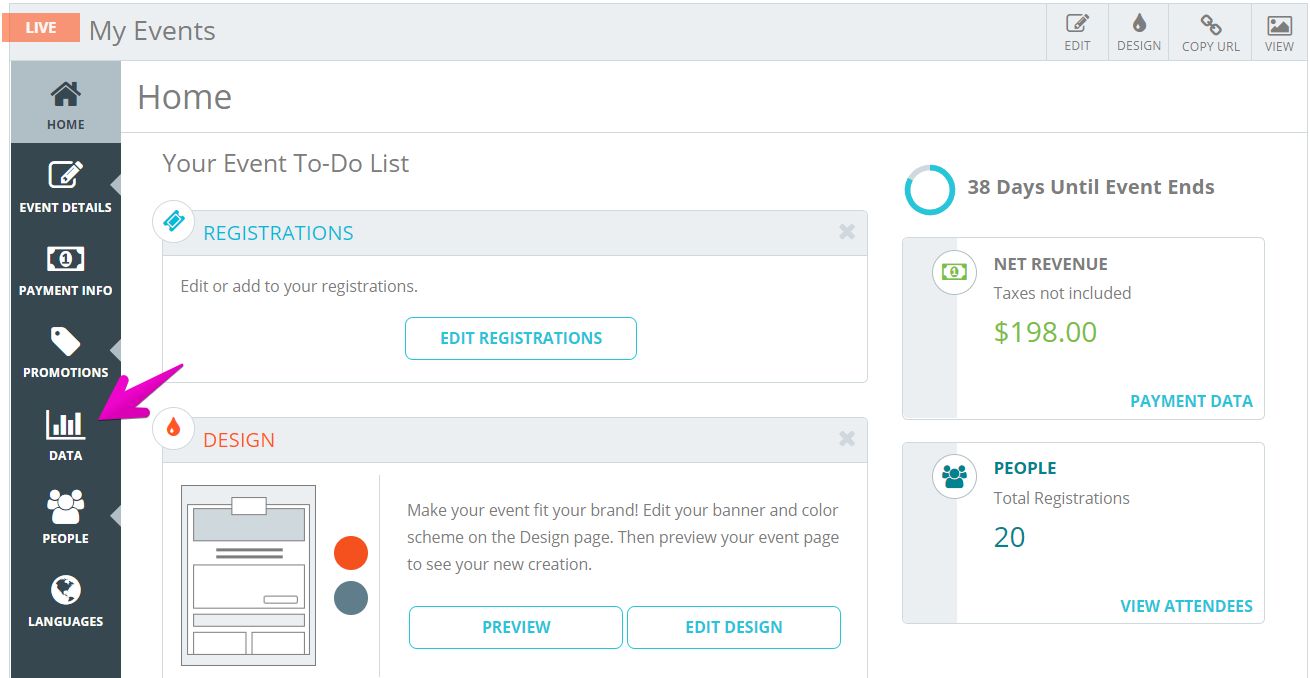
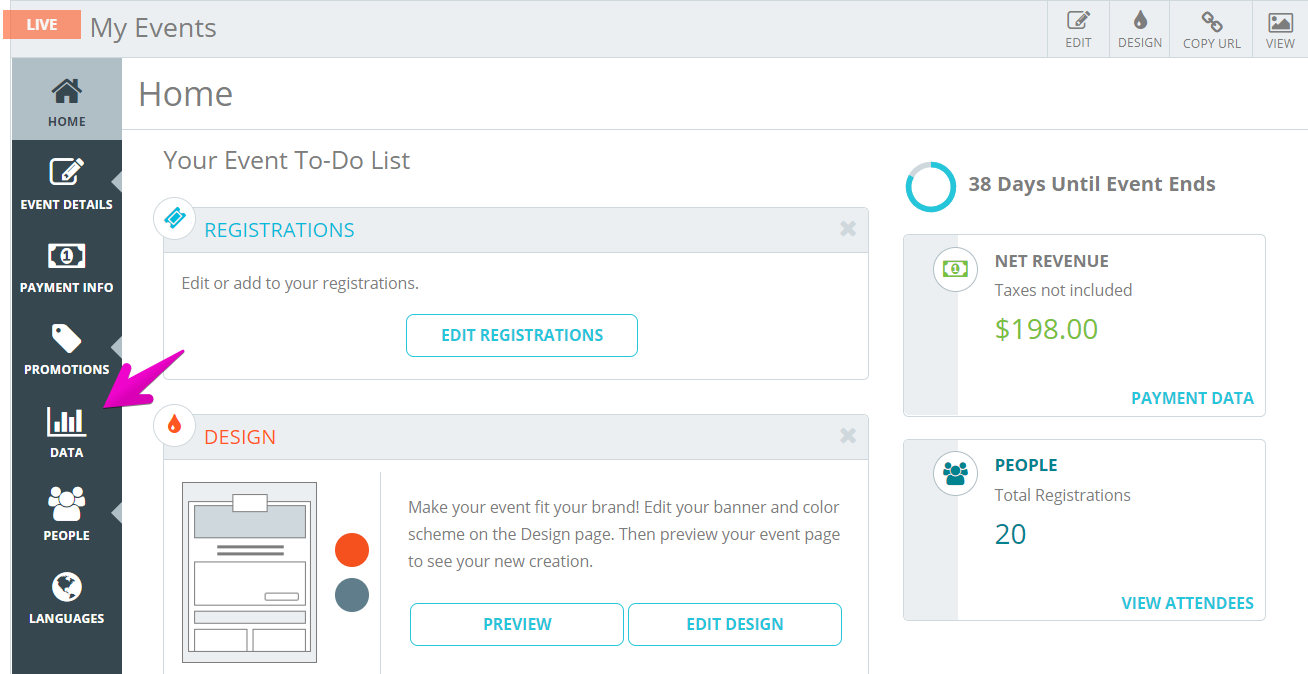
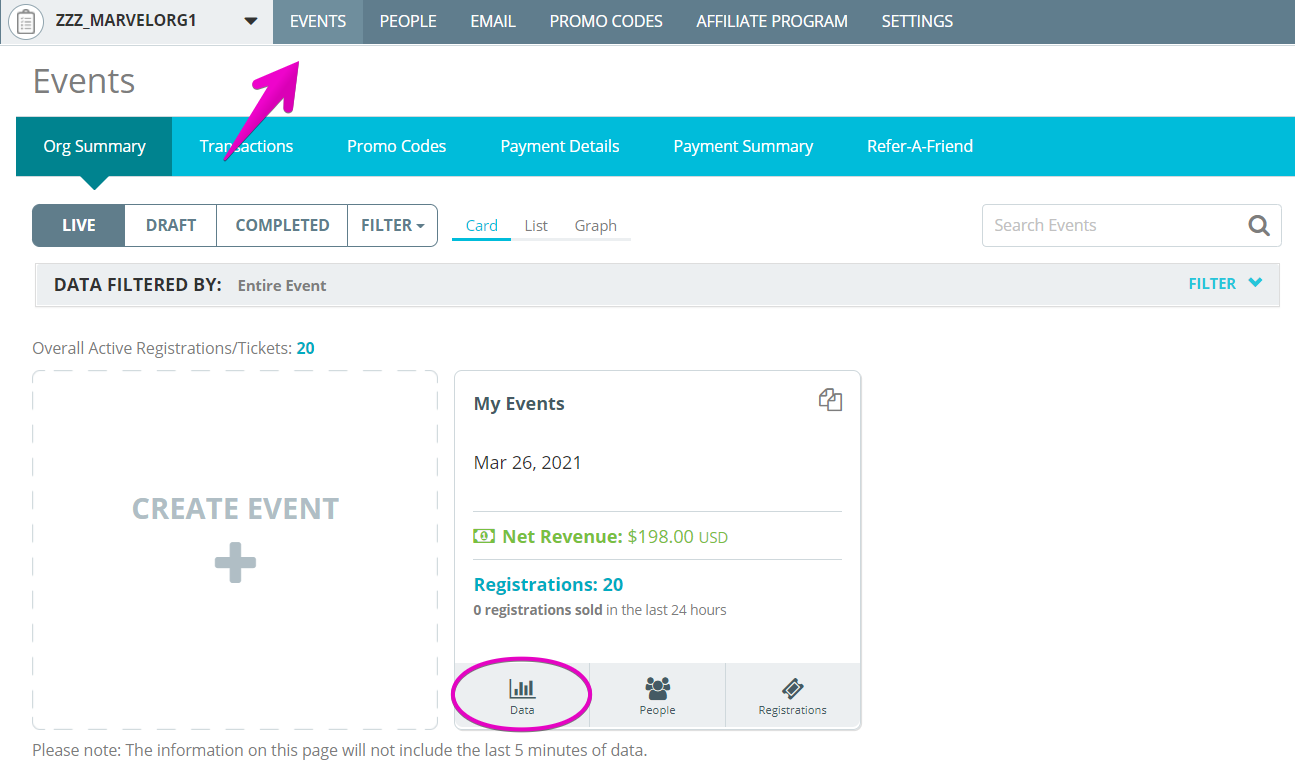
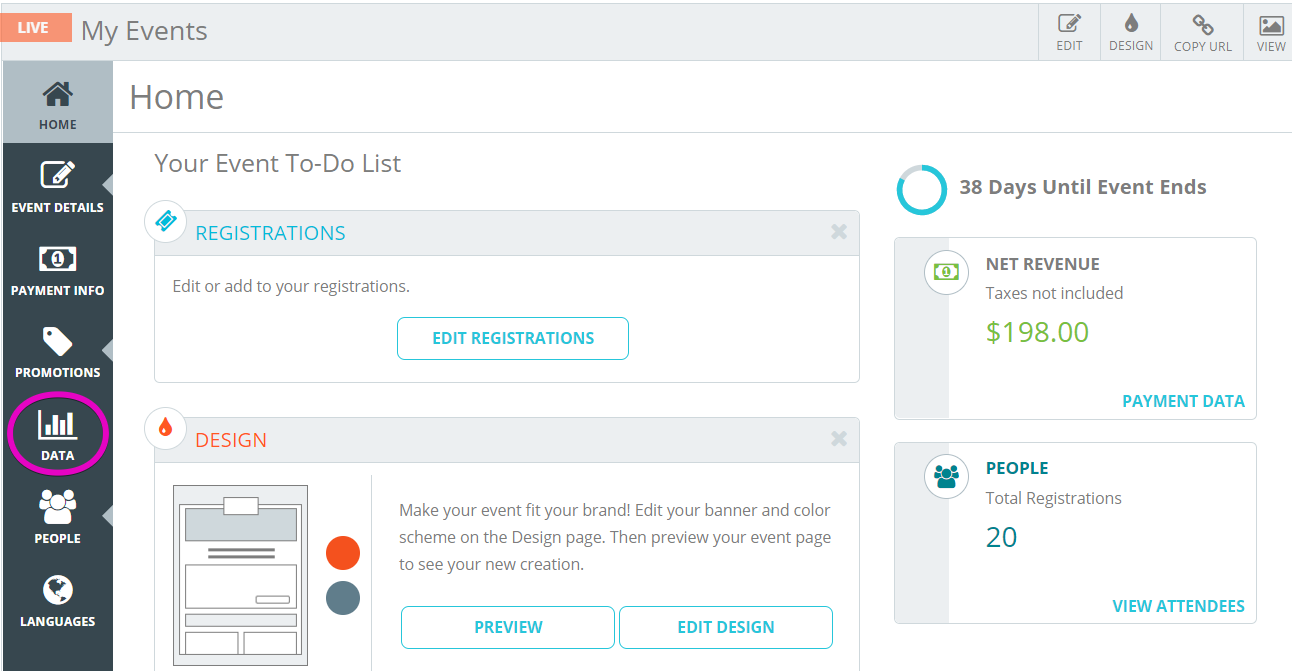
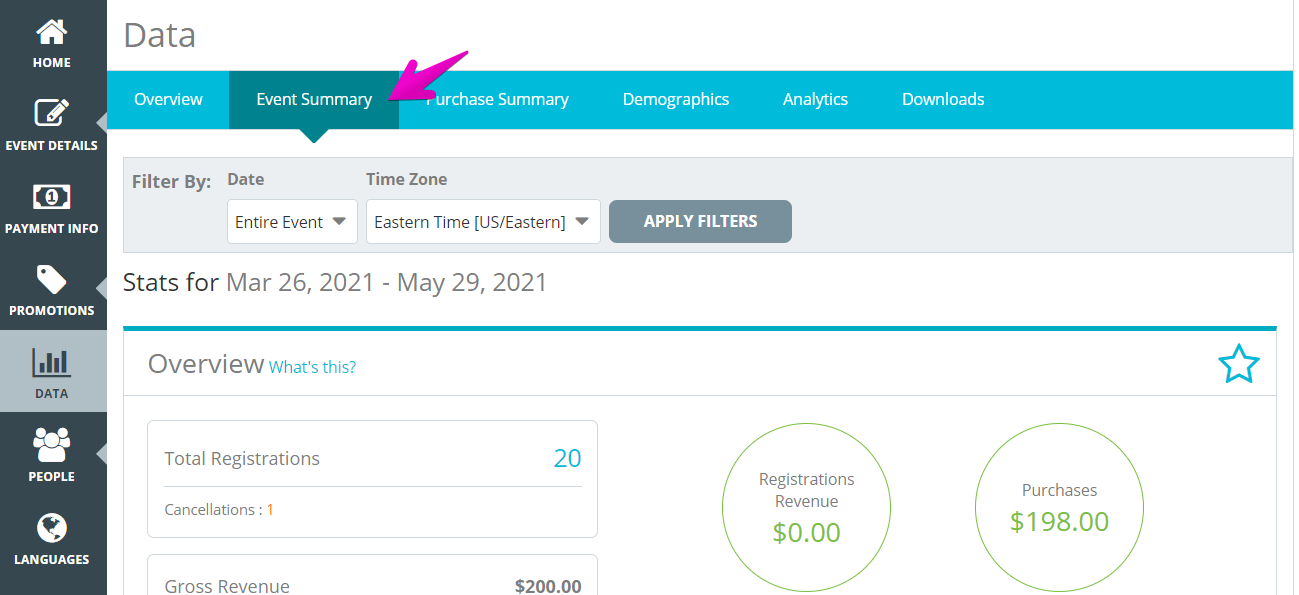
At Events.com we understand how important data is in the decision making process of any business. This is no different in the event management space. Real time visibility of your event’s data and performance is key to be able to put on and manage a successful event. With our Dashboards tool, you can get a real time snapshot of your event’s performance with a focus on KPIs (Key Performance Indicators). All of these tools are accessible on the go from a smartphone or tablet.
1. Log In to your Events.com account.
2. As an organizer your first screen will be your organization data. You can select between your LIVE, DRAFT and COMPLETED events and find the event for which you want to view your data.
3. Within your event, click DATA from the tools on the left.
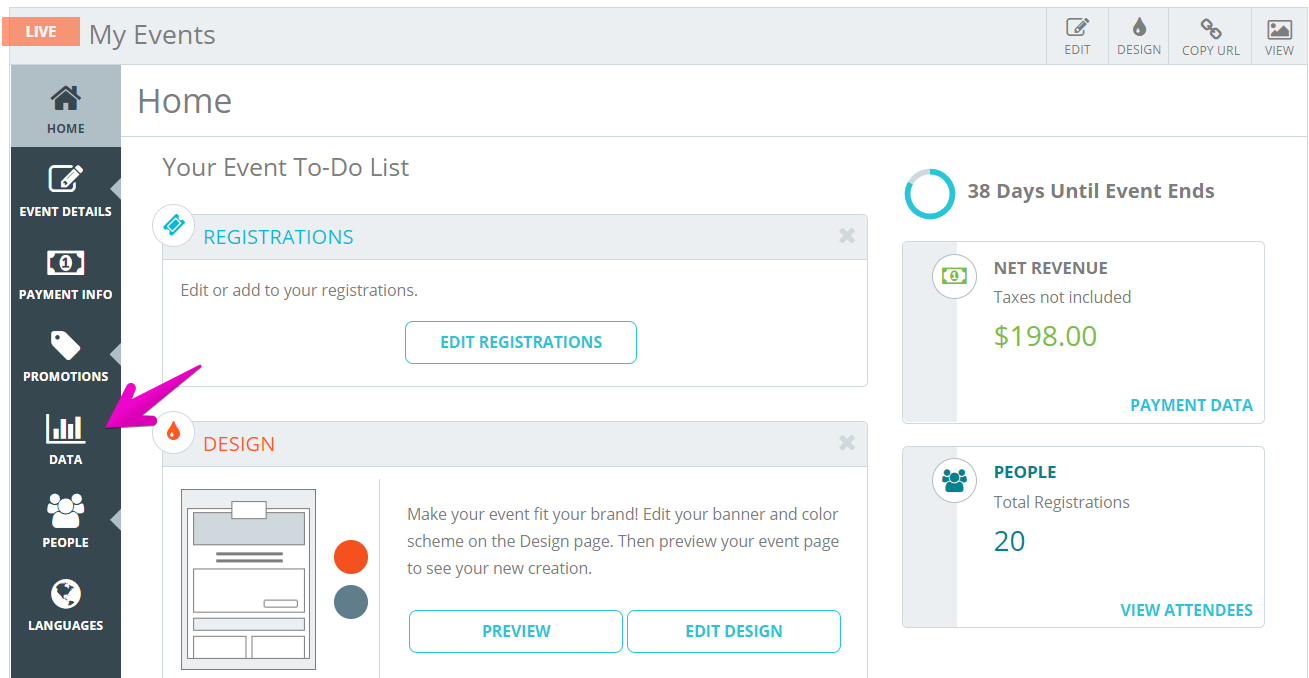
4. The Overview summary dashboard will appear by default (read about building your Overview Summary here). In the blue navigation tool bar, click Event Summary.
Your Event Summary dashboard has designated sections:
Overview
- Total Registrations: The total number of registrations/tickets your event has sold minus the total number of registrations/tickets cancelled.
- Total Unfulfilled Registrations (If applicable): The total number of corporate registrations/tickets that have not been fulfilled.
- Cancellations: Number of cancelled registration (or tickets).
- Tax Net Revenue (If applicable): This is the total sum of revenue earned for taxes associated to both registration/ticket type and Purchases.
- Gross Revenue: The full amount of all sales generated by the event.
- Total Discounts: This is the total sum of revenue that was used to reduce an order with a promotion for promos and multi-quantity discounts.
Total Refunds/Transfers: This is the sum of revenue that was refunded for all registration/tickets, inventory changes and purchases - Net Revenue: This is the total revenue you’ve earned for Registration/Tickets and purchases (does not include tax).
- Summary Circles: These will depend on what you’re selling in your event. These summaries may include Registration/Ticket Revenue; Purchases; Transfer Fees and/ or Teams Registered (unique teams, rather than the below individual sales). *All revenues displayed are Net Revenue.
Revenue Over Time
In this section, you can view how your event is performing by Revenue generated, or Tickets sold, and you can view a live total by the Day, Month or Year

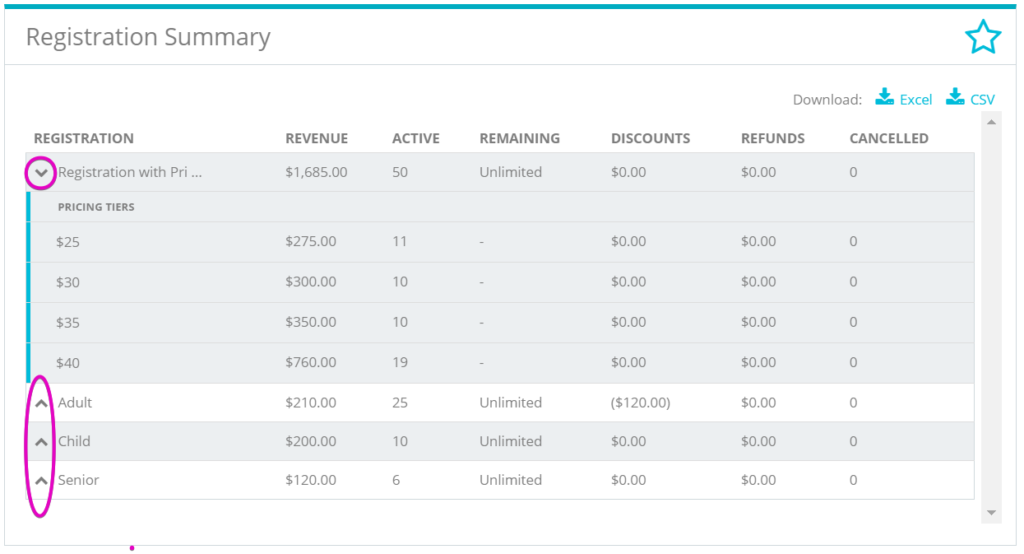
Registration Summary
For each Registration/Ticket you’re able to see specific data relating to their sales – Revenue; Active; Unfulfilled (Corporate Groups); Remaining; Discounts; Refunds; Cancelled.
Keep in mind, the Active column displays the amount of registrations/ tickets that have been sold (including any fulfilled Corporate Group spots *if applicable). Unfulfilled only applies to prepaid Corporate Group spots that haven’t been completed. These are reflected in the Remaining inventory. If Corporate Groups are not being offered, this column will not be displayed.
Your registrations/tickets will expand to display your specific price tiers, you can click the arrows on the left to minimize or maximize these tiers.
Top Promo Codes
The next section of the Event Summary tab displays your Top Promo Codes, where you can view a snapshot of the following data for each Promo Code in real time: INVENTORY allotted, how many have been PURCHASED and how many are REMAINING. Click View All Promo Codes to see more.

Waivers
If you have any electronic signature waivers, this is where you can review how many people have signed, download the list of remaining and you can send reminders.

Check-In Summary
If you’re using the Event Assistant app for checking in your attendees, you’ll have a quick reference to your daily check-in numbers per registration/ticket. You can also download a report in excel.

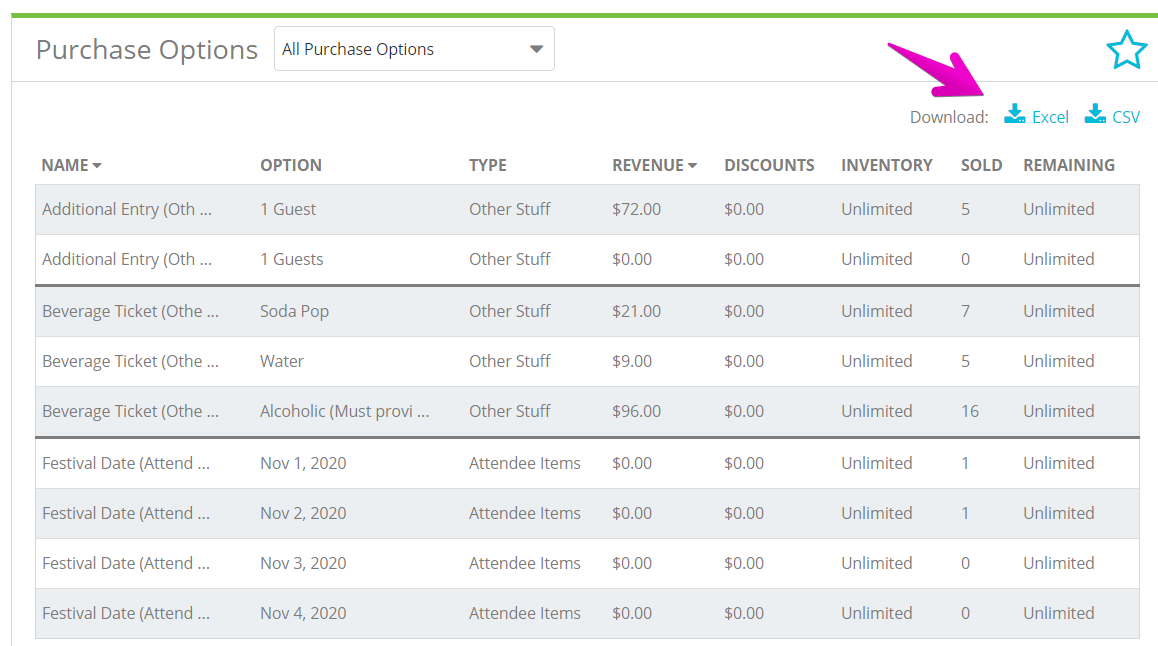
Pro Tips: Transactions processed within the past 10 minutes may not be included in the dashboards. If you want more detailed info about your purchases you can find it in your Purchase Summary.
The Purchase Summary dashboard lets you keep a close eye on your sales and inventory, as well as gives you access to specific Purchase reports.
Easily accessible on mobile devices you can quickly get the information that you want, and only the information that you want, anywhere, anytime.
1. Log In to your Events.com account.
2. As an organizer your first screen will be your organization data. You can select between your LIVE, DRAFT and COMPLETED events and find the event for which you want to view your data.

3. While in your event, click DATA from the tools on the left.
4. The Overview summary dashboard will appear by default (read about building your Overview summary here). From the blue navigation tool bar, click Purchase Summary.

5. By default, all items sold will be displayed. You can customize your report by specifying which items you want to look at over a variable time span.
At a glance, your dashboard will display:
- Purchases Net Revenue: This is the total revenue collected for all purchases sold (Other Stuff and Required) minus fees, discounts and refunds.
- Other Stuff Purchases Net Revenue: This is the total revenue paid for “Other Stuff” purchases sold minus fees, discounts and refunds.
- Attendee Item Purchases Net Revenue: This is the total revenue paid for “Attendee Items” sold minus fees, discounts and refunds.
- Tax Net Revenue (If applicable): This is the sum of revenue earned for taxes paid on purchases minus refunded taxes for purchases.
- Refunds/Transfers: Total revenue that was refunded for purchases (including transfers).
- Cancelled Purchases: This is the total count of purchase items that were cancelled.
- Purchase Options: (Itemized chart of each merchandise option.) This will include a count of each item and display net revenue, net tax, discounts, inventory limit, inventory sold, and inventory remaining.
Pro Tips: You can limit the report to certain items by using the Purchase Options Drop-down menu. Clicking Download will create a report in excel that will include full attendee as well as item information. Transactions processed within the past 10 minutes may not be included in the dashboards.
As an organization putting on multiple events a year, or the same event year over year, you need a way to view all of your events’ data and performances. Your Organization Dashboard allows you to get a real-time snapshot of this data with a few simple clicks.
Currently the Organization level dashboards will show you:
- Registration/Tickets Sold: An overall count of registrations/tickets sold minus all registrations/tickets canceled across all events.
- Net Revenue by Currency: The net revenue across all registration/tickets, purchases and user-defined taxes, minus refunds, discounts and fees per currency across all events.

- Live, Draft, or Completed: You can change the view to see all events that are live, in drafts, or completed.

- Filter: With any of the options in this article, the filter can be added to further narrow your search of information.

- List View: This will show you the information placed out in a list format similar to how an excel spreadsheet would appear. You can view the active registrations, net revenue, discounts, refunds, taxes, and currency. This is all arranged by the events within your live, draft, or completed folders.

- Graph View: Selecting the graph view will allow you to see specific events registrations and revenue compared to other events, this can be chosen by clicking the Graph button.

Note: Transactions processed within the past 10 minutes may not be included in the dashboards.
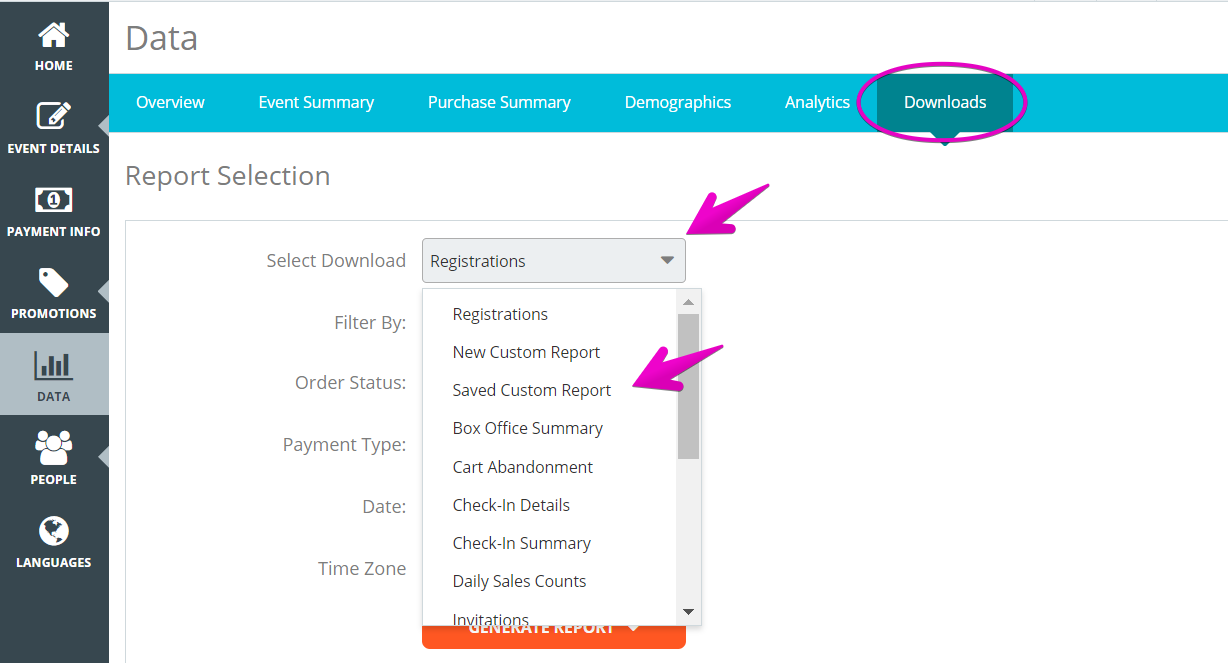
With Events.com you can easily download your event data in several different report formats. However, we understand the need for a customized report. Maybe all you want is to get an idea for t-shirt orders you should place, or maybe you need to export only addresses, who knows. The good news is that with Events.com you can get as specific as you need to get!
1. Log In to your Events.com account.
2. As an organizer your first screen will be your organization data. You can select between your LIVE, DRAFT and COMPLETED events and find the event for which you want to view your data and select Data on the event card.

3. While in your event, go to DATA in your left side navigation

4. Click on the Downloads tab and select New Custom Report from the Select Download drop-down.

5. From here, scroll to the CREATE NEW CUSTOM REPORT section and select the data fields that apply . Check as many or as few boxes as you need.

6. Once you are done, simply click DOWNLOAD REPORT.
Pro Tips: If you want to save this report for future use, give it a name in the REPORT NAME field. If you need to update the report, follow the steps as if it was new and then give it the same name. To run a saved report, choose Saved Custom Report from the Select Download dropdown.
When you’ve set up Direct Deposit with Events.com, we provide you with two different payment reports: Payment Details and Payment Summary. Payment Details will give you individual transactions that make up your deposit. The Payment Summary will summarize the information based by product (products are purchases, and registration / ticket types). Find out how to access these reports below!
1. Log In to your Events.com account.
2. As an organizer, your first screen will be your Org Summary. To the right of the Org Summary in the blue navigation bar, you will find your account’s Payment Details and Payment Summary.

3. Going into Payment Details will allow you to view where your funds are obtained from in your events. You will need to select a date in which you received a remittance to see where the funds were gathered from.

4. Going into the Payment Summary, it will allow you to view your past payouts, and your Current Remittance Amount. Clicking SHOW HISTORY will display the past payouts. You can use the dropdowns to view specific reports by dates.

5. Once you have specified all necessary fields, you can click START DOWNLOAD. The report will download and be added into your Previous Reports list for you to open and view.
Pro Tips: All of your events under the same organization using the same account will be a part of the same deposit. By choosing Custom in the date range you will be given two date fields to indicate a start and end, allowing you to download all of your remittances in one report.
We understand that not everyone at your organization uses the same statistics from the data dashboards. Finance is probably looking at something different from what marketing is searching for. This is why we created the Overview dashboard. This is a way to customize what you want to see at a quick glance when you go to your event’s dashboards.
1. Log In to your Events.com account.
2. As an organizer your first screen will be your organization data. You can select between your LIVE, DRAFT and COMPLETED events and choose the event for which you want to customize. You can click the Data icon, or if you’re already in your event.

3. Click Data in the left navigation
4. You will see on your Overview page a description of how to save different dashboards to this page. This is where your preferred reports will be accessible to you after you’ve selected them to be added.
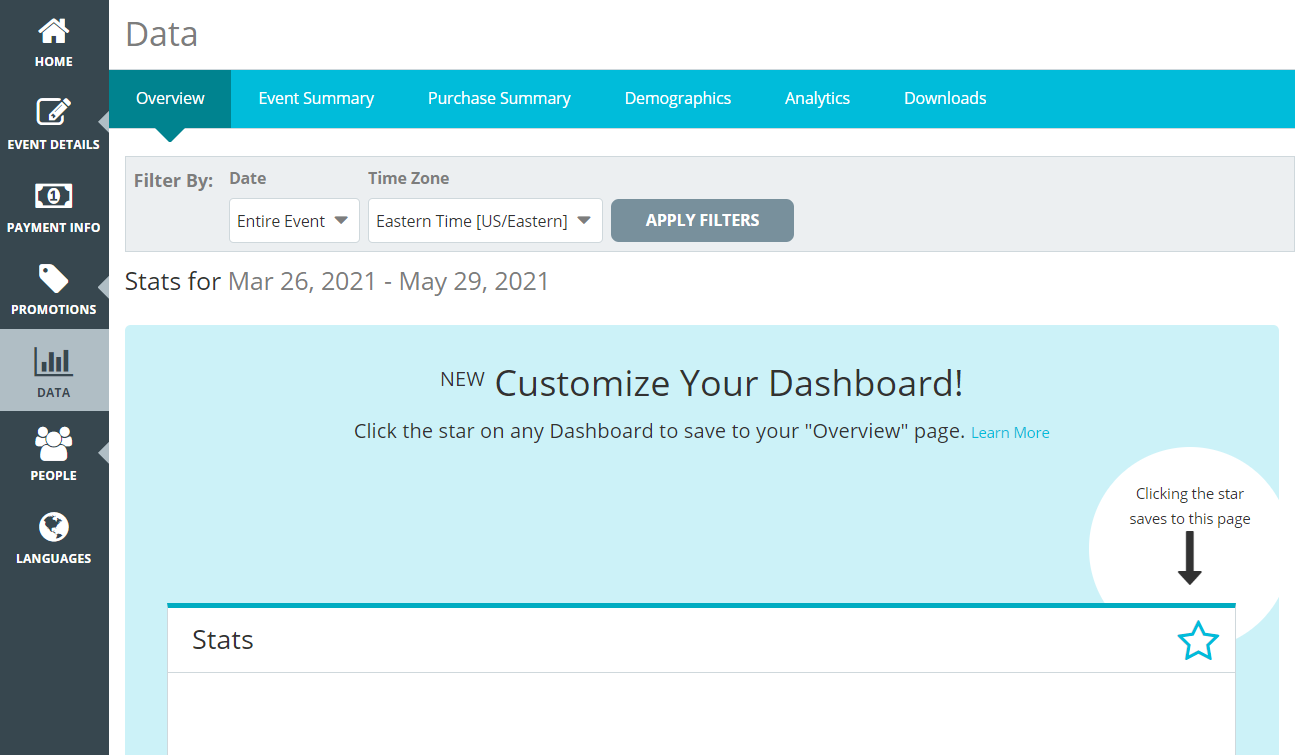
5. You can also use the Filter By tool to see your data pages according to remittance cycles and custom date ranges.
6. Go to any of your other dashboards and you will notice a star in the top right corner of each section. By clicking this star, it saves that dashboard to your Overview page. Items will be saved in the order you click the stars. If you deselect a star, it disappears from the Overview page.
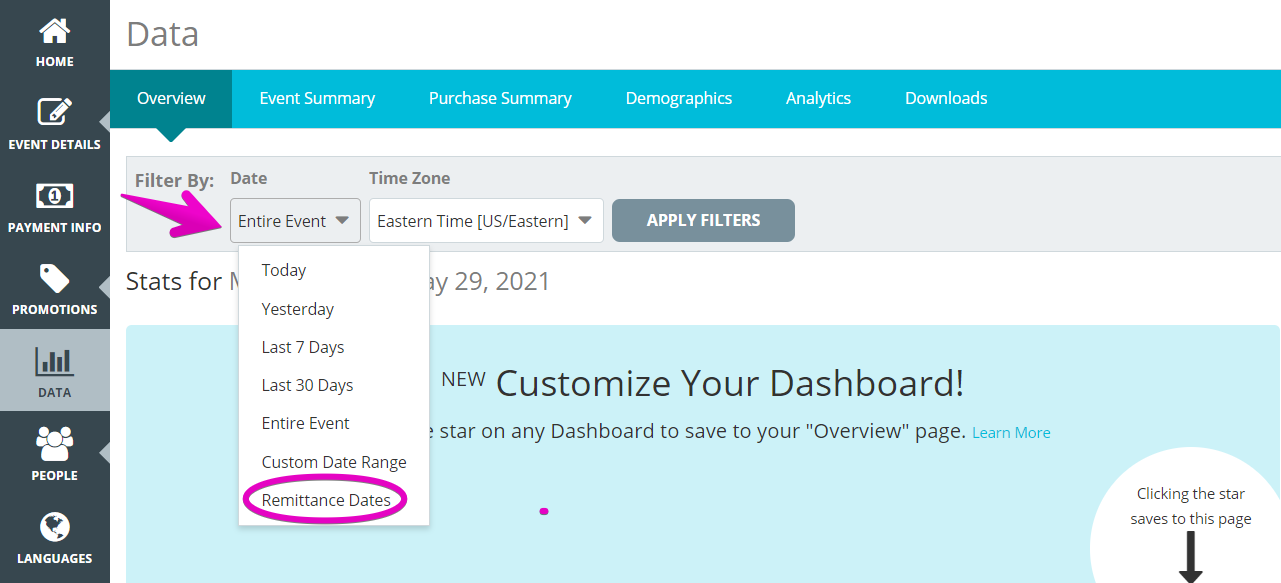
If you’re looking for a snapshot of your sales made during your most recent payout, you can filter your event data summaries by your remittance dates with these easy steps!
1. Log In to your Events.com account.
2. Go to Events in the organizer navigation and choose an event (on the event card you can also choose the shortcut Data button to get to the Data page).
3. If you are already in your event, in the left side navigation, click Data.
4. In the Filter by: section of each page (Event Summary, Purchase Summary, and Demographics) choose Remittance Dates in the Date dropdown and APPLY FILTERS.
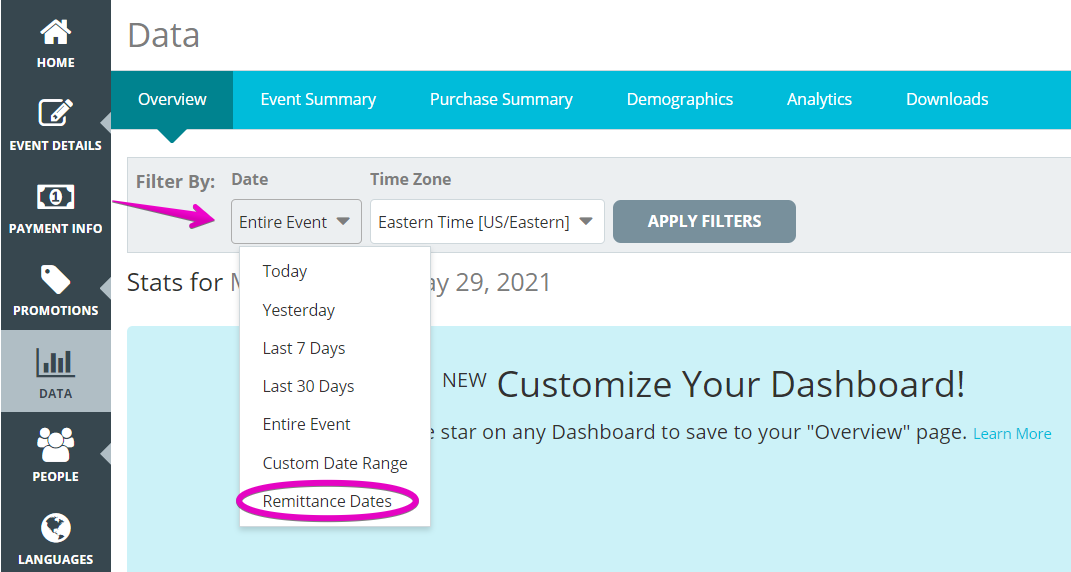
5. All of your data will reflect the remittance dates you choose on the current dashboard.
We understand having analytics for your event is extremely important! We offer three ways to help you track your traffic. Follow the steps below to get set up!
1. Log In to your Events.com account and select the event for which you wish to add analytics.
2. In the left hand navigation, click on DATA. Then in the blue navigation bar select Analytics.
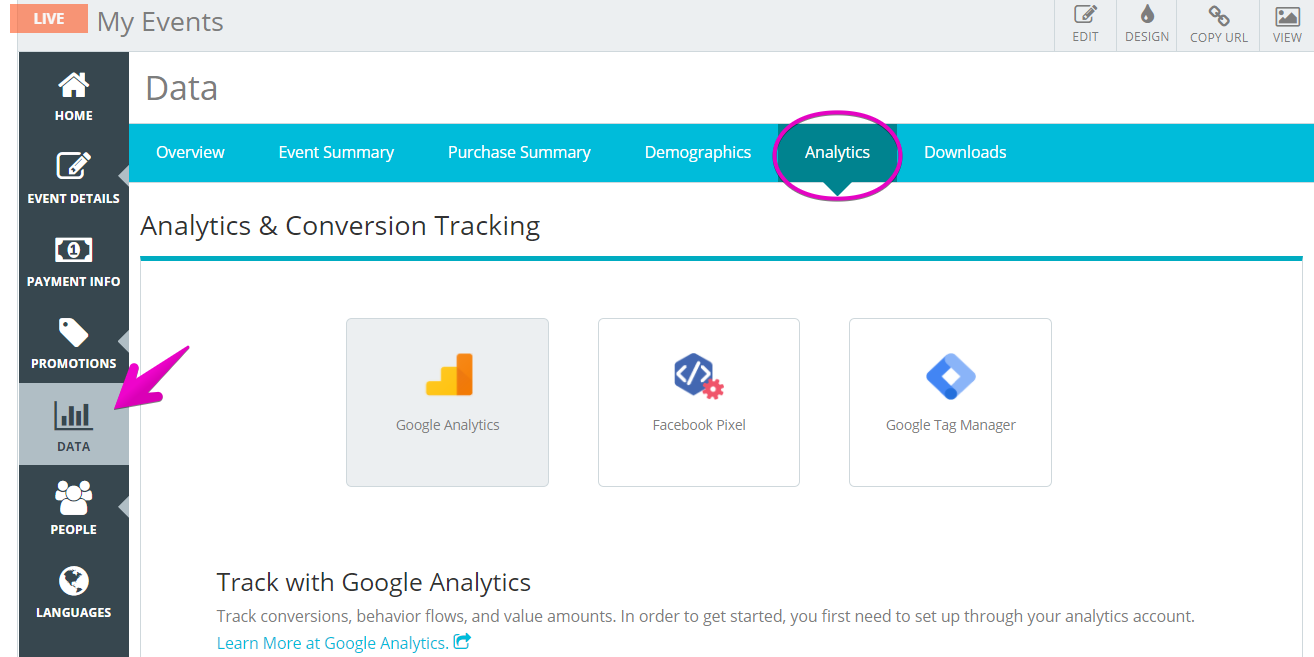
Note: You can use all of the analytics sections or just one! If you need to create an ID for one of these tracking tools, there are links at the end of the article to show you how to.
3. In the Google Analytics section, enter in the Tracking ID.

4. Next, in the Facebook Pixel section enter in the FB Pixel ID.

5. Lastly, in the Google Tag Manager section enter in the Container ID.

Note: If you need to set up your Analytics, click here. To set up your Facebook Pixel, click here. Finally to set up Google Tag Manager, click here.
No longer need that custom report? Let’s get rid of that report right now in just a few easy clicks!
1. Log In to your Events.com account.
2. Select the event for which you want to delete the custom report. Then select DATA from the left hand menu.

3. Select Downloads from the tool bar.
4. In the drop down menu for Select Download, scroll down to Saved Custom Report.
5. Select the drop down icon next to the name of your custom report. Click the trash icon to delete the report.

Pro Tip: Custom reports are the perfect way to collect information for those important columns you want to look at. You can create as many reports as you need for your event(s)!
At Events.com we understand how important data is in the decision making process of any business. With our Dashboards, you can get real time snapshots of various aspects of your event including your price change performance.
1. Within your event, click DATA from the tools on the left.

2. The Overview summary dashboard will appear by default (read about building your Overview Summary here). In the blue navigation tool bar, click Event Summary.
3. Scroll to your Registration Summary:
Registration Summary
For each Registration/Ticket you’re able to see specific data relating to their sales – Revenue; Active; Unfulfilled (Corporate Groups); Remaining; Discounts; Refunds; Cancelled.
Keep in mind, the Active column displays the amount of registrations/ tickets that have been sold (including any fulfilled Corporate Group spots *if applicable). Unfulfilled only applies to prepaid Corporate Group spots that haven’t been completed. These are reflected in the Remaining inventory. If Corporate Groups are not being offered, this column will not be displayed.
Your registrations/tickets will expand to display your specific price tiers, you can click the arrows on the left to minimize or maximize these tiers.
Pro Tips: Transactions processed within the past 10 minutes may not be included in the dashboards. If you want more detailed info about your purchases you can find it in your Purchase Summary.
Event Promotions (16)
With Events.com you have full control over the creation and management of your event’s promo codes. You can allow your participants to use promo codes on their Registrations/Tickets AND also on their Attendee Items/Other Stuff.
1. Log In to your Events.com account.
2. Click on PROMOTIONS and select Promo Codes on the left side of your screen.

3. Enter your promo code information.
- PROMO CODE – Name your promo code. The name you enter here will be used in your reports.
- DISCOUNT – Choose between a flat amount ($) or a percent (%) off of the purchase price.
- USAGE LIMIT – This will restrict how many times the code can be used. Leave the field blank for Unlimited usage.
- APPLICABLE TO – From the dropdown menu, you can select which Registrations/Tickets or Purchases (Attendee Items or Other Stuff) the discount applies to.

4. To choose the dates this code is available for, click on the Settings (gear) icon. It is optional for you to select a start and end date for when this discount code will be available.

5. There is also a spot to leave an optional note. This could come in handy if there were special circumstances leading to its creation.
6. Click SAVE at the top or bottom of the page before navigating to a new page. Your code will be ready to use right away (unless you set it for a future date)!
Pro Tip: Only one promo code can be used per order. If you want someone to have a code for a registration/ ticket AND an Attendee Item, set it to 2 usages.
With Events.com, you can export a .CSV file that lists all the promo codes for your event as well as how many times each has been used. Find out how to download the file in these easy steps!
1. Log In to your Events.com account.
2. Click on PROMOTIONS and select PROMO CODES on the left side of your screen.
3. To download the .CSV file, click on the EXPORT button.

4. All data for your promo codes will open in an excel spreadsheet.
Events.com’s invitation tool is a great way to invite attendees on a more personal level. The system allows you to create invitations embedded with a unique link (different from your public event link). This is great for inviting VIPs, sponsors, staff members, and more. *If this feature is not available in your account please contact us at help@events.com
There are several parameters you can customize per invitation. For example, if you want to add a special discount for those invited, or if you want to ensure that only those whose first name and last name appears on the invitation, can redeem it.
1. Log In to your Events.com account.
2. As an organizer your first screen will be your organization data. You can select between your LIVE, DRAFT and COMPLETED events and choose the event you would like to set up special invitations for.
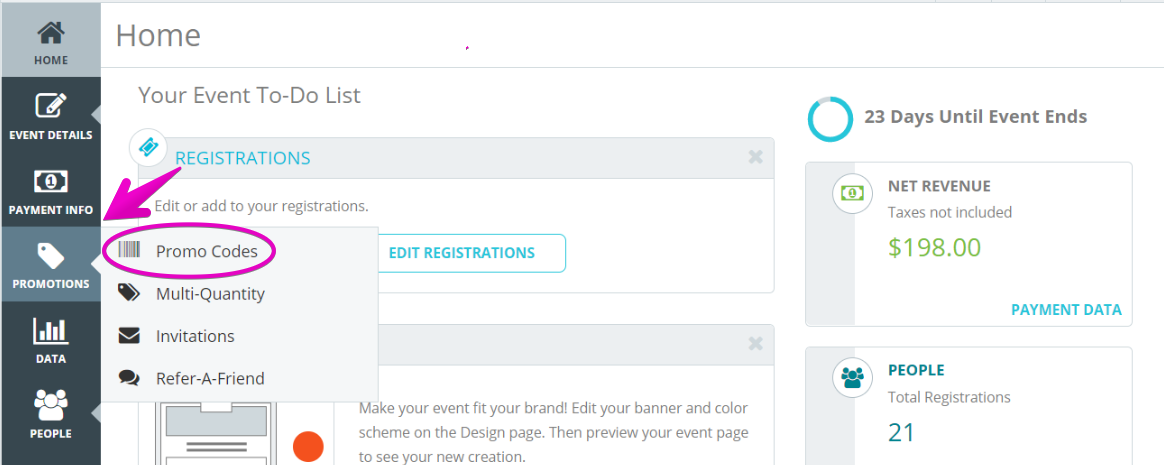
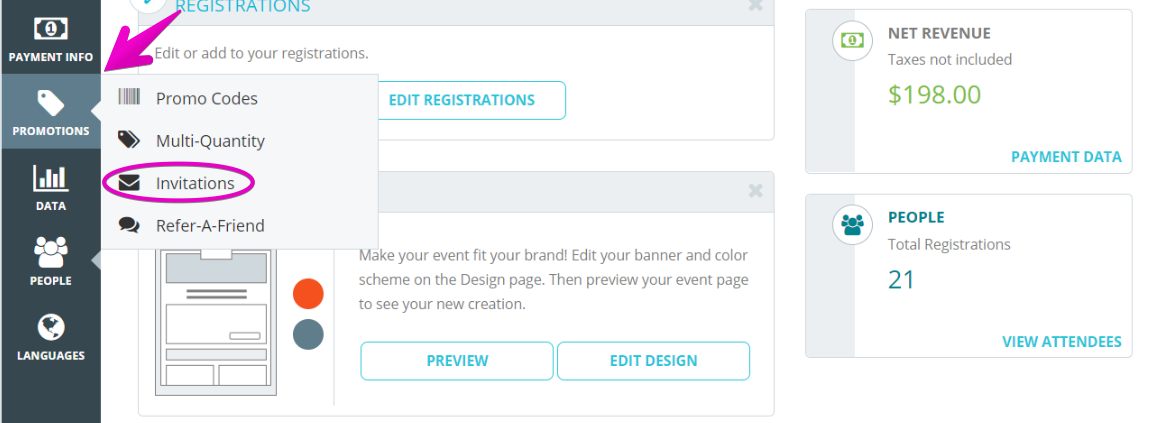
3. Go to PROMOTIONS in the left navigation, and then select Invitations.
4. Name your invitation (for reference purposes). Then, click the Settings (gear) icon to open the Advanced Settings. Here you can specify the Valid Dates for this invitation; the registration or ticket type(s) you wish it Applies to; any Discount you’d like to offer to the invitee (a discount is not required); and the Uses Per Invite field allows you to set the amount of registrations that will be available for purchase to the invitee. *Uses Per Invite cannot be edited for a previously sent invitation. You can add the contact list again through Add Invitees to send the same invite (with the updated uses) or we recommend sending a new invitation.

These invitation details will be included in the email sent to invitees. You can also select if the invitation will be restricted. If you toggle this option to YES, the invitation will pre-populate and lock in the name of the invitee on the registration form from the information used in the upload (step 3).
You may also view how many invitations have been redeemed by clicking PROMOTIONS / Invitations, and you will see the totals here

5. Add a custom message to the invitation. Feel free to add images, hyperlinks, etc. Make it personal!
6. We provide you with a template you can download in two different formats, so adding your invitees is easier on you. After saving your completed template, click BROWSE to find your file, and then UPLOAD. The spot will update, to display a confirmation message that the upload was a success.
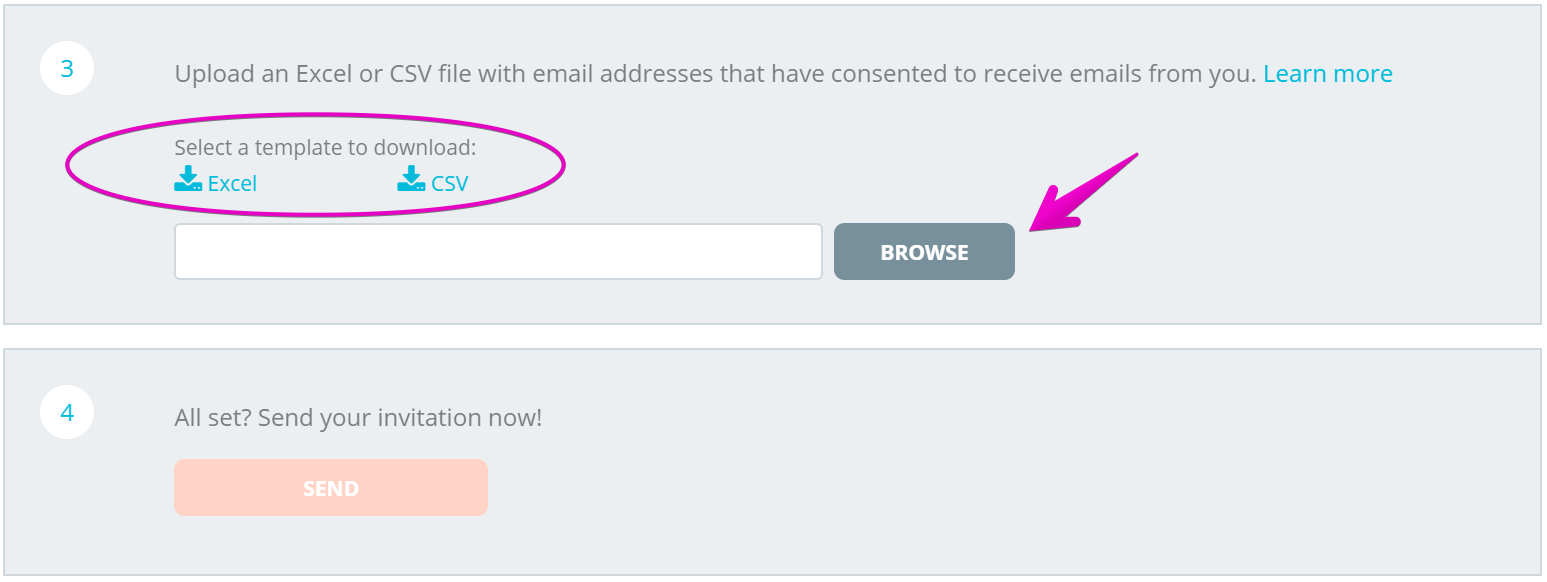
7. SEND the invitation!
If the need arises, and you want to send this invitation to a new group of people at a later time, check out this helpful article – How do I add new invitees to an existing invitation?
Events.com gives every event the ability to send up to 10,000 emails every 24 hours. Sending invitations with high bounce or spam rates may cause Events.com to revoke email privileges from an organization. This is because mailings with high bounce or spam rates reduce the likelihood that mailbox providers (e.g., Gmail, Outlook, Yahoo, etc.) will deliver future emails sent by users of Events.com.
It is nearly impossible to ensure 100% inbox delivery of emails. However, the likelihood of inbox delivery increases significantly by following anti-spam laws, guidelines and email best practices. events.com does our part to increase inbox deliverability of your invitations, and we expect that you do your part by following our Email Guidelines.
Events.com expects our users to follow these email guidelines or risk being blacklisted (having email privileges revoked):
- Follow all relevant anti-spam laws. Learn more here
- Use clean, permission-based lists of people that have opted to receive emails from your organization. Note, signing up for a previous event is a valid opt-in method
- Do not send to known invalid email addresses
- Include recipient’s first name if you have it, so that we can personalize the “To:” field of the email
- Don’t send to role accounts such as info@domain.com or help@domain.com
- Send emails to your list semi-regularly so that they remain familiar with your brand
If you leverage the features of an Email Service Provider, such as MailChimp, we recommend that you follow these best practices to maintain a clean list:
- Maintain one list for your organization
- Segment your list to targeted audiences so that you aren’t sending too many emails and recipients will engage with your content
- Regularly clean your list and remove emails that are not delivered due to a hard bounce or invalid email
- Track engagement with your mail, such as open and click rates. Remove emails that are not engaging with your mail
- Re-confirm your list if it has been more than 6 months since they heard from you
- Cross-reference a list from events.com with your main list to remove invalid and disengaged subscribers
Events.com wants your emails to be delivered. We do the following to keep the delivery of your invitations high:
- Provide an opt-out for recipients. Users can unsubscribe from emails from your organization sent through events.com.
- Use a relevant subject line for Invitations: “You’re now Invited to <Event Name>”
- Use your organization as the “From Name”, so that your brand is front-and-center
- Personalize the “To” field in the email if you provide a first name for the recipient
- Include our mailing address and privacy policy in the email
- Do not allow the upload of invalid email addresses that do not follow a standard format
- Format the email with relevant content that does not resemble spam
Events.com, like any other email service providers, is required to enforce spam laws. We have some very strict rules that must be adhered to in all countries, but you may find that your country has additional requirements. Please visit the link(s) below to learn about your countries law requirements.
Your invitations and/or emails must comply with the US CAN-SPAM ACT. In addition to the CAN-SPAM rules, you must comply with the anti-spam laws of the country your recipients live in. If you are sending to UK residents and US residents, check the UK spam laws to make sure you are also UK compliant.
International requirements by country
Below you will finds either links to anti-spam legislation in countries outside the US or the name of the country’s anti-spam law.
Canada
Canada’s Anti-Spam Legislation (CASL) amends the Canadian Radio-television and Telecommunications Commission Act, the Competition Act, the Personal Information Protection and Electronic Documents Act and the Telecommunications Act. It is very similar to CAN-SPAM but has some minor differences and covers all electronic messages, not just email. Check out CASL basics.
Australia
Spam Act 2003, Act No. 129 of 2003 as amended.
EU
Article 13 of DIRECTIVE 2002/58/EC OF THE EUROPEAN PARLIAMENT AND OF THE COUNCIL of 12 July 2002 concerning the processing of personal data and the protection of privacy in the electronic communications sector (Directive on privacy and electronic communications).
The EU body that addresses spam is The Contact Network of Spam Enforcement Authorities (CNSA).
The Directive is implemented by each member state independently so you will want to check with your particular country law for more details.
UK
The Privacy and Electronic Communications (EC Directive) Regulations
Austria
Telecommunications Act 2003
Belgium
Commission de la protection de la vie privée, Le spam en Belgique Etat des lieux en juillet 2003, July 4, 2003
China
Measures for Administration of E-Mail Service on Internet (2006)
( Unofficial English Translation)
Cyprus
Section 06 of the Regulation of Electronic Communications and Postal Services Law of 2004 (Law 12 (I) / 2004 deals with unsolicited communications (spam)
Czech Republic
Act No. 480/2004 Coll., on Certain Information Society Services
Estonia
Information Society Service Act
France
Falls under the Commission Nationale de l’Informatique et des Libertés (CNIL) [National Data Processing and Liberties Commission], Electronic Mailing and Data Protection (Oct. 14, 1999) (French) CNIL Guidelines on email marketing.
Germany
Art. 7 German Unfair Competition Law (Gesetz gegen Unlauteren Wettbewerb) (UWG)
Art. 202a, 263, 303a, 303b of the German Criminal Code Art. 6 of the German Law regarding Information Society Services Art. 28 Par. 4 of the German Data Protection Act
Italy
Italy’s anti-spam laws are very strict. You can even be imprisoned for sending spam. If you’re sending to Italian recipients, follow these guidelines as well.
Personal Data Protection Code (legislative decree no. 196/2003)
The Code transposed EC Directive 95/46 on the protection of personal data and EC Directive 2002/58 on privacy in electronic communications; it consolidated all Italian pre-existing laws and regulations in this sector.
DL 196/2003 Personal Data Protection Code • DL 675/1996 on privacy protection states, inter alia, that a company must have authorization from each user whose personal data (such as e-mail) they want to use. • DL 171/1998 (deriving from the European Community directive 97/66/CE) on telecommunications privacy protection: this put outlaws all automatic systems to call a user and says that all the expenses of an advertising must be paid by the company and not the user (faxes and e-mails are instead paid also by the user).
DL 185/1999 (deriving from the European Community directive 97/7/CE) on customer protection with respect to long-distance contracts: this obliges companies to seek the permission of the user for virtual or telephone sales.
Netherlands
Dutch law requires very explicit permission and heavily protects data and privacy.
New Zealand
The Unsolicited Electronic Messages Act 2007. The Department of Internal Affairs provides detailed guidelines on the anti-spam laws.
Sweden
Swedish Marketing Act (Swedish Code of Statutes, SFS 1995:450).
Personal Data Act (Swedish Code of Statutes, SFS 1998:204), in so far as spam activities involve processing of personal data.
Sending invitations via Events.com is a privilege that we provide our event organizers. We must actively protect our mailing reputation so that invites sent from Events.com reliably arrive in recipient’s inboxes, and must restrict access in some cases. There are two reasons why event organizers cannot use the invitation feature:
1. The event is in an organization that does not have a payment account. You can set up a payment account by clicking on PAYMENT INFO on the left-hand navigation within your event. For the steps to set up your own Stripe account click here. To set up an ACH direct deposit here.
2. Your email privileges have been revoked due to sending one or more mailings with high bounce or spam rates. Learn more now
Tip: If you want to take advantage of the invitation functionality in Events.com and currently are not able to do so, please contact our support at help@events.com.
The Refer-A-Friend tool is a great way for your attendees to get the word out about your event. What better way to get all of your attendees to use this feature than to add a financial incentive! You can add incentives for the referrer, the referee, or both!
1. Log In to your Events.com account.
2. Choose the event that you want to edit.
3. Go to Promotions in your left navigation, and then to Refer-A-Friend.

4. You will see the options Email and Social. You can utilize both parts so that people can refer their friends through an email OR share a unique link through Facebook and Twitter.

5. To enable, make sure the YES/NO button on the top right is set to YES

Setting up the Refer By Email tool.
1. Enter the number of friends a referrer must have in order to get a discount, as well as the discount amount (percent or dollar) that will apply to their highest priced registration.

2. Enter the number of friends that will get a discount when they register, and specify the amount of that discount.

3. You will be able to Preview what your attendees will see as they register to your event. The Refresh button will show you the latest changes you made in step 1 and step 2.

4. Click Save
Setting up the Refer With Unique Link tool.
1. As with email, you can choose the number of friends that will receive a discount, and specify that discount. Due to social media policies it is not possible to offer the current purchaser a discount.

2. You can preview what your attendee will see in their registration, and the social media icons that allows them to post on Facebook and Twitter. Your attendees will need to allow pop-ups to post to Facebook.

3. Click SAVE
Pro Tip: Refer-A-Friend can also be effective without adding a discount. You can have it available for your attendees to share with their friends with or without a discount at any time.
Facebook events are a great way to boost ticket sales, visibility, and sharing! Follow the steps below to easily link your event to Facebook!
1. Log In to Facebook and go to your event’s Business Facebook page.
Note: Don’t have a Facebook page set up for your business yet? Here is a quick how-to article
2. On your business page, click the Create Event button above your feed.

3. Fill out the basic information about your event (name, date, time, etc). In Admission, click the + beside the Ticket URL field, and add your Events.com Event URL.

4. Publish your event, and you’re all set! Users can now find your event on Facebook and purchase tickets via the link to your Events.com event page.
With Events.com you have full control over the creation and management of your event’s discounting for multiple purchases. You can set up a promotion for your participants based on their Registration/Ticket type and the quantity they are purchasing with the Multi-Quantity feature.
1. Log In to your Events.com account.
2. While in your event, click on PROMOTIONS and select Multi-Quantity on the left side of your screen.
3. Enter your Multi-Quantity information.
- DISCOUNT – Choose between a flat amount ($) or a percent (%) off of the purchase price.

- REGISTRATIONS – From the dropdown menu, you can select which tickets/registrations the discount applies to.

- DATE & TIME AVAILABLE – From the dropdown menu, you can select the time frame this quantity discount will be valid.

- BUY – Set the amount of tickets that are required to obtain the discounting. (Ex: 4 or More). The discount that applies off of each eligible item displays in the next box. And in the final box, select the maximum number of items to be discounted.

4. Click SAVE at the top or bottom of the page before navigating to a new page. Based on the date you added, the promotion is ready for your attendees!
We’ve synced with MailChimp so you can keep your contact list up to date! If you haven’t synced yet please check out – How do I contact my attendees?
If you have synced and are ready to send an email, this is for you! MailChimp does have a full glorious help center of their own but we’ve found the following steps have helped our organizers get a quick introduction to sending off their first message.
1. Log In to your MailChimp account.
2. Click Campaigns in the upper left – then in the upper right.

3. Click Email, enter a Campaign Name (this is for you) and click BEGIN.

4. Follow these 4 areas to set the Campaign Info. Of the four sections, select Design Email which we’ll dig deeper into in the next step. After clicking that you will select a layout template, we recommend choosing Basic.

5. Designing your Basic template. It starts you with some building blocks. If there’s anything you don’t want, hover your mouse on it and click the trash can.

If you want to add a logo, click the block and the Content window will open on the right, you can click Replace – Upload (select your image). It will import for you. If you are finished you can click Save & Close at the bottom. This will refresh to the Content Menu on the right side.

To insert an image block, you can click on the Image icon and drag it to the main display.
To edit the text box, click on it and it’ll open the content on the right side with the formatting tools.
The next building block is the social media links, when clicking this it’ll open them to be updated on the right.

You can remove any icon or add another icon in Content on the right. If you want to remove the whole block, hover on the box on the left side and click the trash can. If you’re adding any click Add Another Service, enter in your pages and click Save & Close to finish.

The part at the very bottom will populate with the info you added to your account. This will display in a test if you want to view it before sending.

When you’ve finished your campaign, click the blue Save & Close on the lower far right.
6. You can now send yourself a Test Email to view before sending to your attendees.

7. When you’re ready, you have two options for sending. You can send right now, by clicking Send in the upper right, or click Schedule if you’d like to set a time/ date. Finish later will take you back to the main page.

Pro Tip: You can repeat these steps for each campaign to give your valued attendees the information they need, every time! Other related articles:
How do I manage my MailChimp account after I sync my lists on Events.com?
Events.com understands that there are many points in the event cycle where an organizer might like to contact their attendees, such as promotion of new products, up-selling, relaying or reminding of important information. We have integrated with MailChimp, a popular email marketing service, to help make this happen. You can sync your MailChimp account to your event, so your attendees can be added to your contact list automatically.
To start syncing…
1. Log In to Events.com
2. Click on EMAIL tab in the top Organizer navigation
3. Log in to your MailChimp account (you will be prompted to create an account if you are a new user).
4. Find your listed event and select desired MailChimp Lists from the dropdown. If you would like to create a new list, click CREATE NEW LIST and name your new list.

5. To ensure your list is up to date, click SYNC. The date of the last sync will display in the status column. The lists will automatically sync every 24 hours.
6. After the syncing is complete, you can log into MailChimp and begin using your list right away!
If you’d like any tips on creating a MailChimp Campaign, please check out our helpful article – How do I send an email in MailChimp?
Note: Due to anti-spam laws, a street address may be required in order to sync. This can be added in your organization Settings (top Organizer navigation).
At Events.com we understand that the world of events moves quickly. Sometimes, after an invitation has been sent out, you might realize that there are more people that you want to reach. Instead of starting again, we’ve made it easy for you to send the existing invitation to these new people. You can make this happen by following these steps:
1. Log In to your Events.com account.
2. As an organizer your first screen will be your organization’s dashboard. You can select between your LIVE, DRAFT and COMPLETED events. For this task, select LIVE, and click on the event that includes the invitation(s) you’d like to edit.
3. Go to PROMOTIONS in the left navigation, then select Invitations, and find the name of the specific invitation you’d like to add to. Click Manage, then click view/edit.

4. Scroll down until you see the Add Invitees section. You can Download the template from here if needed. Prepare your new list with First Name, Last Name and Email and save. Click BROWSE, and upload your file of the additional attendees you wish to include in your invitation.
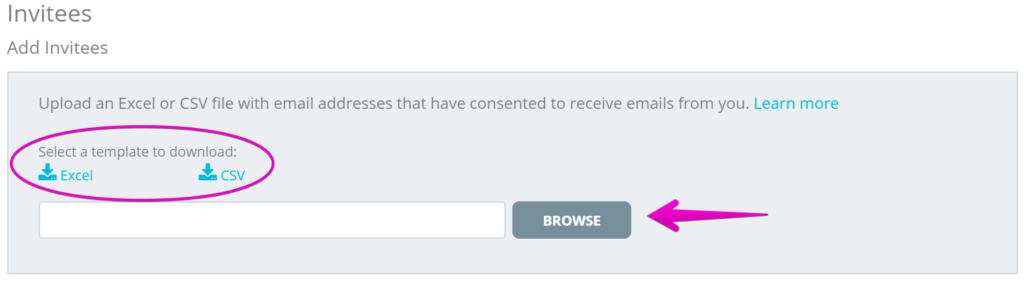
5. Once you’ve uploaded your new attendee list, the system will prompt you with the Success! alert, telling you the total amount of invitees that have been added.

6. Now you’re all set to SEND the invitation! (Don’t worry, those who have already received an invitation will not receive another one from this process)
If you haven’t sent an invitation yet, check out our helpful article – How do I use invitations?
Sometimes after sending an invitation to a list of contacts, you may notice that there are still a number of invitees who have yet to redeem their voucher(s). Events.com makes it very easy to resend invitations. Here’s how:
1. Log In to your Events.com account.
2. As an organizer your first screen will be your organization data. You can select between your LIVE, DRAFT and COMPLETED events and choose the event you would like to resend invitations for.
3. Go to PROMOTIONS in the left navigation, and then select Invitations.
4. Find the invitation by its name, and click Manage, then click View/Edit
5. Scroll down to the third section, where you will see your Current Invitees. From here, you can now click RESEND ALL ‘NOT REDEEMED’, which will resend your invite to remind your contacts to register for your event.

Since we want to make sure you never do this by mistake, the system will always prompt you with the following confirmation alert:

6. Once you are all set, you can click YES, SEND!
Pro Tip: If you wish to add invitees to the invitation at the same time, do the RESEND and then Add Invitees to ensure the new people are only getting it once. For the steps on adding new invitees check out this helpful article – How do I add new invitees to an existing invitation?
As an event organizer, sometimes you want to make reference to why a certain promo code was generated for your guests. We at Events.com make it easy! Follow these steps, and you will be able to add notes to any and every event level promo code moving forward.
1. Log In to your Events.com account.
2. As an organizer, your first screen will be your organization data. Select between your LIVE, DRAFT and COMPLETED events, and find the event for which you want to add notes to promo codes.
3. Click on PROMOTIONS in the left column, and click Promo Codes. Then, click the Settings (gear) icon, and you will see the Notes section below. Click into the box and start typing up to 600 characters.
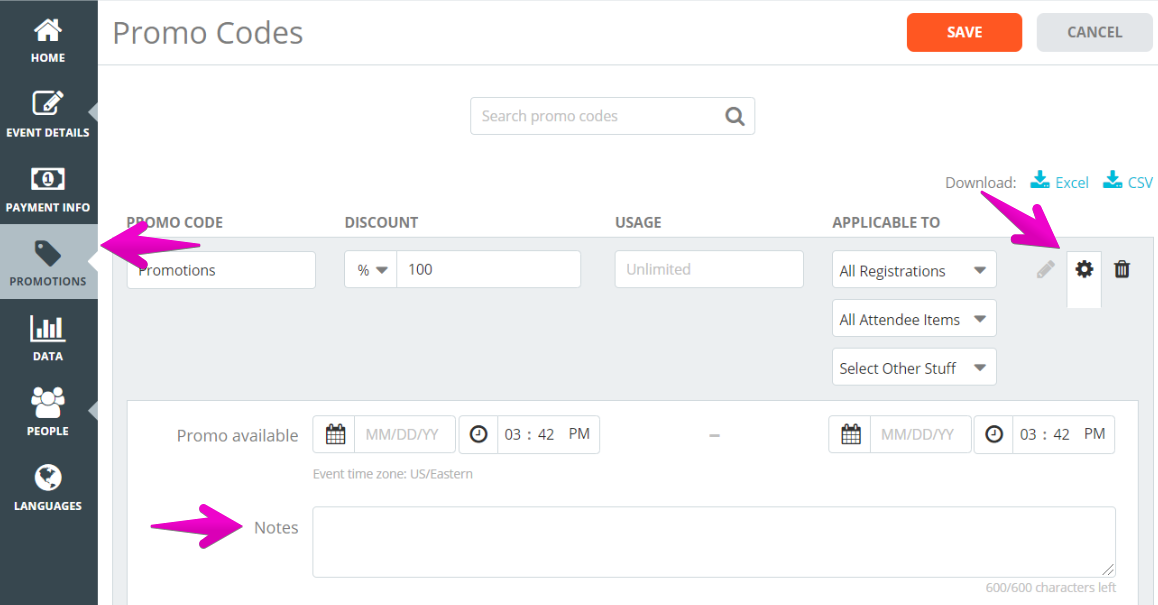
4. When you’re finished press SAVE! Your note will be viewable in the settings for any future needs.
The Affiliate Program provides you with all of the features needed to start affiliate marketing with promoters. This is a popular tactic to drive sales and generate significant online revenue.
Affiliate marketing on Events.com is the process by which a promoter earns a fee for the resulting sales from marketing an event organizer’s registrations/tickets. The event organizer can add as many promoters as they want. The promoter, earns a fee from every sale they make (set by you). The sales are tracked via affiliate links from one website to another.
To get started, click Affiliate Program in your organization menu.

Within the Affiliate Program, you can Add Promoters (people that will be selling on your behalf). Add PROMOTER NAME, EMAIL, their unique CODE (added to their custom URL), REFERRAL FEE (what they’ll earn from each sale) and select which events this information APPLIES TO. If you’d like to track a promoter’s progress separately for different events, you’d select one event in the APPLIES TO drop down, and then click the + to open more fields to create another CODE for a different event (x to remove). They could also have two (or more) different codes for one event, if they wanted to track different methods or their marketing distribution.
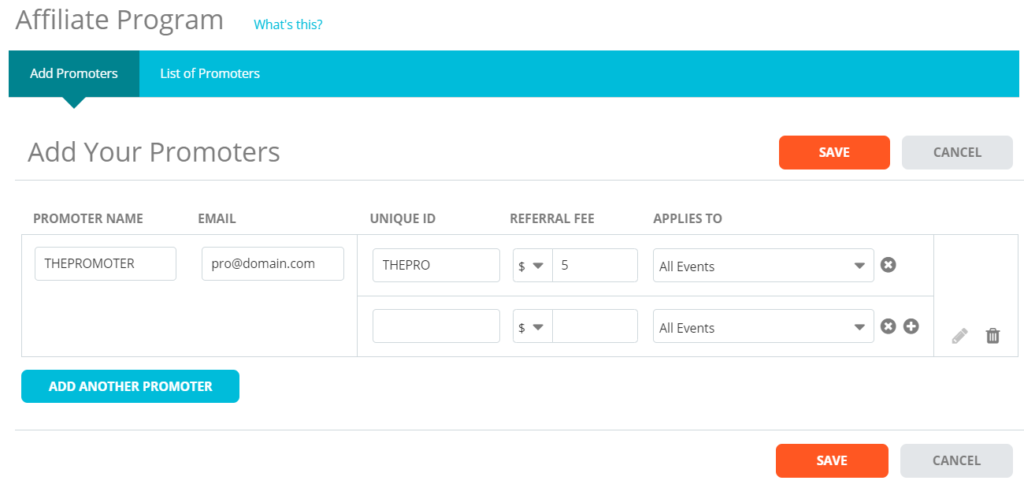
When you’ve finished adding your promoters click SAVE. You can then copy the link (from the Generated Link drop down) if you’ll be sending your promoter’s emails directly from you, or you can click EMAIL PROMOTER to create their Affiliate Program Invitation.

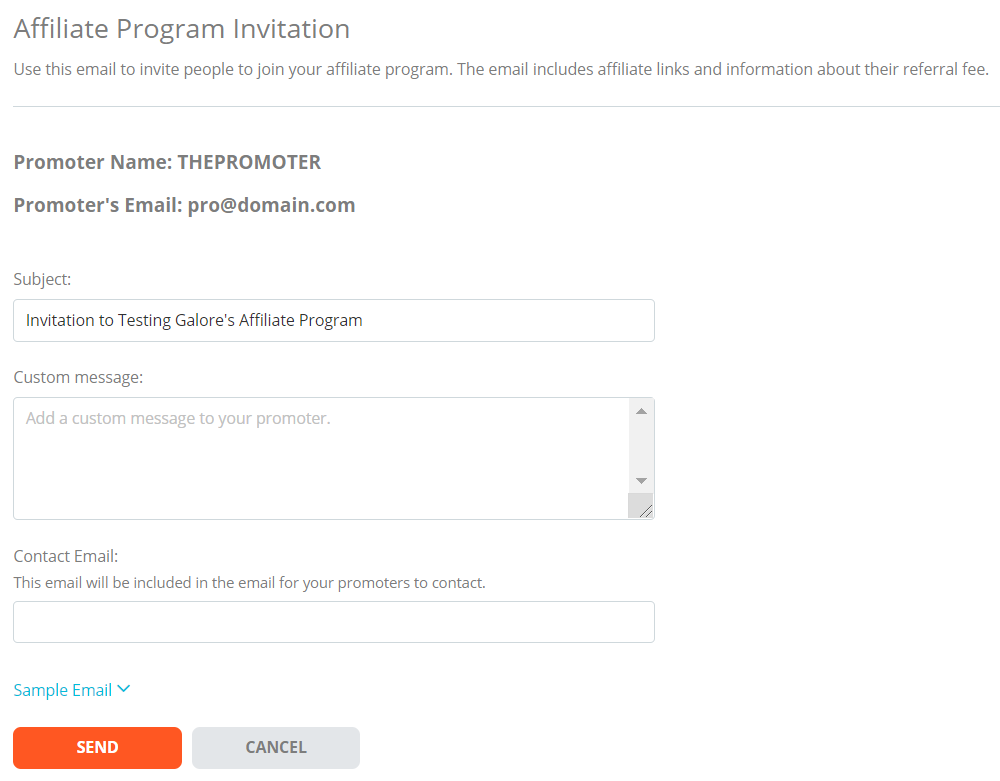
You can add a custom message, select an email to include into the email to be provided as contact, and the details – custom link, event date & time and the referral fee will be listed for them. Click Sample Email to view a sample. And when ready, click SEND!
When your program is up and running, at any time you can view your promoter’s progress by clicking List of Promoters.

This will list each active promoter that you have, and how many registrations/tickets they have sold. If a promoter has more than one code, click the down arrow to view their codes individually.
You can also download a report to view each transaction of registrations/tickets associated with your promoters.
Pro Tip: Referral fees can’t be set to $0 as they are intended to record incentives for your affiliates. The platform does not pay out on your behalf however, so you are able to make your own custom agreements. If you choose to make a custom agreement, we recommend copying and pasting the affiliate link for your promoter directly as the affiliate program invitation will confirm the details set (as shown in the sample email).
As an Event Organizer, you may want to email your attendees some new or last minute information. Our Email Active Attendees feature will let you do just that! Please contact our Customer Success team at help@events.com to request access for your event and then you’ll be ready to follow the steps below!
1. Log In to your Events.com account.
2. As an organizer your first screen will be your organization data. You can select between your LIVE, DRAFT, and COMPLETED events and find the event for which you want to assign attendee numbers.
3. Click PEOPLE on the event card to open your Attendees page. Or PEOPLE and then Attendees, if you’re already inside your event.

4. Click the ATTENDEE ACTIONS drop down button on the right side and select Email Active Attendees.
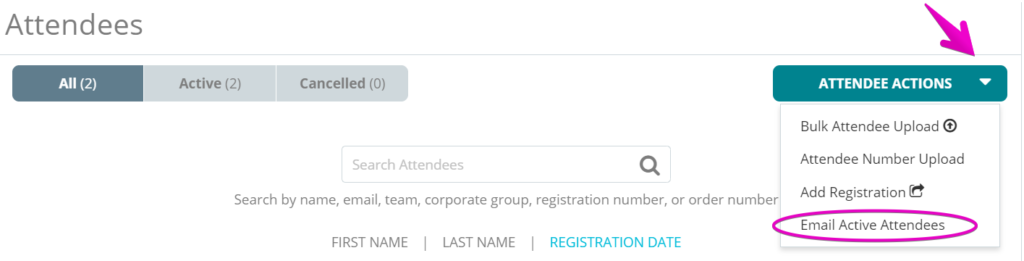
5. Click COMPOSE AN EMAIL to open the email editor.
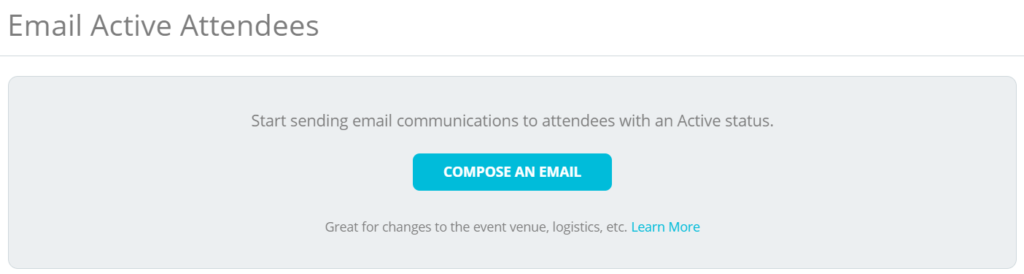
6. You can segment your Email recipients from your list of registrations/tickets and add a unique subject for your Email subject. Your event name will display in the From field.
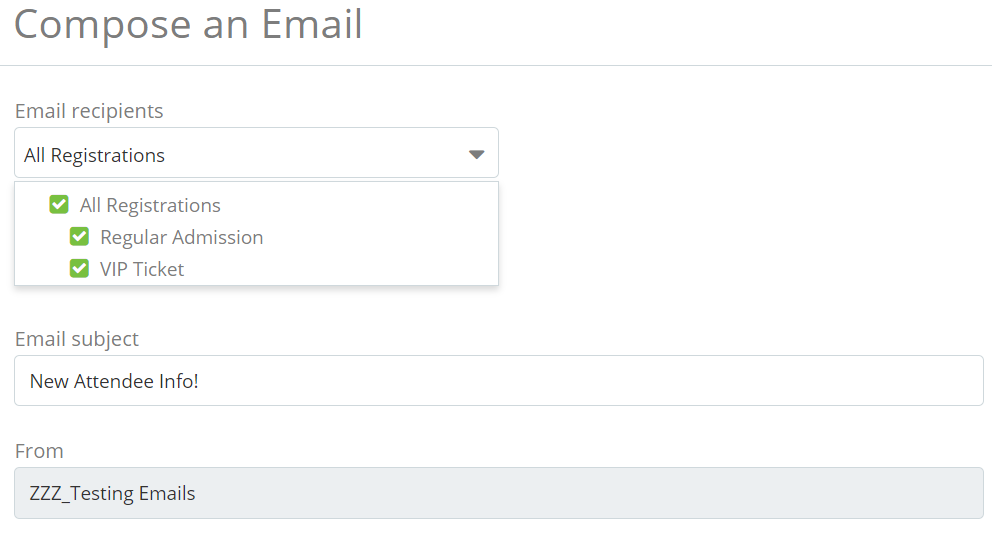
7. Your Message to Recipient(s) can be customized with images, stylized font, alignment, lists and hyperlinks.
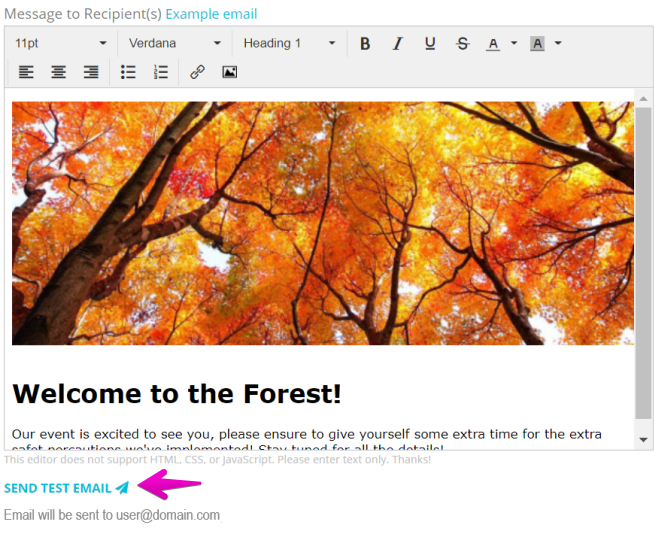
You have the option to send yourself a test by clicking SEND TEST EMAIL. It will deliver to the email of the logged in user.
When you finish your message, you have the options of Send now, Schedule send or Save draft. Clicking Send now will send your email to all of your active attendees in real time. After sending it will be available in your list and can be sent to new attendees. Schedule send will allow you to select the date and time you want your message to be sent. You can edit your message or change the date or if left it will send out on your set date/time. When you Save draft, you can also open your message later to edit to Send now or Schedule send.
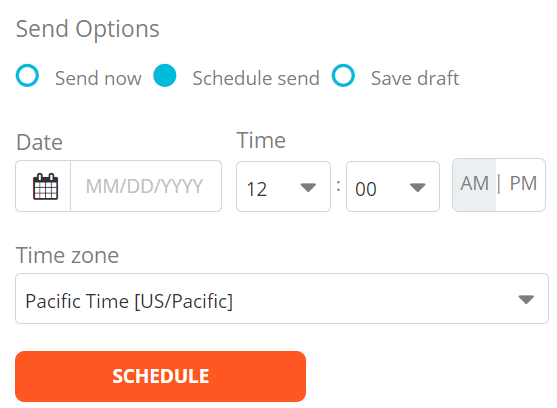

Pro Tip: If you have a banner added to your Custom Confirmation Message, it’ll be added automatically for you to use in your communication to active attendees. (You can edit your Custom Confirmation Message, by opening Custom Confirmation from your Event Details tab)
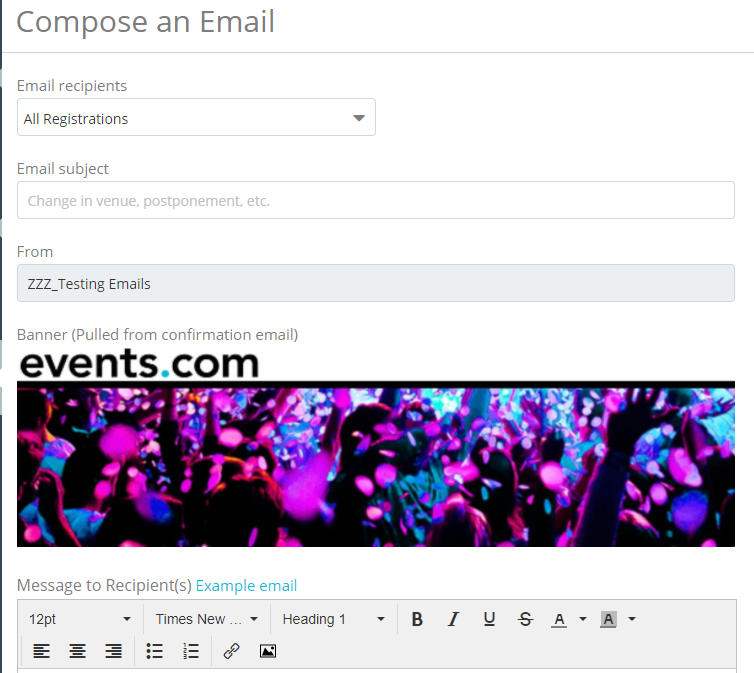
EveryHere™ App (15)
The EveryHere™ App gives you the ability to check your attendees in quickly, helping to alleviate long lines and simplify your check-in process.
The app also helps you keep track of when an attendee picks up any items associated to their order (such as T-shirts, hats, etc.), so can you see who has (and hasn’t) received their items.
1. Make sure the Attendee Details toggle is set to ON (in Event Set-Up under Check-In Settings)
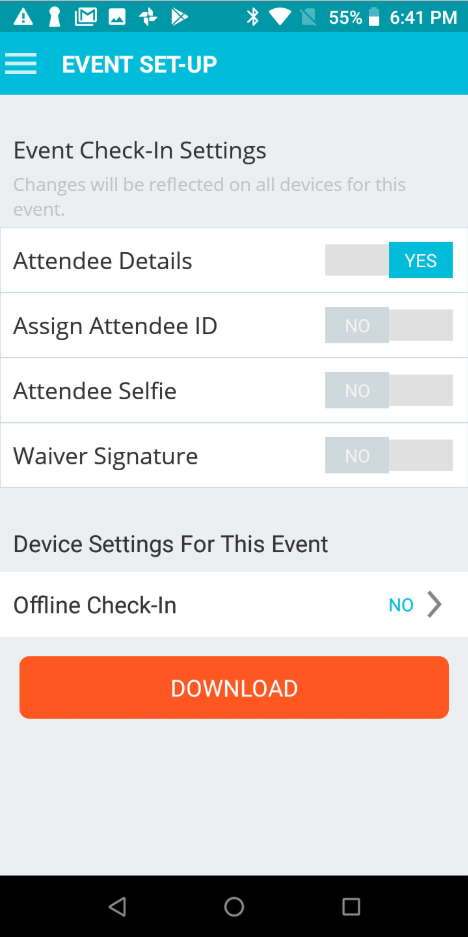
2. When you get to the Attendee Details page in the check-in flow, you’ll see checkboxes next to the attendee’s items. (Don’t worry, if your attendees are supposed to pick up their items from another person/location, see Step 3.)
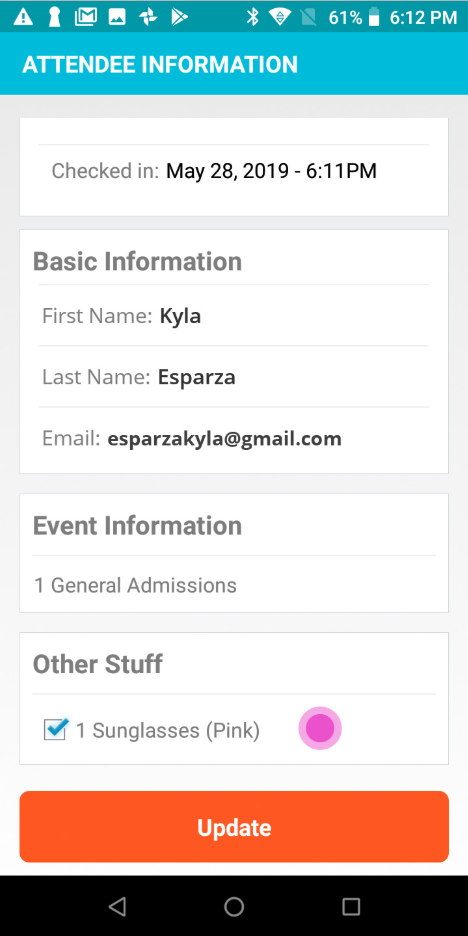
3. If your attendee picks up their items in a different area from where they are being checked in, simply search for their name and click the ‘i’ button next to it. This will bring up their Attendee Details again.
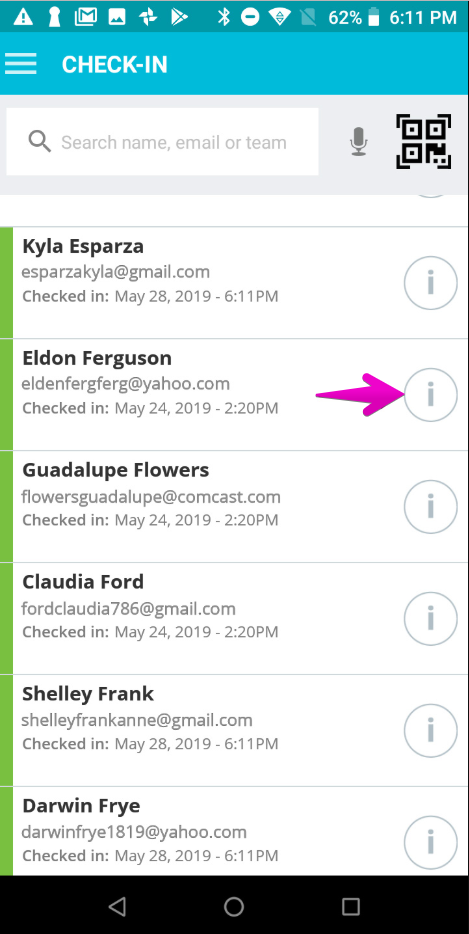
4. Check the boxes when you give your attendee their items.
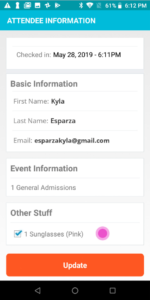
Note: If using wifi, this information will sync up across all your devices, keeping check-in staff on the same page.
We understand that many events do not have reliable wifi or cellular connection. Therefore, the EveryHere™ App will work in both online and offline mode.
To set your Online or Offline Mode:
1. Log in to the Event EveryHere™ App
2. Choose an event
3. Click the menu icon to open up your navigation. Go to EVENT SET-UP
4. Click Offline Check-In
5. Toggle Offline Check-In to YES or NO


Below are some important considerations when deciding which mode will work best for your event:
Online Check-In:
- Each completed check-in will be synced to Events.com and other devices immediately.
- Check-ins completed on other devices, new registrations, cancelled registrations, and information updates will be reflected automatically on your device.
- Minimal amount of attendee information is downloaded to the device to minimize memory usage.
Offline Check-In:
- Attendee information must be downloaded on the device before leaving an area with network connection.
- The device will not reflect check-ins completed on other devices.
- The device will not reflect new registrations, cancelled registrations, and information updates since attendees were downloaded.
- All attendee data will be downloaded on the device and will use significant device memory (amount depends on number of attendees and attendee information collected).
- Check-in data must be manually uploaded to Events.com.
NOTE: it is not recommended to use selfies when in offline mode. This will drastically increase the time to download the attendee information on to the devices and to sync data back to Events.com.
Below are a few scenarios that you may experience and our suggested check-in mode:
Strong network connection
- We suggest online mode since data is synced automatically to other devices and Events.com.
Spotty or weak network connection
- We suggest online mode since data will sync automatically when there is a connection.
- If there is slowness with the app when in an area with spotty connection, try offline mode to see if there is an improvement.
No network connection
- Offline mode is required when there is no network connection.
- You must download the attendee information while in a connected area.
*Remember, in order to use a cellular network, you must have a 4G plan with high data to support the app.
We understand the importance of keeping lines moving and your event goers happy on event day. We suggest that you do the following to make the best of our EveryHere™ App.
1. Make sure you have access to enough Android devices that run on Marshmallow (6) version with a back camera.
2. If possible, download the app, log in to your Events.com account on the app, and set-up the event for check-in before event day.
3. Encourage attendees to bring their PDF ticket attached to their confirmation email for faster check-in using QR code scanner.
4. Use the search functionality if the attendee does not have a QR code. You can search by name or team name.
5. In order to use a cellular network, you must have a 4G plan with high data to support the app.
6. Keeping the app connected to the network gives you the most flexibility. Have a wifi hotspot available in case your wifi connection is not reliable.
7. If you are using a hotspot and the connection is slow, try removing devices or adding another hotspot.
8. If you will not have reliable network connection, use Offline Mode You will need to download the attendee list in a connected area and upload check-in data when you return to a network connection.
The EveryHere™ App will work on any Android devices that runs on the Marshmallow (6) version or higher with a rear facing camera. If you want to use the rear facing camera to scan barcodes, the device will need auto-focus. Auto-focus is not a requirement for scanning QR codes, but is recommended to ensure scanability in most scenarios.
If you are in the market to purchase devices for event day, we suggest the following low-cost devices:
- Nexus 7 by Asus 2013/2nd Gen (Autofocus)
- Samsung Tab 4 (7in) (No Autofocus)
- Lenovo A3000 7in or 8in (Autofocus)
You can download the app HERE.
PRO TIP: When printing QR codes for the bib/attendee ID scanning, the recommended minimum size is 1.2 x 1.2 inches.

There are two ways to access your event on the EveryHere™ App.
1. Grant access to your organization for each device owner. This will work if your volunteers or staff will all have devices that support the app.
- You can learn how to grant accounts access to your organization HERE.
2. Create a unique account for each device. This works best if you have dedicated devices to use on event day.
- It is recommended that valid emails be used to create accounts so that the accounts can be managed.
Pro Tip: You can add an unlimited number of secondary emails to a Gmail account by using “+”. For example, tester@gmail.com, tester+1@gmail.com, and tester+2@gmail.com can be used to create 3 separate events.com accounts, with emails sent to all accounts will be delivered to the primary account (tester@gmail.com).
At Events.com, we understand that not all events are the same and the tools you may need to manage event day operations may vary from event to event. Because of this, we let you customize the check-in flow in our EveryHere™ App.
1. Log In to the EveryHere™App
2. Choose an event that you would like to set up settings for.

3. Click the menu icon in the upper left corner, and then select EVENT SET-UP.

4. The check-in flow can be customized by turning each of the five settings ON or OFF. By default, all check-in settings are OFF. We suggest keeping this setting if you don’t need to collect any information from attendees or view attendee information, as this will be the fastest way to complete a check-in.
- Attendee Details: This setting will display the attendee information that was collected when they signed up for your event. If they answered any questions, joined a team, or bought additional purchases, the information will be found here.

- Attendee ID Number: Need to associate a unique number to your attendee during check-in? Enable this setting to enter in a bib or other unique number.

- Attendee Selfie: Want to capture an image for each of your attendees? Enable this setting so that a photo is attached to the attendee information.

- Waiver E-Signature: If your event has waivers, you can enable this setting to have your attendees review the waivers and provide an e-signature indicating their agreement.

- Offline Check-In: Learn more about offline check-in HERE


In order to ensure the process your staff and volunteers use while checking in your attendees is the best fit for your event, simply follow the steps below to configure the flow:
- Access the Events.com app on your device and log in using an account that has access to your organization (any role but Timer or Accountant).
- From the Hosting view, select the desired event. You will be brought to the Event Set-up screen.
- Toggle ON any of the steps you’ll need.
- Tap DOWNLOAD at the bottom of the screen.
- That’s it! You will be brought to the attendee list and be ready to check people into your event.

The app will auto-sync with Events.com and other devices in real-time. Any information that you collect during check-in is available on the app and via the Check-In Report on Events.com Event Management Platform.
Below are some steps your staff/volunteers will need to follow to check-in attendees using the EveryHere™ App:
1. Set up the event using these steps.
2. From the Hosting view, select the event you want to work on by tapping on it
3. You will see the Attendee List for this event.
4. Attendees can be found using one of four ways:
- Scroll through the list

- Type in an attendee’s name or team name in the search box at the top of the screen

- Tap on the microphone icon to trigger the voice search and say the attendee’s name or team name

- Open up the QR scanner via the icon at the top of the screen to scan a QR code
 .
. 


5. Once the attendee has been found, swipe right 
6. If all event check-in settings are turned OFF, the check-in is complete. Hooray!
7. If any event check-in settings are turned ON, go through the check-in flow to complete the process.
8. If applicable, you will see a confirmation page that summarizes the information collected from the attendee. You can choose to send a copy of the confirmation to the attendee.
We understand that accidents can happen. Perhaps you checked in the wrong attendee, or you were testing out the app to see how it worked. Either way, you can easily undo a check-in by swiping left on the attendee’s row and confirming that you want to check out the participant.
Please perform this function carefully as checking out an attendee will delete all the check-in data that was collected for the person.


Each event is different, so we wanted the EveryHere™ App to support a way to see attendee information at-a-glance. If you need to look up attendee information on the run or hand out add-on purchases after check-in, there is no need to begin the check-in process for the attendee again.
Simply tap on the information button for the attendee when viewing the attendee list to view their information. If they are already checked in, you will see any additional information that was collected, if any, such as bib number, selfie, or waiver signature.


Once you have completed check-ins while in offline mode, follow these steps to sync the check-in data to Events.com.
1. Return to an area with wifi or cellular connection.
2. Open the event.
3. Go to the Event Set-up screen.

4. Tap on Offline Check-in.

5. Turn Offline Check-in to NO.


The sync will happen automatically. Once complete, the data will be reflected in your reports in Events.com and on other devices using the EveryHere™ App.
You can view check-in data via three separate reports in Events.com. If you had attendees take selfies or sign waivers, the URL to each image will be provided. Simply log into an account with access to the event, and follow the steps below.
1. Log In to Events.com
2. As an organizer your first screen will be your Org Summary. You can select between your LIVE, DRAFT and COMPLETED events and find the event for which you want to view your check-in data.
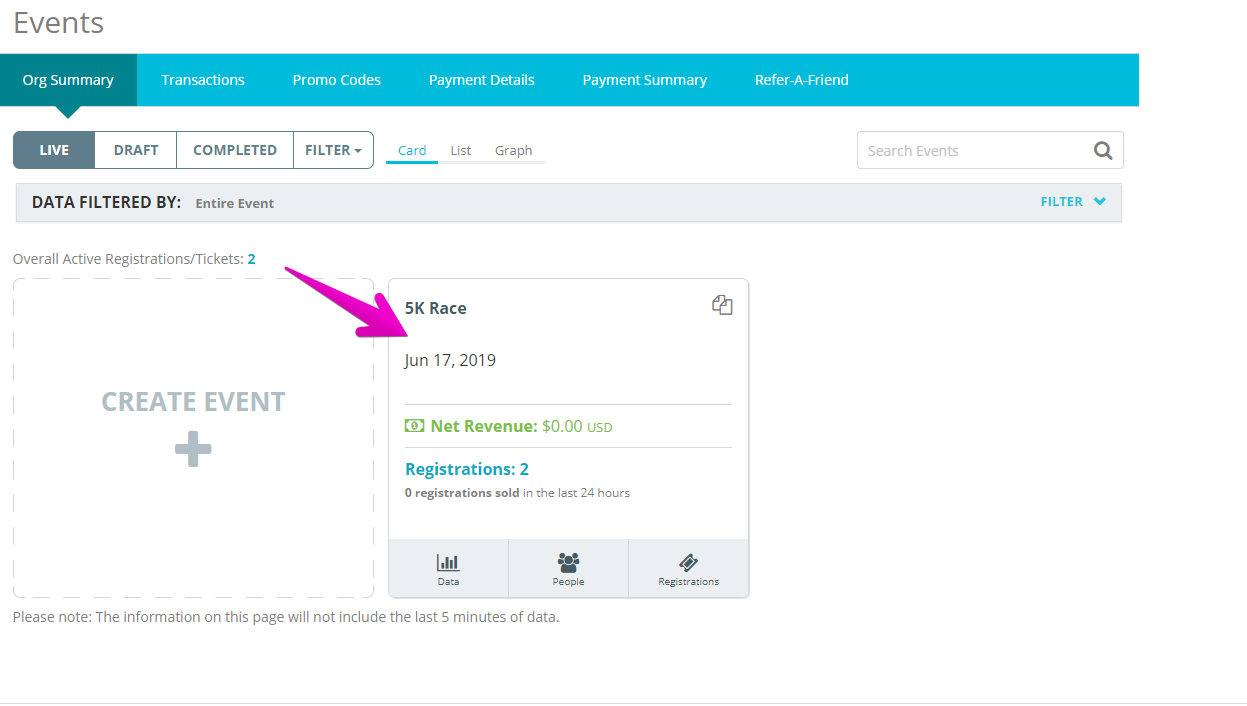
3. Select DATA on your event card. Or if you are already in your event click on DATA in the left side event navigation menu
4. Select the Downloads tab
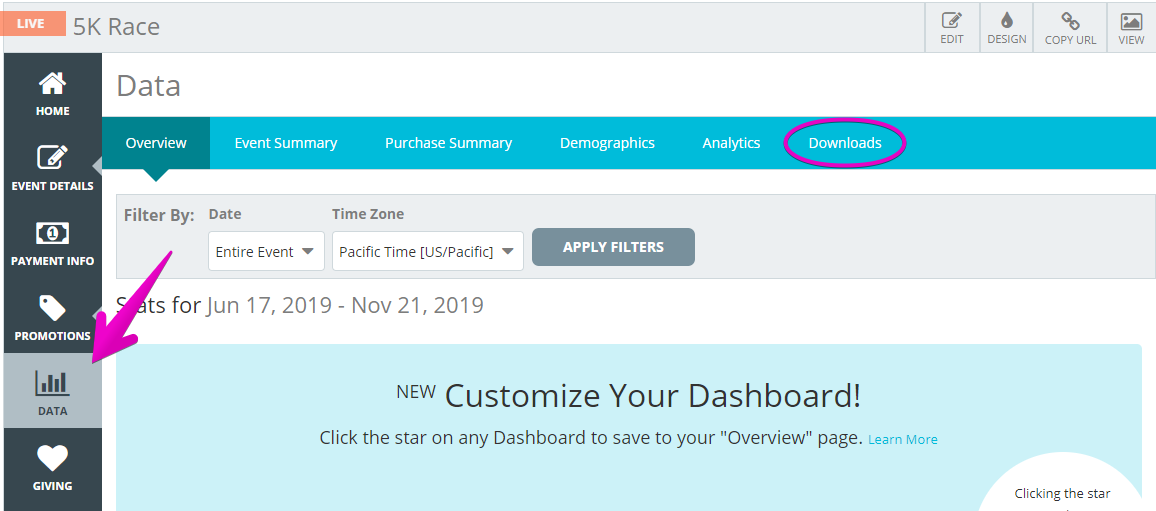
5. In the Select Download dropdown, choose one of these reports and then click GENERATE REPORT. When finished you can download your report from the report list.
- The Registrations report will include check-in data along with the full registration information.
- The Check-In Details report gives individual check-in information for each attendee including status of their check-in and url to their waiver signature.
- The Check-In Summary report provides the summary of how many people checked in each day for each registration/ticket.
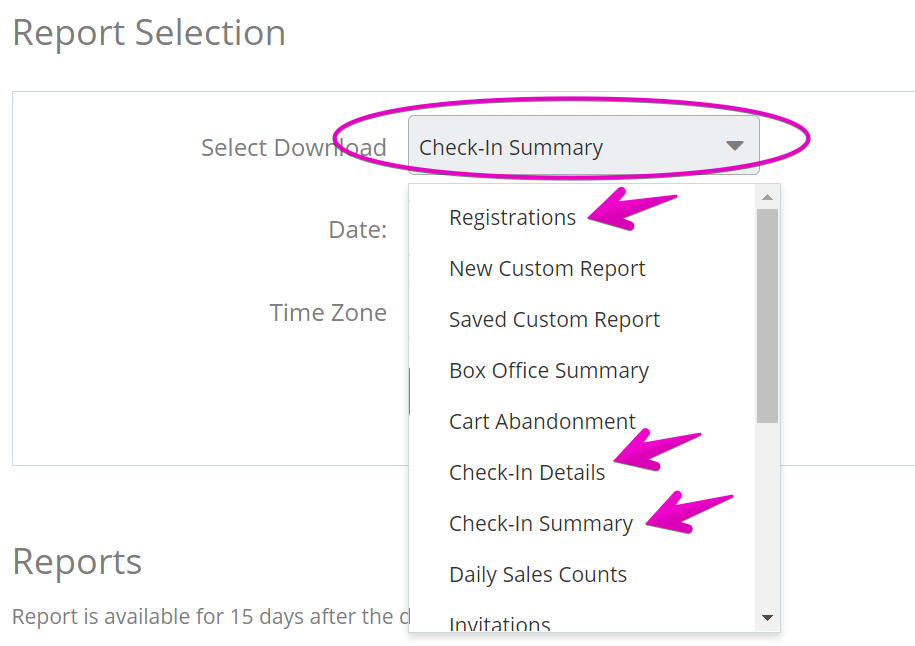
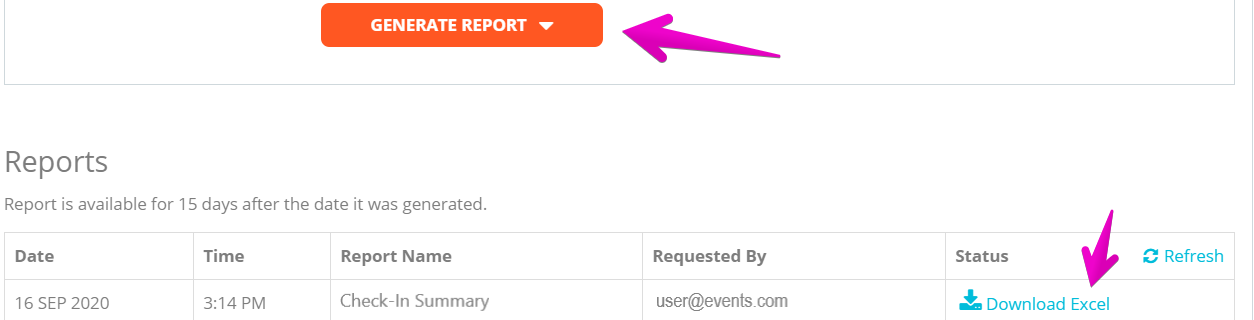
In order to get new events or update event information on the app, you will need to do a manual pull-to-refresh on the Event Hosting Screen.
1. Go to the Event Hosting Screen.

2. Place your finger in the middle at the top of the list and pull down while keeping your finger on the screen.

3. It may take up to 30 seconds to refresh your list, depending on how many events you have.

You can log out of EveryHere™ from the My Settings screen.
1. If you are on the Event Hosting Screen, tap on the gear icon. Scroll to the bottom and tap Log out.


2. If you are on the Attendee List, Event Set-Up, or Data screen tap on the menu icon in the top left and open the My Settings screen. Scroll to the bottom and tap Log out.
 .
. 
With the EveryHere™ App you can create a better experience for your attendees as well as a more efficient check-in flow for you event. You can also gather meaningful data about your check-in process, data that will allow you to learn and grow over time based on your attendees’ behavior.
The Check-Ins Over Time feature, located on the Stats section of the app, tracks the pace of check-ins for your event over a given time period. This will allow you to see, at a glance, when most people arrive onsite and when demand is heaviest. This allows you to better manage volunteers, resources and your time.
The Check-In Summary in your Events.com admin portal will further break down this data and show you how many people per registration/ticket.
When connected to Wifi you can view these stats in realtime. When using offline mode – you can view the results once your check-ins are synched after the event. For more about connectivity and using the app, please click here
How to view your check-ins in the app:
1. Go to Stats in your left side navigation
 .
. 
2. Scroll to Check-Ins Over Time and use the filter arrow to select check-in data for yesterday, today, or any custom date

3. Once your date is selected, you can then view a graph representing the number of check-ins processed over a given time period. Scroll from left to right to view the relative volume of check-ins as it changes over time, as well as the absolute number.

How to view your check-ins in your Events.com admin portal:
1. Log In to your Events.com account and open your event.
2. Within your event, click DATA from the tools on the left.
3. The Overview summary dashboard will appear by default (read about building your Overview Summary here). In the blue navigation tool bar, click Event Summary.
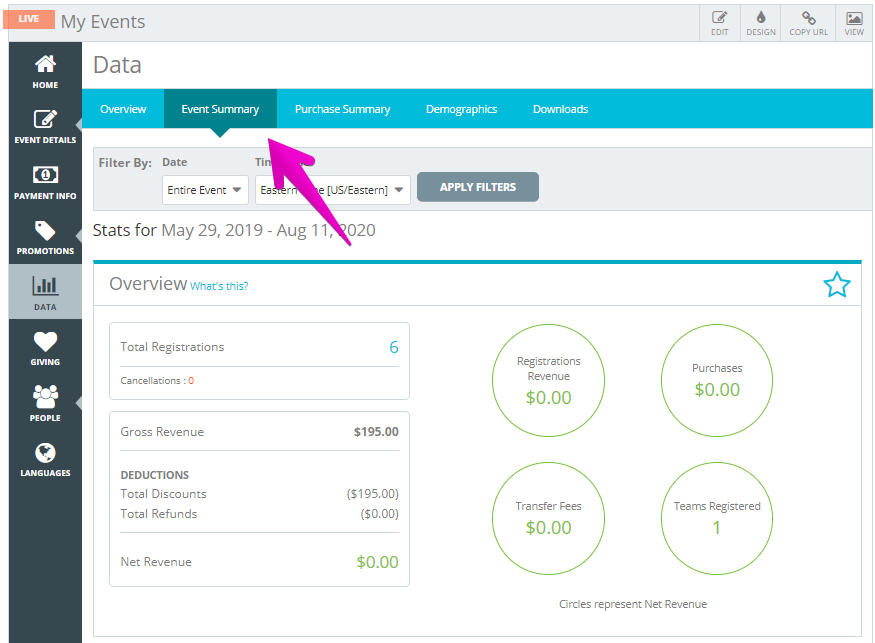
4. Scroll down to your Check-In Summary.
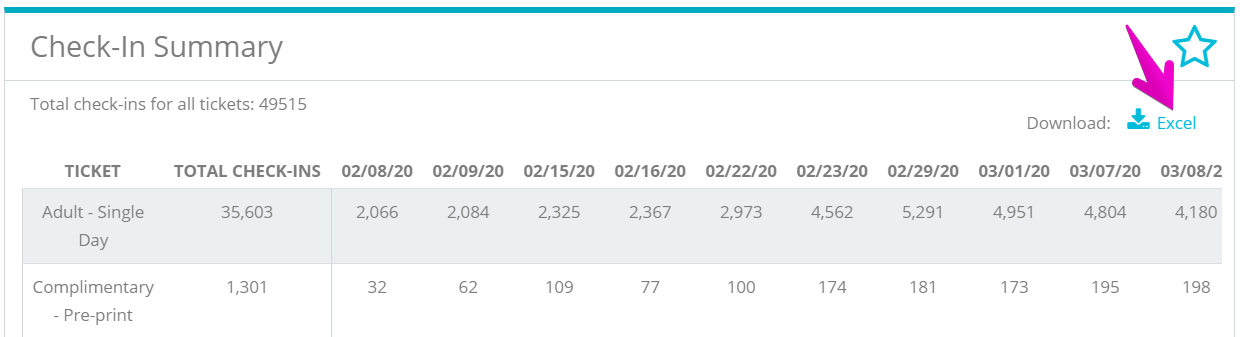
Here the dashboard will display the overall number of registration/tickets that were checked in, as well as break down how many of each were checked in on each day. This information can also be exported as an excel worksheet.

If you are planning an event that takes place on multiple days, and need the registrations/tickets to be available for check-in throughout the duration of the the event, follow these steps during set-up:
1. Log In to your Events.com account
2. Click on the event for which you wish to make registrations/tickets apply to multiple days
3. Click on EVENT DETAILS, then select Registrations / Tickets

4. Next, click on the Settings (gear) icon within the registration/ticket type, and scroll down until you see the option box under Check-in Availability, and click on This ticket will be available to use on multiple days/times (or registration depending on your event).

5. Enter the specific dates of which you wish to allow for check-in, and make sure to click the orange SAVE button at the top or bottom of the page.
Pro Tip: On each new day, any attendees for this Registration/Ticket type will appear like brand new people ready to be checked in. The Events.com report will record the specifics for when they checked in on which day for you. A pop up on the app will tell you if you’re trying to check in someone outside of their check-in.
EverySale™ App (20)
As an event organizer, you can set your order and processing fees to be absorbed by your organization or pass them on to your attendees. Your Events.com EverySale fees settings are separate from your online registration/ ticketing fees settings. You get to choose what works best in both situations! Follow the steps below to set your onsite fees!
1. Log In to your Events.com account.
2. As an organizer your first screen will be your organization data. Choose the event for which you want to set up the online vs onsite transaction fees.
3. Next, go to EVENT DETAILS in the left side navigation and select Settings.
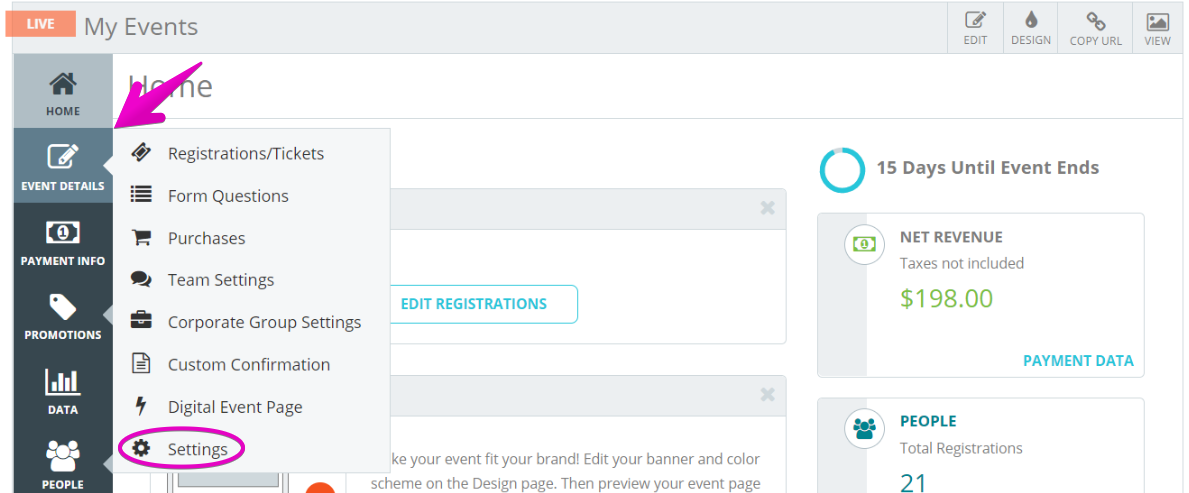
4. Scroll down to the EVENTS.COM EVERYSALE APP section, where you will see the option to Include Events.com fee in price of registration.

Select how you want to manage Events.com onsite order and processing fees.
By toggling it to YES your organization will absorb the fees, or toggle it to NO to pass the fees on to the participant. *You will be able to change this back and forth as needed.
5. Press Save and voilà you’re done!
More information below on how fees work:
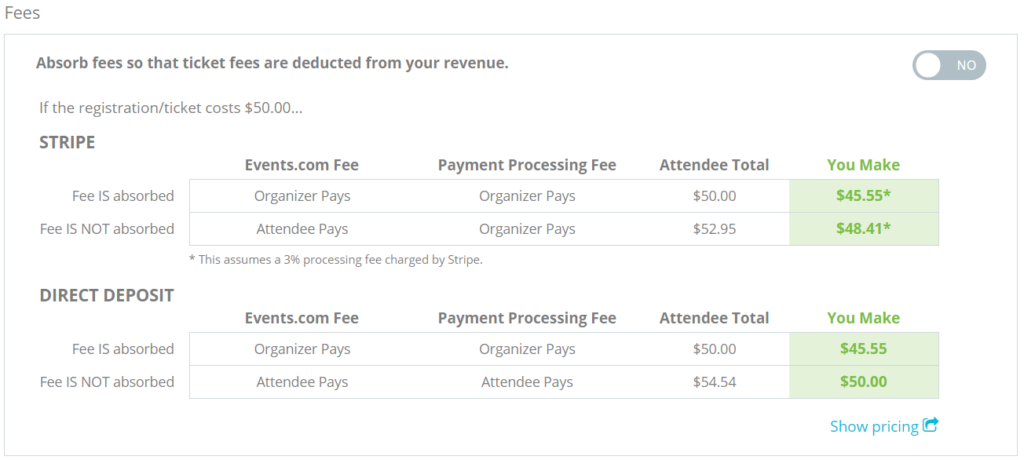
Please note: If you are set up for direct deposit your processing fee will apply to your order in the same way you’ve selected to apply your Events.com fee. If you’ve selected to pass them on to your attendees, both the Events.com order fee and processing fee will be passed on (added to the order).
If you have set up a Stripe Connect account, your processing fee is automatically absorbed. You still have the option of whether or not you’d like to set the Events.com order fee to be included in your price or not. If you have any questions, please contact our help desk at help@events.com
Events.com EverySale app gives event organizers the tools to easily and securely sell tickets, registrations, merchandise on-site, and more at their events. The mobile app is available for Android devices on Google Play. We suggest using Android tablets, though Android-enabled smartphones work too. Read How do I use the Events.com EverySale™ app? for a step-by-step guide to using the app. ![]()
To use the Events.com EverySale app you must first set up an event on Events.com. Your event must: (1) be set to Live, (2) have at least one ticket or registration, and (3) have your payment information set up.
1. Make sure you have at least one event set up on Events.com
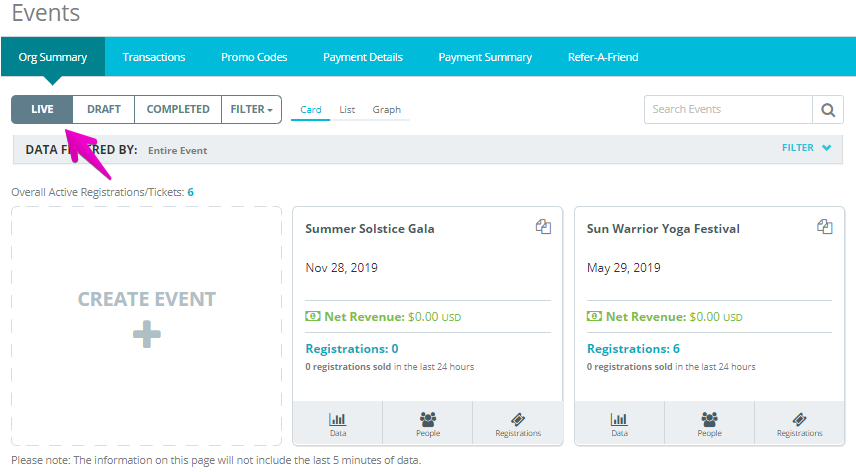
2. Your event must be live in order to show up on the app
3. Go to Google Play to download the Events.com EverySale app![]()
4. Log in to the app using your Events.com log in information
You’re ready to go! Please check out other help articles if you have other questions about using the app. We suggest reading How do I use the Events.com EverySale™ app? if you’d like a step-by-step guide to using the app.
If you need assistance with creating an event and going live, please take a look at How do I create an event?
The app can accept payments made by credit card, cash, or check. Secure credit card processing is available in both Box Office and Self-Service modes. To accept cash or checks, the app must be used in Box Office mode.
1. To set up payment types, log in to the Events.com EverySale app
2. Select the event for which you want to set up payments
3. Click the START ON-SITE SALES button

4. Choose either The Event Staff – Box Office Style or My Attendees – Self-Service. Remember, The Event Staff option gives you the choice of Credit Card, Cash, and/or Check, while My Attendees only has Credit Card available
5. After choosing who will be managing checkout, you will be able to choose the form(s) of payment you wish to accept while using the app. Below are the choices for Event Staff. If you set up for your Attendees, the setup will confirm that it is credit card only. Click CONTINUE to finish and start selling!
Yes, the app works with select thermal printers so you can print individual tickets, as well as a single order receipt. If you need help selecting your printer please refer to our article – What kind of hardware equipment do I need to use Events.com EverySale™ app?
If you’re ready to set up your printer, please follow the steps below!
1. Log in to the Events.com EverySale app
2. Select the event for which you want to set up a printer
3. Go to the event settings page
4. Turn Print Tickets or Print Registrations to ON and follow the prompts to select a nearby printer
5. Connect the printer’s power cord into the back of the printer and then to an electrical outlet
6. Connect the printer to the router
7. Plug one end of an ethernet cable to the back of the printer and the other end into any available port on the router (or switch)
8. Turn on the printer and wait for the blue light to stop blinking and appear solid.
Pro Tips: If using more than one printer, we suggest labeling each printer for easier setup
If using your own printer(s), the name of the printer will display when you search for it in the app’s event settings page
If renting a printer from Events.com, the printer’s MAC address will be labeled on the printer, select this when choosing a printer in the app’s event settings page – email help@events.com for more info.
No, the Events.com EverySale app can be set to Self-Service mode so your attendees can purchase their tickets on-site without event staff. Though we recommend having event staff nearby to provide assistance.
1. Log in to the Events.com EverySale app
2. Select the event for which you want to set up on-site sales
3. Click the START ON-SITE SALES button
4. Choose the My Attendees – Self-Service management option
Remember, The Event Staff option gives you the choice of Credit Card, Cash, and/or Check, while My Attendees only allows the Credit Card option. If you need further information on the forms of payment accepted and further details: What forms of payment are accepted with Events.com EverySale™ app at my event?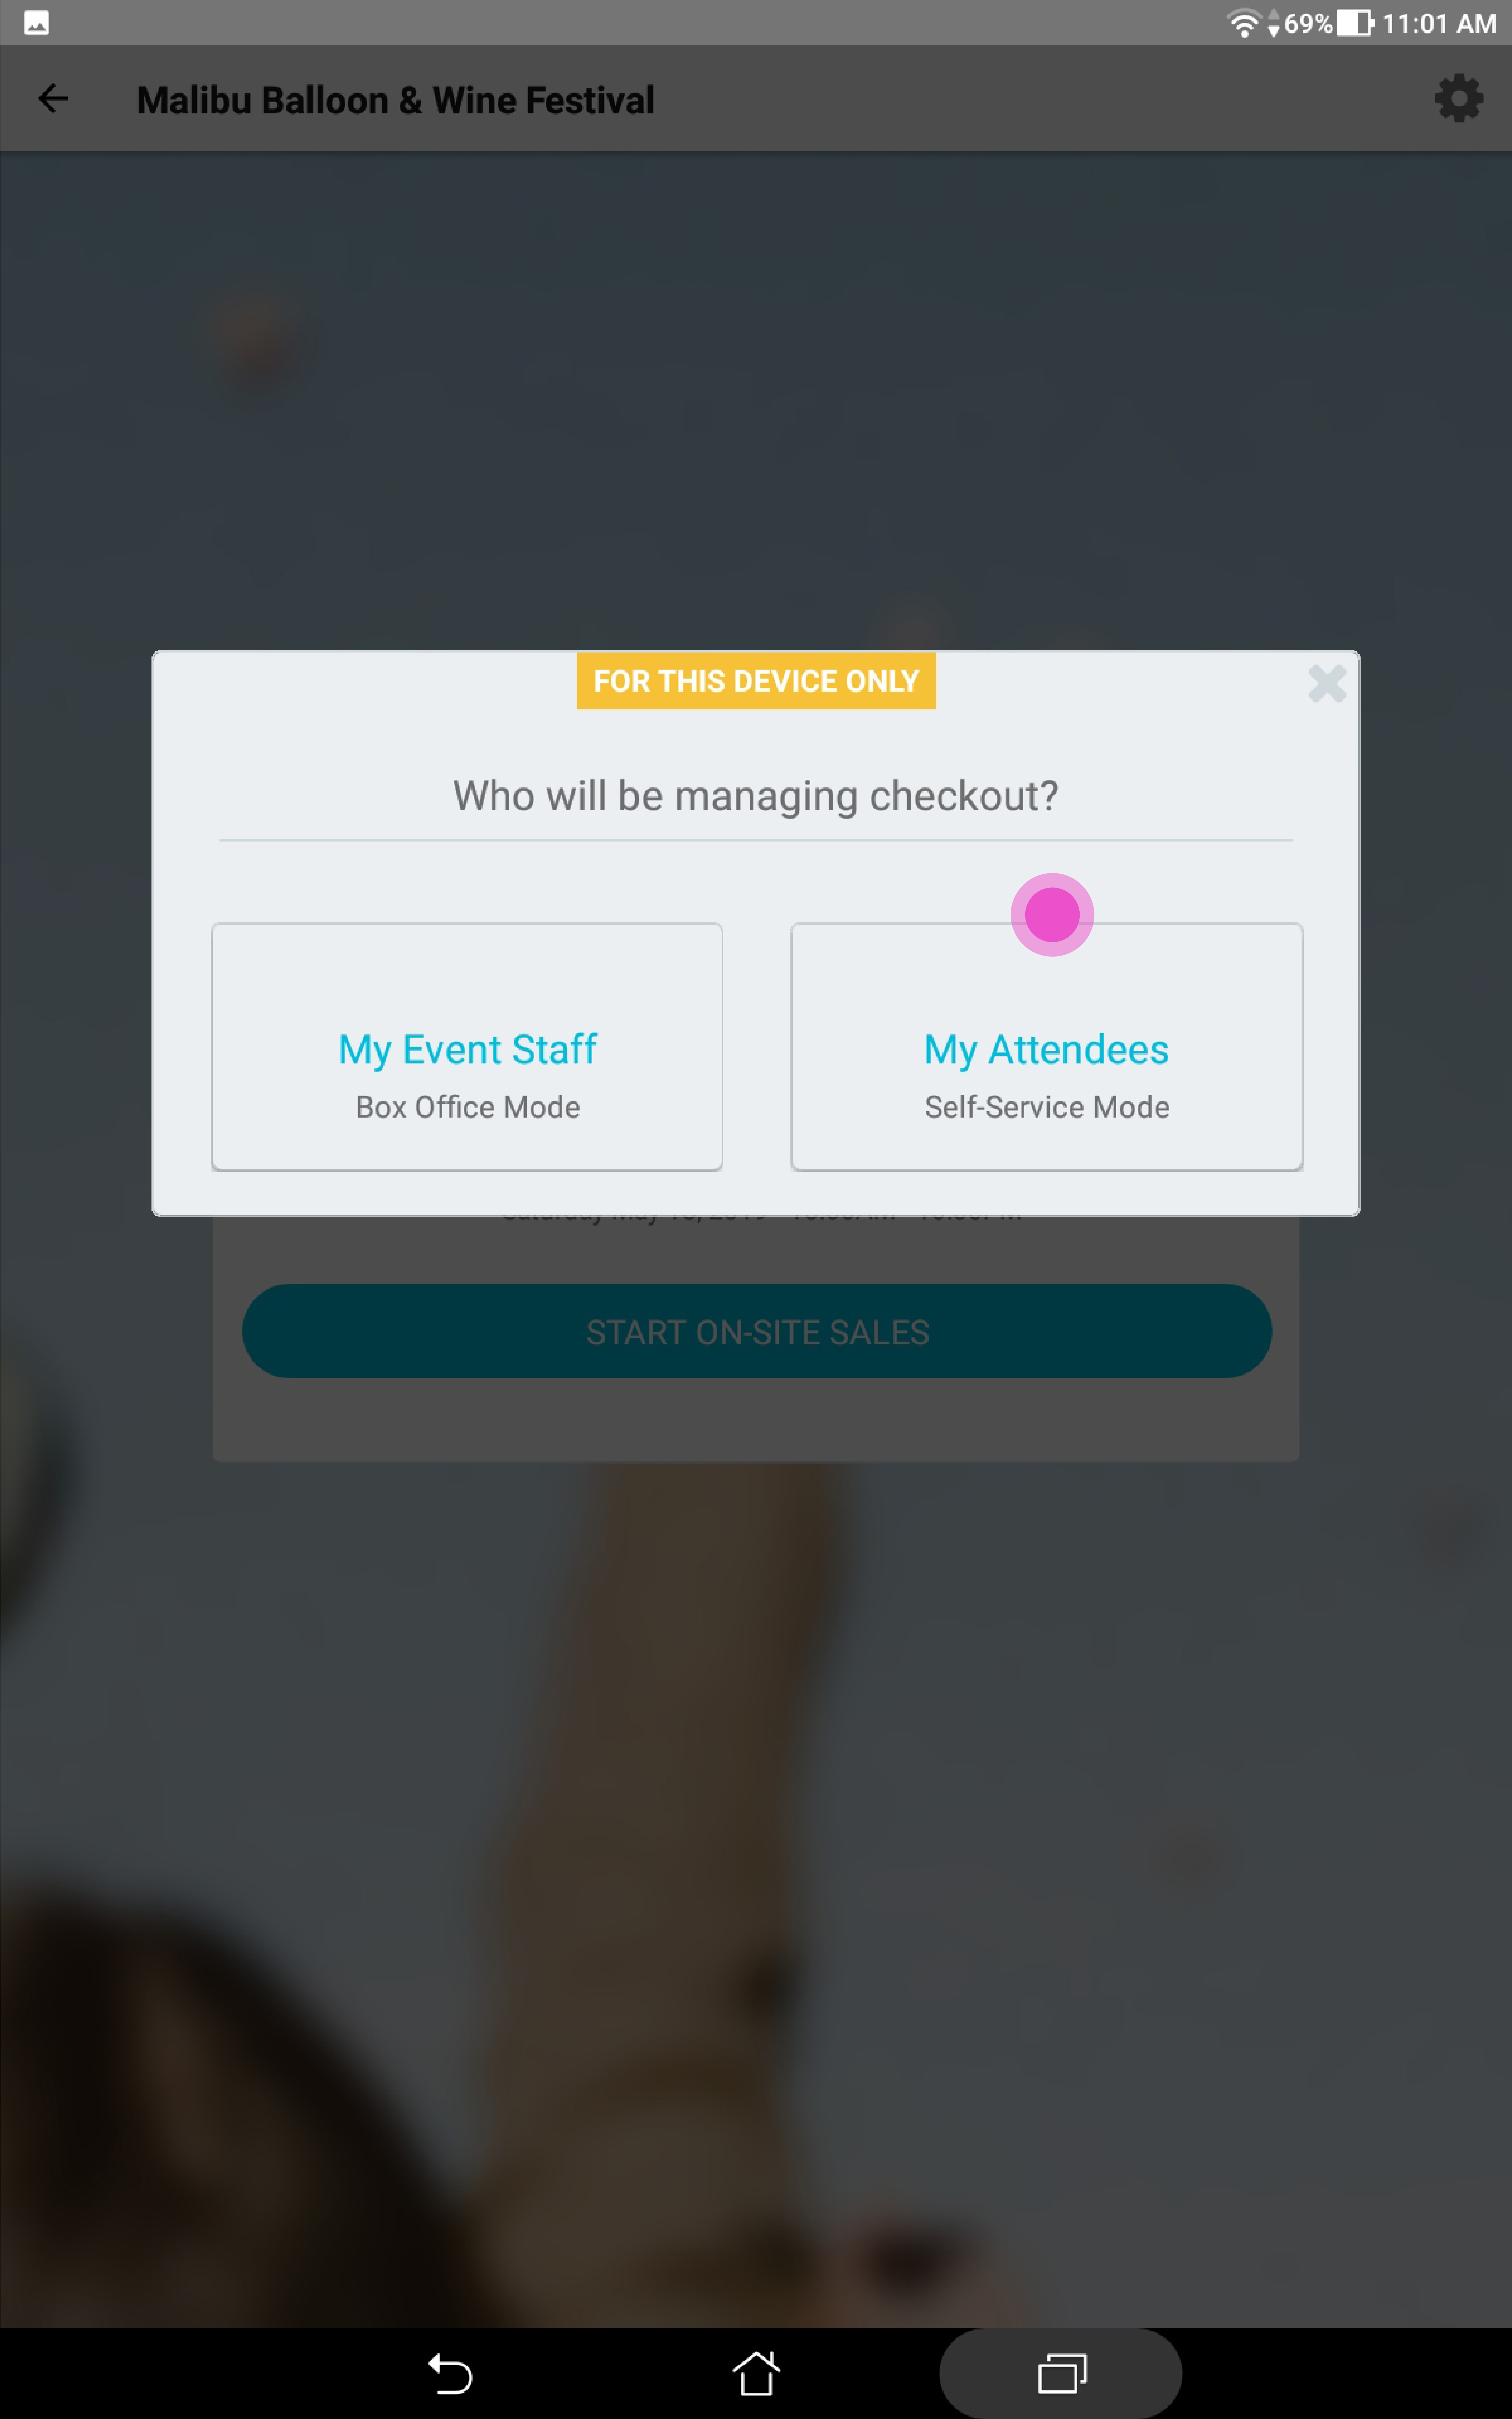
5. To confirm the Credit/Debit Card payment option, click continue, and your device is now set up for self-service
Make sure you are using the Magtek uDynamo credit card swiper (modenumber 21073092)
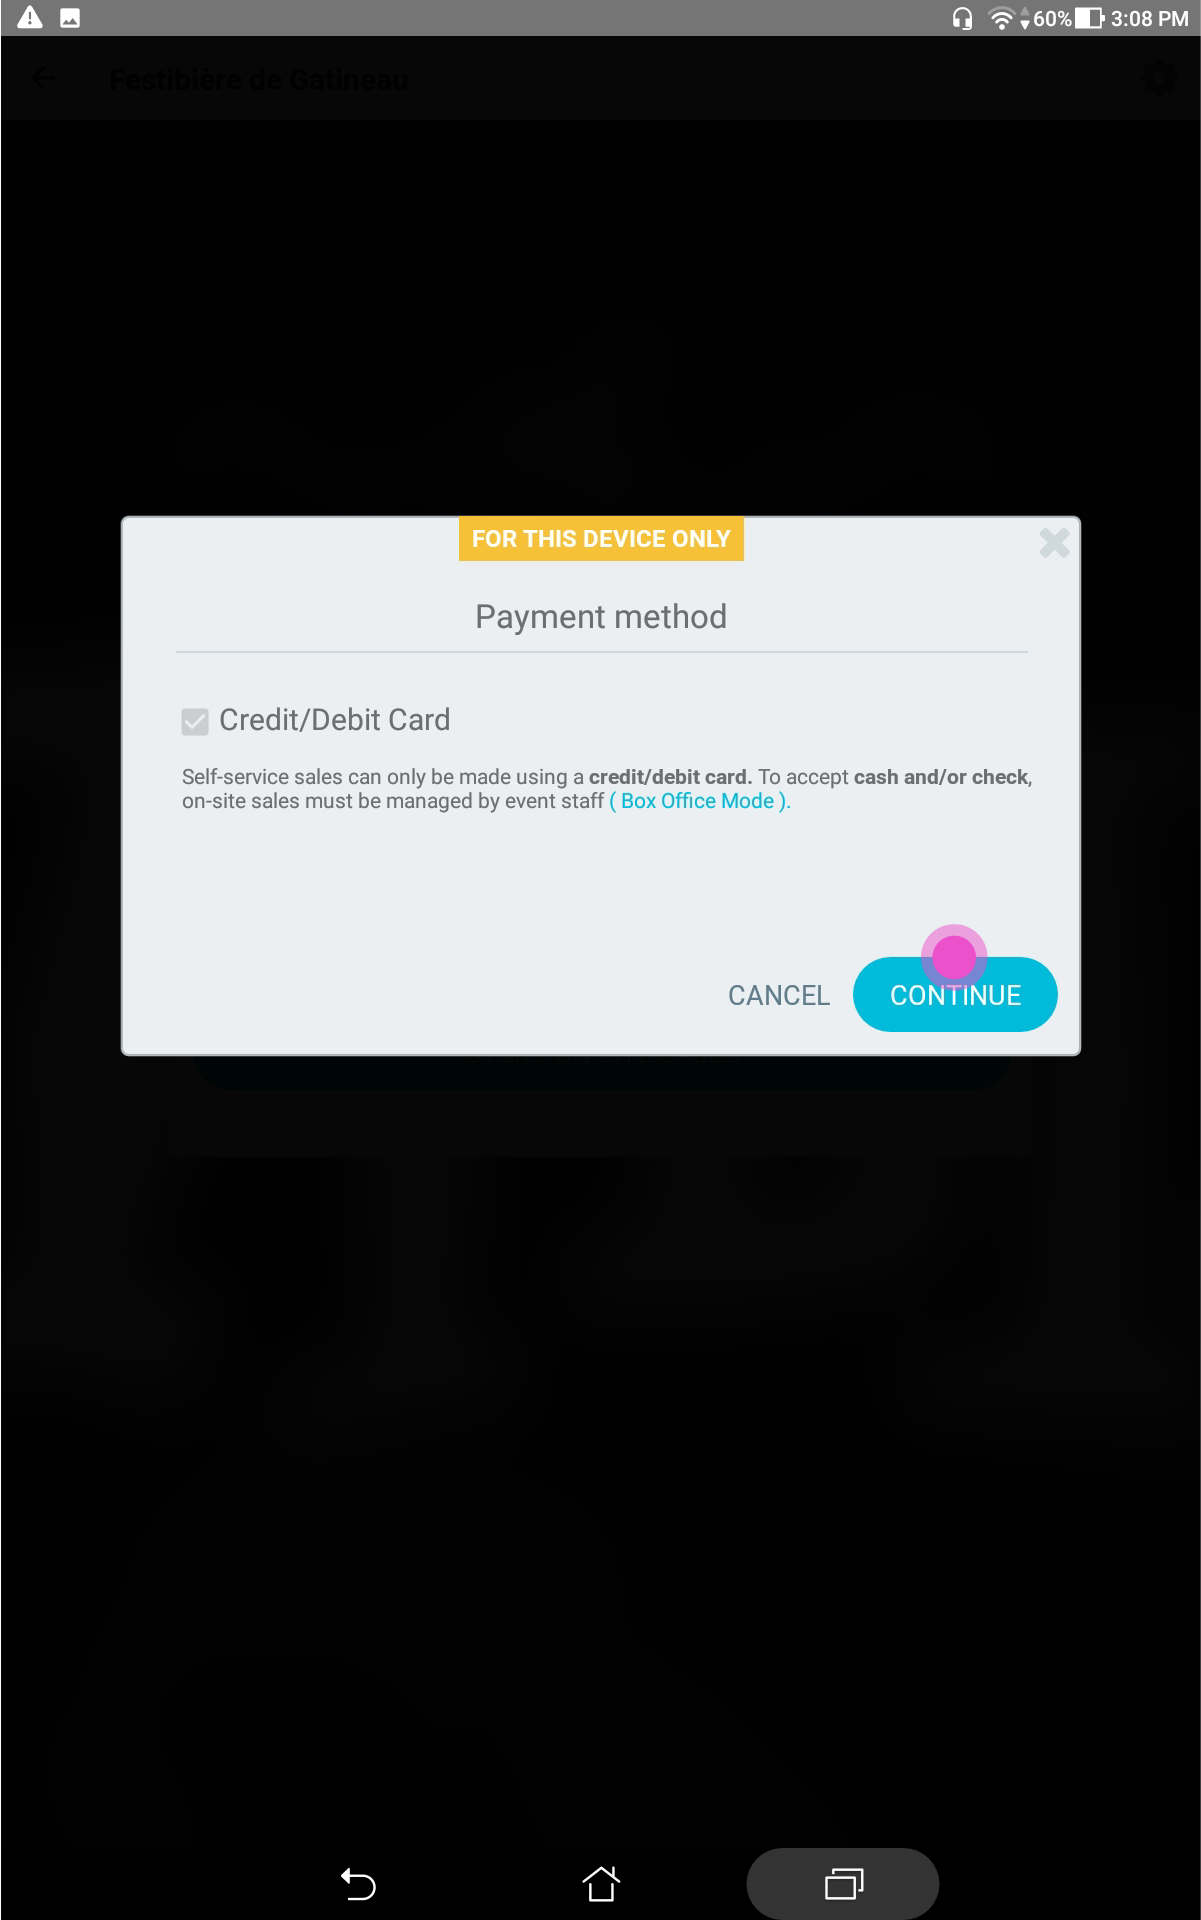
If printing tickets, have your printer set up close by. Learn more about printing with the Events.com EverySale app
The app is available in the Google Play store for Android tablets and smartphones running Android version 4.4 or later.
![]()
Currently the Events.com EverySale app is only available for Android tablets and smartphones running Android version 4.4 or later. It is available to download in the Google Play store.![]()
We recommend using our approved hardware list to optimize the app’s performance. Events.com offers hardware rental, if you’re interested, contact your Customer Success Manager or email help@events.com.
- Tablet – We recommend the following two Asus tablets:
- ASUS ZenPad 8.0 (Model #: P00A, Model Name: Z380M)
- ASUS ZenPad 10 (Model #: P028, Model Name: Z301MF)

- Credit Card Swiper – Magtek uDynamo (Model #: 21073092)*
- The credit card swiper requires proper configuration, contact Events.com for more information

- The credit card swiper requires proper configuration, contact Events.com for more information
- WiFi Router – D-Link router (Model #: DIR-605L)

- Printer & Thermal Paper – Star Micronics Thermal Printer (Model #: TSP100IIILAN)
- Only if printing tickets and receipts (not required)
- Use with thermal paper roll
- We recommend one roll per printer, per day

- Network Switch – D-Link network switch (Model #: DGS-108)*
- This is only necessary in cases where 5-10 printers are being used

- This is only necessary in cases where 5-10 printers are being used
Yes, an internet connection is required in order to use the Events.com EverySale app. We recommend a wired connection. If you are using the sales function and a wired connection is not available, you can connect to a WiFi signal, although WiFi is less secure and may result in inferior performance. However, if you will be printing tickets and/or receipts you must have a wired internet connection or a mobile hotspot with an ethernet port.
You will need an Events.com login with at least one live event set up and ready to transact.
1. Log in to the Events.com EverySale app
2. Select the event you would like to sell tickets for on-site
3. On the event page, click the Settings icon
3. Edit settings if needed, and click SAVE if you’ve made changes. Find out more about events settings
4. Click START ON-SITE SALES when you’re ready to start selling tickets/registrations at your event
5. Choose between The Event Staff – Box Office and My Attendees – Self-Service management options
Note: The Event Staff option gives you the choice of Credit Card, Cash, and/or Check, while My Attendees only has the CC payment style available
If using – The Event Staff (Box Office Mode)
1. Add the name of the user who will be taking payment on this device don’t worry, you can change this later if needed 
2. Click the Sell Tickets or Sell Registrations button
3. On Step 1, select the tickets/registrations and quantity the attendee wants to buy
4. On Step 2, enter any attendee information you wish to collect (first name, last name and email are all optional text fields) and add any additional items, or promo codes to the order
5. The Purchase Summary will update automatically as changes are made to the order
6. When finished, click NEXT
7. On Step 3, take payment from the attendee—payment options depend on what has been selected for this event during the setup process
8. For credit card transactions, simply swipe the card using Magtek uDynamo credit card swiper (model number 21073092)
9. For cash transactions, add the amount the attendee gives you, and click NEXT
10. If a balance is due back to the attendee, it will show on this page 

11. For check transactions, there is a memo field for any check information you would like to collect, such as check number or other identifying information
12. On the Confirmation page, you will see the order summary and be able to finish the process by clicking the I’M FINISHED button
13. If printing, you have the option to print or re-print on this page
14. If the attendee paid with cash, you can see the change due on this page as well
If using “My Attendees – Self-Service”
Remember, this feature enables attendees to purchase tickets kiosk-style on their own
Note: We recommend having event staff nearby to offer assistance
1. Click the Sell Registrations button
2. On Step 1, choose the desired ticket/registration and quantity
3. On Step 2, enter optional attendee information (first name, last name and email are all optional text fields) and add any additional items, or promo codes to the order
4. The Purchase Summary will update automatically as changes are made to the order
5. When finished, click NEXT
6. On Step 3, swipe the card using Magtek uDynamo credit card swiper (model number 21073092)
7. On the Confirmation page you will see the order summary, and be able to finish the process by clicking the I’M FINISHED button
8. If printing, you have the option to print or re-print on this page
Post-Transaction Options
1. On the START page you will see a MANAGE button 
2. If using the The Event Staff – Box Office option to Switch Users , you can change the name of the staff member using the app here
3. You will need a manager log in or pin to do so

4. In the Manage Tickets tab you are able to manage orders after a transaction is complete.You can refund, cancel, and re-print tickets for past orders

5. These actions require a manager login or pin number
6. Exit On-Site Sales.
All finished with your event or want to change any event settings? With a manager login or pin number, you are able to exit on-site sales and return to the setup portion of the app.
Yes, if you’ve set up Attendee Items and/or Other Stuff on Events.com those will appear in the app
1. Once you are in the purchase flow and have chosen the ticket/registration types the attendee would like to buy, click the PURCHASE button
2. On Step 2 of the purchase flow Complete Form, all Other Stuff and Attendee Items you’ve set up for your event will show on the form
3. Simply choose an item, select the + icon to add a quantity and click ADD TO CART
4. Your Purchase Summary will automatically update with the new total
5. Click on NEXT to complete your order
Learn how to set up Attendee Items and Other Stuff on Events.com
Follow these steps to select your event settings in the Events.com EverySale app:
1. Log in to the Events.com EverySale app
2. Select the event you want to update
3. Click the settings icon on the right corner of the page
4. On this page you are able to set:
- Device Name: This will show up in your reports so you can see which device was used for which transactions

- Fees: This is where you can set whether you want to include the Events.com Fee in your ticket/registration price. Note: Changing this on the app will not affect this setting online in Events.com

- Show Other Stuff Items: If you have any Other Stuff items set up on Events.com, turning this ON will make them available to buy on site. Note: Turning this to OFF will hide any Other Stuff items you have set up. All Attendee Items set up will appear within the purchase flow – learn how to set up Other Stuff and Attendee Items on Events.com

- Print Tickets/Registrations & Receipts: If you want to print tickets/registrations and receipts on-site, you can set this to ON. Note: The recommended printer is the Star Micronics Thermal Printer (model number TSP100IIILAN—find out more about printing

- Confirmation Message: This message appears on the confirmation page.

5. This could be a helpful tip for your event staff if using Box Office mode or guidelines for your attendees if using Self-Service mode

If you have selected Credit Card as one of your forms of payment, you will need to make sure you have the credit card swiper attached to your device. If you do not, your device may make a loud noise because it is looking for the swiper. The Events.com EverySale app uses the Magtek uDynamo credit card swiper (model number 21073092).
Follow these steps to cancel an order in the Events.com EverySale app:
1. To cancel an order, click the MANAGE button on the Start Purchase page
2. Go to Manage Tickets or Manage Registrations
3. Find the order you want to cancel in one of the following ways:
- Search for the order/buyer by the buyer name, order number, email, or the last four digits of the credit card used for the transaction
- Scroll through the list of orders/buyers displayed on this page

4. Once you have found the order/buyer, click the buyer name, which will take you to the order page
5. Select the item you want to cancel
6. This requires a manager to log in, so make sure you have login credentials handy
7. Check the ticket/registration or item(s) you wish to cancel
8. Simply check the box, if you want to cancel the order. 
9. Click the CANCEL/REFUND button
If you want to cancel other tickets/registrations or items on this order, follow the steps again for the other items
Follow these steps to refund an order in the Events.com EverySale app:
1. To refund an order, click the MANAGE button on the Start Purchase page
2. Go to Manage Tickets or Manage Registrations
3. Find the order you want to refund in one of the following ways:
- Search for the order/buyer by the buyer name, order number, email, or the last four digits of the credit card used for the transaction
- Scroll through the list of orders/buyers displayed on this page
4. Once you have found the order/buyer, click the buyer name, which will take you to the order page
5. Select the item you want to refund
6. This requires a manager to log in, so make sure you have login credentials handy
7. Fill in the refund amount for the ticket/registration or item(s) you wish to refund
Note: You cannot refund more than the amount charged, but you can refund a portion of the amount.
You can also refund associated taxes if there are any by checking off the box on the bottom left side of the page.
Note: If you do not want to cancel the order, make sure to leave the checkbox next to the item(s) unchecked, but If you want to cancel the order, simply check the box(es)
8. Click the CANCEL/REFUND button
If you want to refund other tickets/registrations or items on this order, follow the steps again for other items on the order
Pro Tip: In Step 7, the refunded amount cannot exceed the amount paid for the item in the original purchase. Your event goer will see their refund on the original card used for purchase within 5 – 10 business days, depending on their specific banking institution’s process.
IMPORTANT INFORMATION ON FULL PLATFORM REFUNDS:
Events.com fees are non-refundable by Events.com. These are the order and processing fees for services rendered. As an organizer, you have the option to refund these fees to your attendees directly. Choosing to refund these fees will result in them being refunded from your revenue.
If your fees are added to the cost of your registrations/tickets: To process a full refund including the Events.com fees, you will need to contact us to facilitate. Please contact our help desk at help@events.com.
If your fees are absorbed (part of the registration/ticket cost): You will be able to refund them directly to your attendees within the registration/ticket amount using the steps above.
Please note: Platform refunds are dependent on fund availability.
You can re-print tickets and receipts in the Events.com EverySale app on an order’s Confirmation page or through the Manage Tickets section of the app
Note: Printing must be turned on in the event settings – learn how to configure event settings
From the Confirmation Page: Once a transaction is complete, a RE-PRINT button will appear on the confirmation page
1. Simply click the button and the ticket(s) and receipt will re-print from the connected printer

From Manage Tickets:
1. Click the MANAGE button in the upper left and then Mange Tickets
2. Find the order/buyer for which you want to re-print ticket(s) by one of the following ways:
- Search for the order/buyer by the buyer name, order number, email, or the last four digits of the credit card used for the transaction

- Scroll through the list of orders/buyers displayed on this page
- Once you have found the order/buyer, click the buyer name, which will take you to the order page
3. Click the RE-PRINT TICKETS or RE-PRINT RECEIPTS button 
4. This requires a manager to enter their password for final authorization.
Make sure you have login credentials handy and voila!
You are able to process cancellations, refunds, and re-print tickets and receipts for completed orders.
1. Click the MANAGE button
2. Go to Manage Tickets or Manage Registrations
3. Find the buyer or order you wish to manage by one of the following ways:
- Search for the order/buyer by the buyer name, order number, email, or the last four digits of the credit card used for the transaction
- Scroll through the list of orders/buyers displayed on this page
4. Once you have found the order/buyer, click on their name, which will take you to their order page
5. Here you can process a cancellation or refund and re-print tickets and receipts
The app currently does not support traditional concessions sales, however you can use the app to sell merchandise, parking passes, and other items—learn more about selling merchandise on-site
Yes, if you have promo codes, they can be used in the app to give attendees a discount
1. At the bottom of the Order Page, there is a promo code field
2. Enter the promo code and click Apply
3. Your code will be applied to the purchase summary

Manage Event Goers (21)
After an attendee registers for your event they may need to make a change to their Registration/Ticket. Events.com allows you as the event organizer to make these changes. Find out how below!
1. Log In to your Events.com account.
2. Select the event in which you wish to manage attendees and click on PEOPLE on the left hand side tool column.
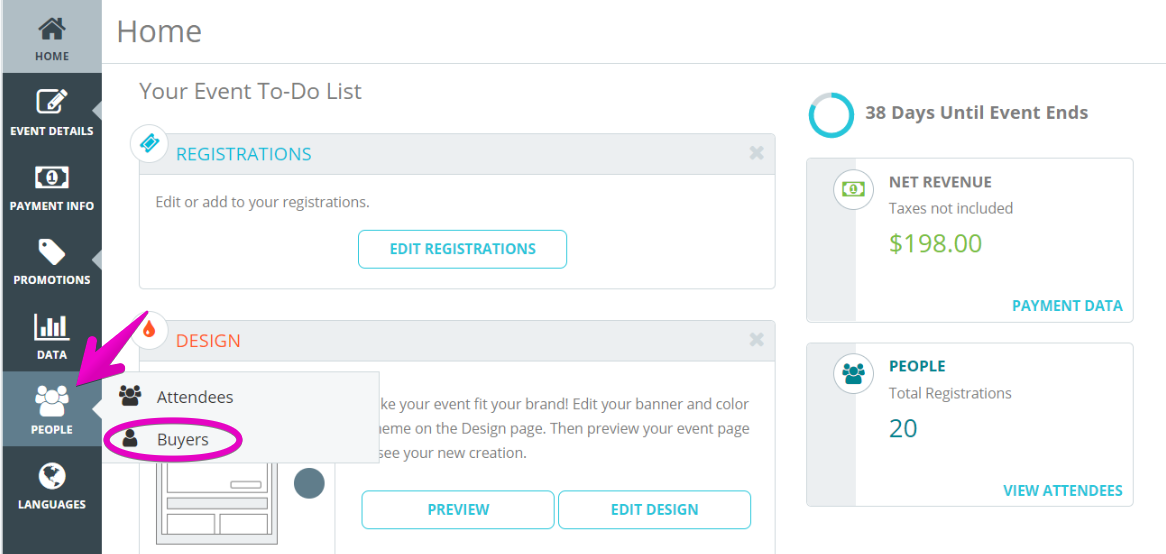
3. Filter your registrations by: All, Active or Canceled.
4. You may pull a search from the search tool on the top right.
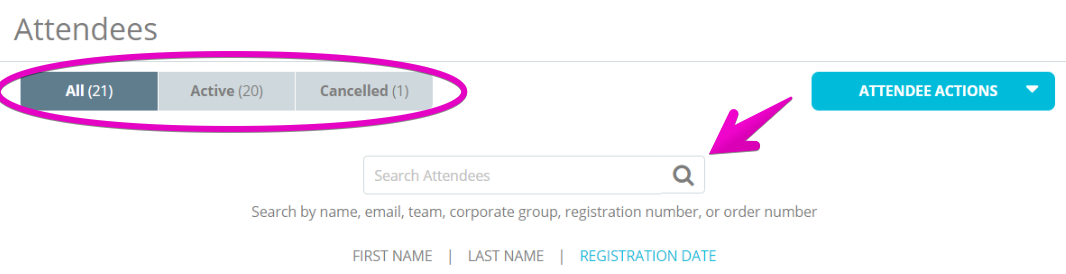
5. Click on the card of the attendee you wish to manage.
6. Scroll down to make any Edits to the form questions.
7. Click Save to save your work.
Note: If searching by Registrations or Order ID, it’s recommended to use the entire number.
As an event organizer, giving your attendees the ability to change their Registration/Ticket types can significantly ease your workload managing your events. You can also capture opportunities for additional revenue by offering opportunities to up-sell into VIP categories, even after you attendees have purchases their registrations and tickets. Events.com makes it easy to control and tailor this ability based on YOUR needs. Here’s how to do it!
1. Log In to your Events.com account.
2. As an organizer your first screen will be your organization data. You can select between your LIVE, DRAFT and COMPLETED events and choose the event for which you want to enable registration/ticket changes.
3. Next, go to EVENT DETAILS in the left side navigation and select Settings.
4. Open Post-Registration Options for Attendees by clicking the + to the the right.
5. You will see the option to Allow attendees to change their registration/ticket type. Toggle this to YES.
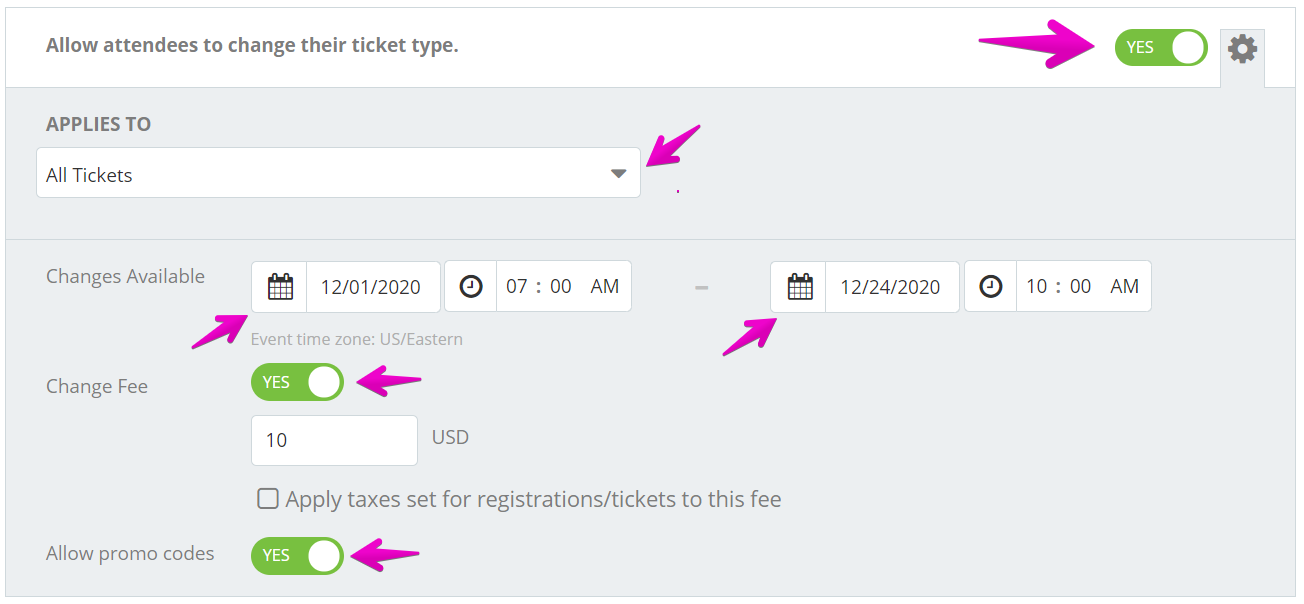
6. Open the APPLIES TO dropdown to select the categories that you want to allow attendees to be able to change out of and in to. You must select at least 2 categories. For any category that you do not select, attendees will not be able to transfer out of, or in to, that category. Registration/Ticket categories must also be open, visible (not hidden) and available for registration in order for attendees to access the feature. If you have any hidden categories you want made available, you can do so with these steps – Can my attendees change themselves into a hidden registration/ticket?
7. If you want to limit the time frame that attendees can make changes, enter in the start and finish dates in the Changes Available calendars. The ability to change registration/ticket categories will only be available to attendees within these dates.
8. You can choose whether or not to charge a Change Fee to your event goers and whether or not to Allow Promo Codes. You might want to allow promo codes if you were offering early bird pricing as the platform charges the current price difference between the two registrations.
9. Press SAVE and voilà you’re done.
Note: A flat fee of $2.95, and the order processing fee will apply to the change or transfer fee. If the new category is at a higher price, the additional payment will be collected from the attendee at the time of the change. In the case of a downgrade, a refund is not generated by the system.
As an event organizer, giving your attendees the ability to change their Registration/Ticket types, or even allowing them to transfer their Registration/Ticket to someone else, all on their own can significantly ease your workload! This can also open the opportunity to create some additional revenue in the form of Change and Transfer Fees. If you have already turned on one or both of these features, you can go back in to add a fee with the following steps.
1. Log In to your Events.com account.
2. Click on the event that you want to edit.
3. Next, go to EVENT DETAILS in the left side navigation and select Settings.
4. Open Post-Registration Options for Attendees by clicking the + to the the right.
5. To activate the fee(s), open the Settings by clicking the gear icon. Then toggle the Change fee and/or the Transfer fee to YES and choose whether or not taxes should apply (only for events charging taxes in their prices).
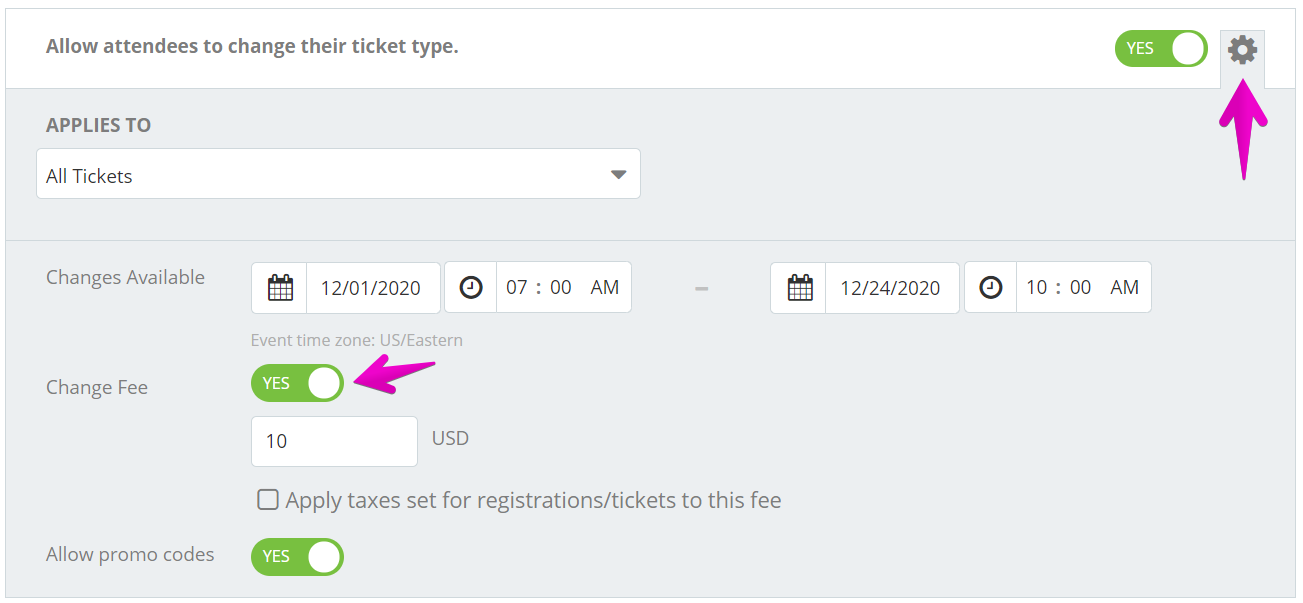
![]()
6. After you’ve added your fee(s), press SAVE and voilà you’re done!
Note: A flat fee of $2.95, and the order processing fee will apply to the change or transfer fee.
As an event organizer, giving your attendees the ability to update their attendee items (such as T-shirts, or wave times) can be particularly useful. This includes changing their answers, adding existing, or brand new items that were added by you after your original launch. Events.com makes it easy to control and tailor this ability based on YOUR needs. Here’s how to do it!
1. Log In to your Events.com account.
2. As an organizer your first screen will be your organization data. You can select between your LIVE, DRAFT, and COMPLETED events and choose the event for which you want to enable changes to attendee items.
3. Next, go to EVENT DETAILS in the left side navigation and select Settings.

4. Open Post-Registration Options for Attendees by clicking the + to the the right.
5. You will see the option to Allow attendees to edit their Attendee Items. Toggle this to YES.
6. APPLIES TO – you can select all, or specific registration/ ticket types that you want to allow attendees to edit their items in. For any categories that you do not select, attendees will not be able to update their attendee items. The attendee items must have inventory to be available for your attendees to be able to select them.
7. Changes Available – select the start and finish dates for this setting. The ability to edit attendee items will only be available to attendees within these dates.
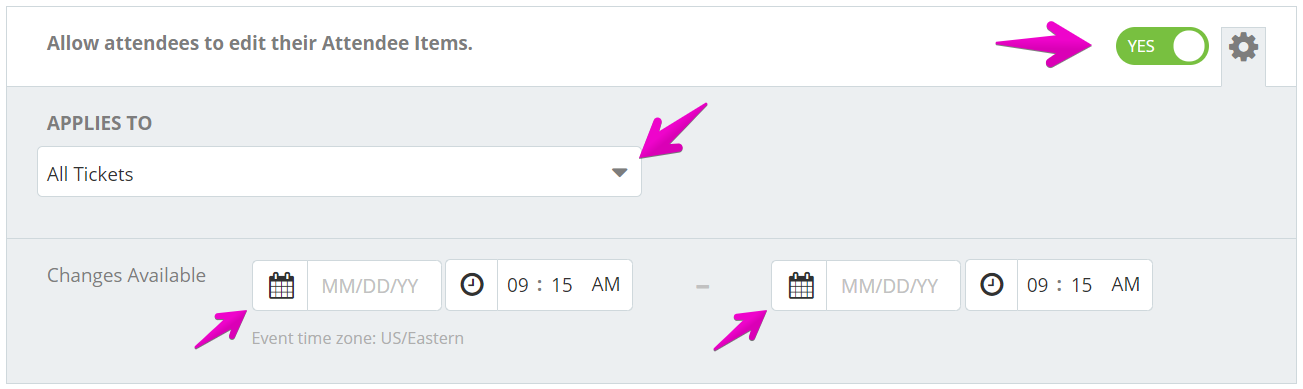
8. Press SAVE and voilà you’re done!
Note: If the new category has a higher price, the additional payment will be collected from the attendee at the time of the change. In the case of an item downgrade, a refund is not generated by the system.
As an event organizer, giving your attendees the ability to add other stuff (such as T-shirts or additional merchandise) to their order can particularly useful. Events.com makes it easy to control and tailor this on YOUR needs. Follow the steps below to learn how to do it!
1. Log In to your Events.com account.
2. As an organizer your first screen will be your organization data. Choose the event for which you want to enable changes to Other Stuff items.
3. Next, go to EVENT DETAILS in the left side navigation and select Settings.
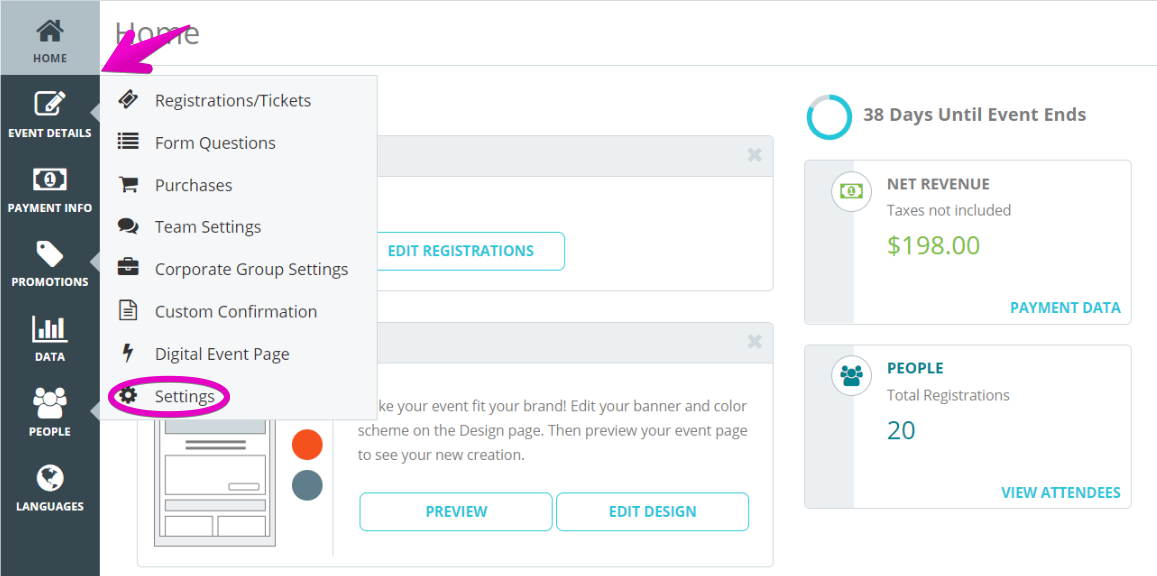
4. Open Post-Registration Options for Attendees by clicking the + to the the right.
5. You will see the option to Allow attendees to add Other Stuff items. Remember that the other stuff must have inventory to be available for your attendees to be able to select them. Toggle this to YES.

6. Dates Available – select the start and finish dates for this setting. The ability to add other stuff will only be available to attendees within these dates.
7. Press Save and voilà you’re done!
Note: If the Other Stuff has a charge associated to it, the additional payment will be collected from the attendee at the time of the change.
With Events.com you have the ability to set a Change or Transfer Fee that would apply to every event goer looking to change their Registration/Ticket or transfer to another person.
If you find yourself needing to complete one of these actions, on behalf of the user, you can do so as an admin of the event. Through your event organizer tools, you can complete the adjustment and choose if you want to apply the fee, remove it, or charge only a portion of the fee. If there is a fee, payment information will be required at the time to finalize the order.
Follow the steps below to complete a Change from your event organizer tools, and work with the open fields to adjust or remove the fees that would otherwise apply. If you are completing a Transfer, select Change Registration/Ticket from the Manage Registration drop down.
1. Log In to your Events.com account.
2. As an organizer your first screen will be your organization data. You can select between your LIVE, DRAFT, and COMPLETED events and select the event for which you want to customize.
3. Go to PEOPLE and then Attendees in the left navigation.

4. Search for the event goer needing a registration change, and click on their attendee card.
5. Once in the attendee info page, click MANAGE REGISTRATION, and select Change Registration/Ticket.

6. Make the necessary changes, including any fee edits, and click CONTINUE WITH CHANGE.

Note: The event goer will be sent an email for the new Registration/Ticket type.
You can allow your attendees to switch between different teams themselves, giving them more control over their own registration and freeing up your time. Find out how to allow attendees to switch teams below!
1. Log In to your Events.com account.
2. Select the event in which you wish to enable team switching for.
3. Click on EVENT DETAILS in the left side navigation and select Settings.

4. Open Post-Registration Options for Attendees by clicking the + to the the right.
5. Scroll down until you see the option Allow attendees to change teams, and toggle the option to YES.

6. Once enabled, you must now choose a start and end date between which your attendees will be able to switch between teams.
7. Make sure to click the orange SAVE button found along the top or bottom of the screen and you’re done!
As an event organizer, giving your event goers the ability to transfer their Registration/Ticket to another person can significantly reduce your workload. Events.com makes it easy to control and tailor this ability based on YOUR needs. Here’s how to do it!
1. Log In to your Events.com account.
2. As an organizer your first screen will be your organization data. You can select between your LIVE, DRAFT and COMPLETED events and choose the event for which you want to enable transfers.
3. Next, go to EVENT DETAILS in the left side navigation and select Settings.

4. Open Post-Registration Options for Attendees by clicking the + to the the right.
5. You will see the option to Allow event goers to transfer their registration/ticket to another person. Toggle this to YES.
6. Select the categories that you want to allow event goers to be able to transfer their registrations from. For any categories that you do not select, event goers will not be able to transfer to other individuals, from that category. Registration/Ticket categories must also be open, visible and available for registration in order for event goers to access the feature. You can also specify a date range if you want to limit when transfers are enabled.
7. If you intend to charge a transfer fee, toggle this on and select the amount you want to charge. And if applicable you can choose to charge tax.
8. Press Save and voilà you’re done.
Please note: Any additional items purchased (like Attendee Protection, Attendee Items or Other Stuff), are not included in a transfer. The new attendee can purchase their own add ons (if inventory and availability allow) when they accept the transfer.
We suggest informing attendees of what to expect as part of your transfer instructions. Any refunds from the original purchase would be at your discretion as the event organizer.
If you choose to charge a transfer fee, a flat fee of $2.95, and any applicable order processing will also be applied. If left blank, the ticket/registration will be $0 for the new attendee.
Need to view someone’s order confirmation? As the Manager or Owner of the event you will be able to see their order confirmation in just a few short steps!
1. Log In to your Events.com account.
2. Select the event, either in the LIVE or COMPLETED tab, that you want to review the order confirmation for.

3. From the menu on the left, select the PEOPLE tab followed by the Buyers section.
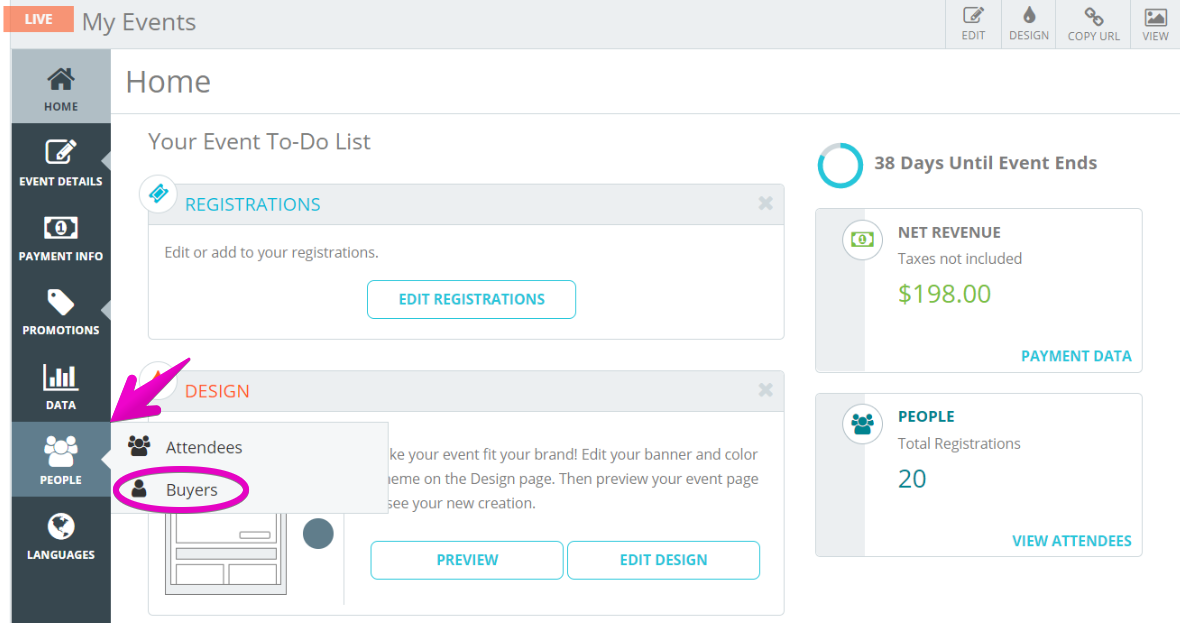
4. Select the buyer that is needed for reviewing the order.
5. Select MANAGE ORDER drop down menu and select View Order Confirmation Email.
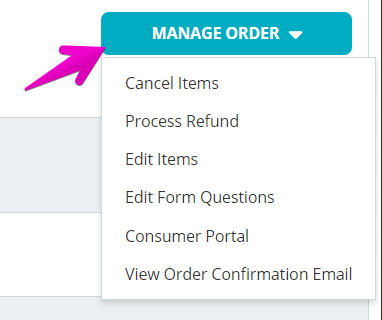
Attendee Protection offers attendees’ protection for some of the common personal reasons out of an individual’s control, that people have for cancelling their event attendance. If an attendee makes a successful claim, FanShield will issue a refund for the amount protected. We know that this can be helpful for an organizer, as you aren’t always able to offer refunds. If this is the case, Attendee Protection can be a solution for your attendees.
You can find the full terms and conditions of FanShield’s Standard Attendee Coverage Policy here.
The registration report contains who has accepted and declined Attendee Protection if you’re interested in reviewing your whole event. For help running a report, please visit our article – How do I view reports?
If you need to review an individual’s protection, there is information available in their registration/ ticket.
1. Open People and click Attendees.
2. Search for the individual and click their card to open their registration/ ticket.
3. In the left corner, Attendee Protection will be listed with the summary of the order. A status message will indicate the Protection status.
The example status is Active! which indicates that the Attendee successfully purchased Protection and could initiate a claim if applicable.
Other possible statuses are:
Inactive! – This can indicate there is a new policy associated with another ticket/registration.
Changed or cancelled! – This could indicate that a claim is in progress, or a change was made with their registration/ ticket.
Something went wrong with processing! – This usually indicates that the attendee’s payment was not success and the attendee should look for a FanShield email or email them directly.
4. Clicking View Details will open a pop up containing the Attendee’s Protection Policy ID (this is needed to submit a claim) and a quick reference to FanShield’s support. The article referenced is this article. If you have additional questions for how you can best support your attendee, please contact our support at help@events.com
If at any time, there are additional questions about Attendee Protection, have the attendee contact FanShield at help@fanshield.insure
Team work makes the dream work! If your attendee signed themselves up and then decided they wanted to create a team, we’ve got your back!
1. Log In to your Events.com account.
2. As an organizer your first screen will be your organization data. You can select between your LIVE, DRAFT and COMPLETED events and find the event for which your attendee needs a hand.

3. Here you can click PEOPLE to go straight into your Attendees, or click PEOPLE in your event navigation (left side).

4. Search for your Attendee, by using either their name or email.

5. Click the person’s Registration/Ticket to open it and then MANAGE REGISTRATION/TICKET. Select Create Team.

6. Enter in the name they wanted and then click CREATE.

Pro Tip: If the first registration/ticket is not in the team setting, you will need to change the registrant into one that is. While in Step 5, select CHANGE REGISTRATION/TICKET. After selecting the new type, you’ll go into the registration flow of the new registration/ticket. Then proceed to Step 6. Also whomever the team was created for (the attendee), becomes the team captain. While viewing the team, click the circle to the left of the person to select a new captain.
As an event organizer, giving your event goers the ability to purchase Attendee Protection can take some pressure off of you, and extend them some extra peace of mind. Events.com makes it easy to offer or remove this feature based on YOUR needs. Here’s how to do it!
1. Log In to your Events.com account.
2. As an organizer your first screen will be your organization data. You can select between your LIVE, DRAFT, and COMPLETED events and choose the event for which you want to review your Attendee Protection settings.
3. Next, go to EVENT DETAILS in the left side navigation and select Settings.
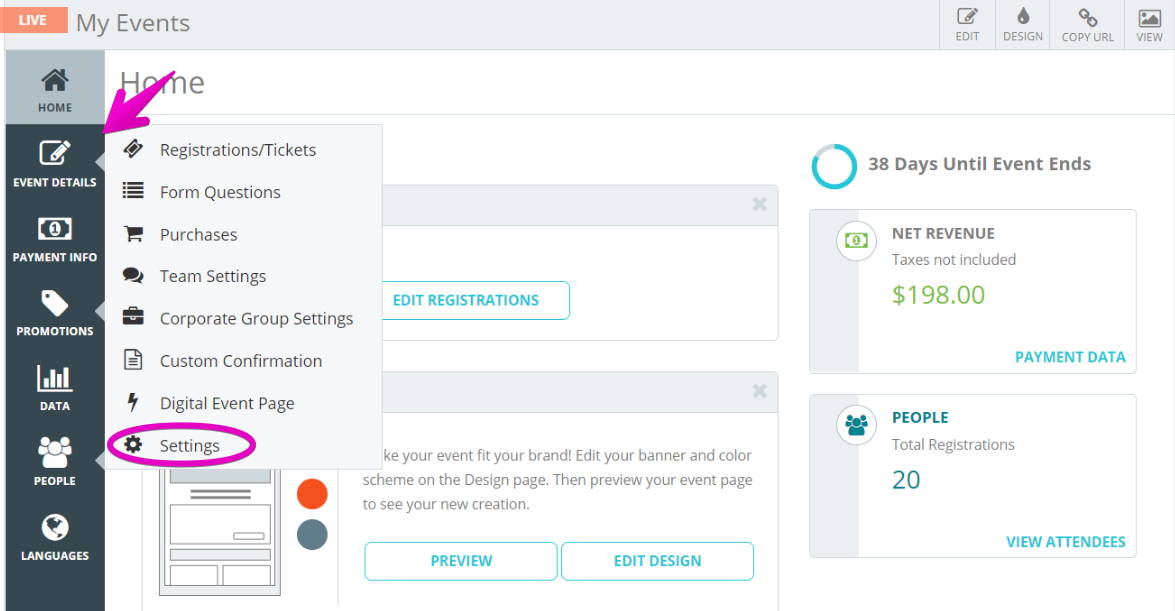
4. Open Pre-Registration Setup by clicking the + to the the right.
5. You will see the option to Make attendee protection available for registration/ticket purchases. Toggle this to YES.

6. Press SAVE and voilà you’re done! The Attendee Protection widget will now be offered within your registration form to all of your attendees.
For additional info on Attendee Protection please view our help article – What is Attendee Protection?
As an event organizer, giving your attendees the ability to change the responses to their form questions can be helpful. This includes changing their answers, or answering new questions that were added by you after your original launch. Events.com makes it easy to control and tailor this ability based on YOUR needs. Here’s how to do it!
1. Log In to your Events.com account.
2. As an organizer your first screen will be your organization data. You can select between your LIVE, DRAFT, and COMPLETED events and choose the event for which you want to allow attendees to change their responses to form questions.
3. Next, go to EVENT DETAILS in the left side navigation and select Settings.

4. Open Post-Registration Options for Attendees by clicking the + to the the right.
5. Scroll to the option to Allow attendees to change their responses to form questions. Toggle this to YES.
6. Open the APPLIES TO dropdown to select the registrations/tickets that you want to allow attendees to be able to update their answers in. For any categories that you do not select, attendees will not be able to change their responses.
7. Changes Available – the ability to change their responses to Form Questions will only be available to attendees within these dates.
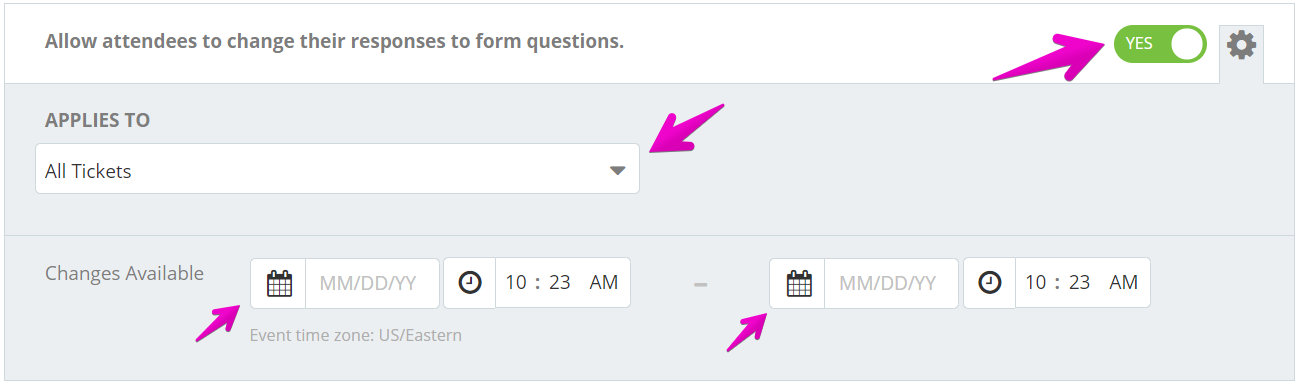
8. Press SAVE and voilà you’re done!
Absolutely! We understand that things can change in the event industry at any time. By adding an Electronic Signature Waiver, you can easily send out requests to your attendees to request they sign, and keep track of their progress. Pro Tip: This can be the first waiver or one of many!
If you need help adding an electronic signature waiver please refer to this helpful article – Can I require an electronic signature for my event waiver?
If you’ve added your waiver and are ready to notify your attendees please use the following steps:
1. Within your event, click DATA from the tools on the left.
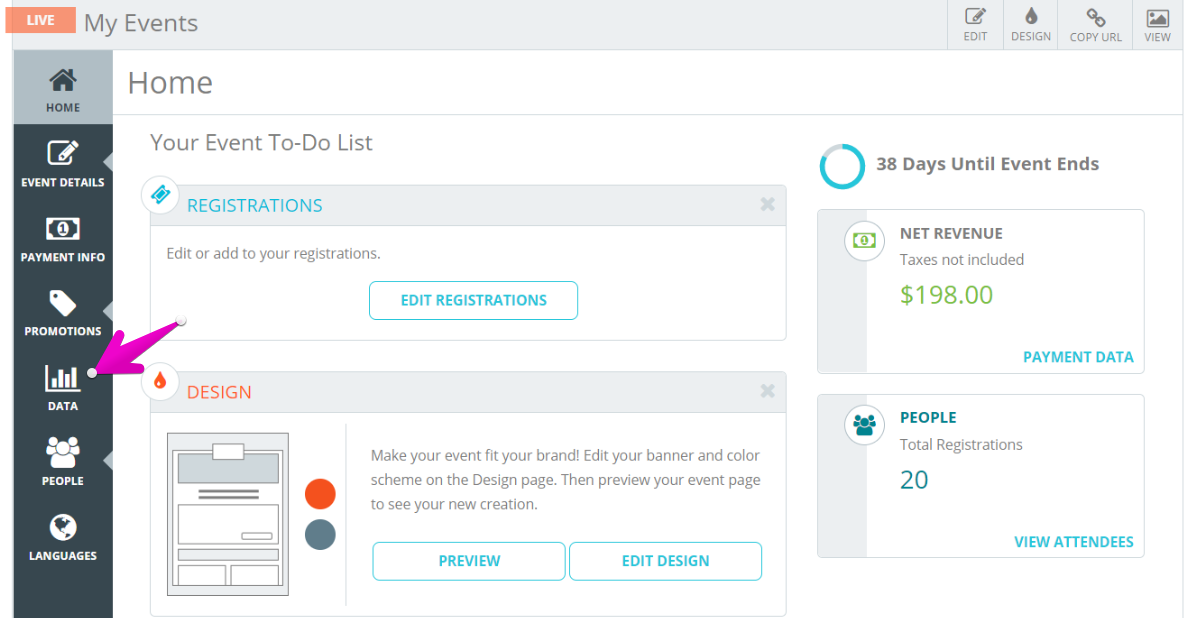
2. The Overview summary dashboard will appear by default (read about building your Overview Summary here). In the blue navigation tool bar, click Event Summary.
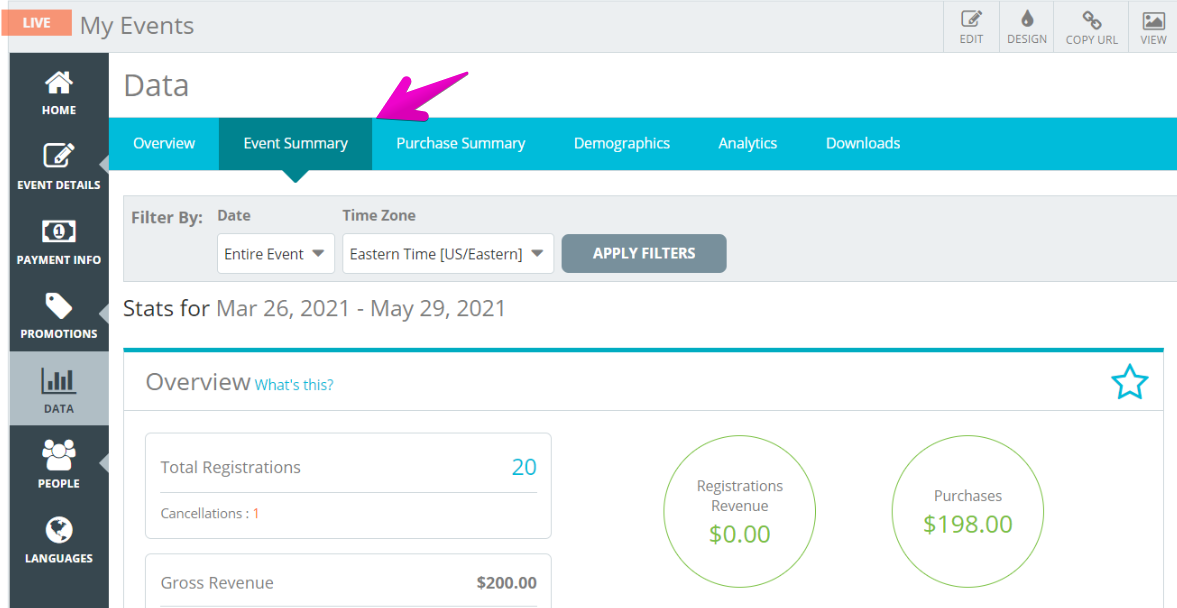
3. Scroll down to the Waiver Signatures section. This is where you can see a pie chart of how many people have Signed and Not Signed. You can download a spreadsheet for individual review and preview the reminder email. You are able to send the reminder email 3 times to communicate with your attendees.
This is what your attendees will receive:
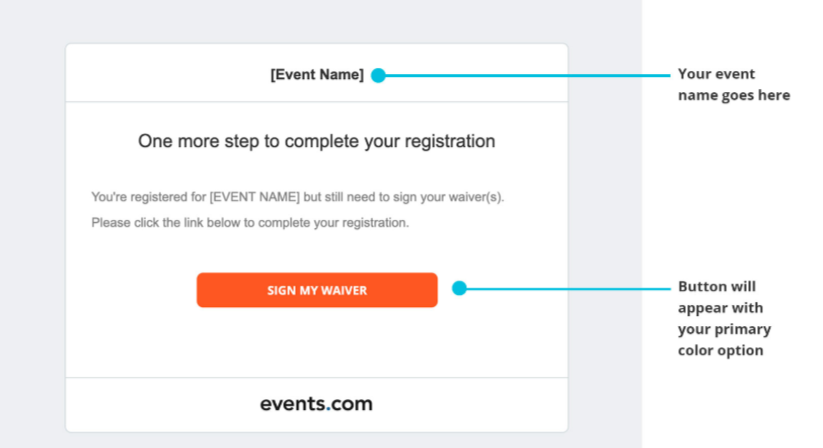
If you’ve added an Electronic Signature Waiver to your event you will want to ensure that everyone has signed their waivers before event day. As soon as you have registrants, you can start keeping an eye on their progress and send out reminders.
1. Within your event, click DATA from the tools on the left.
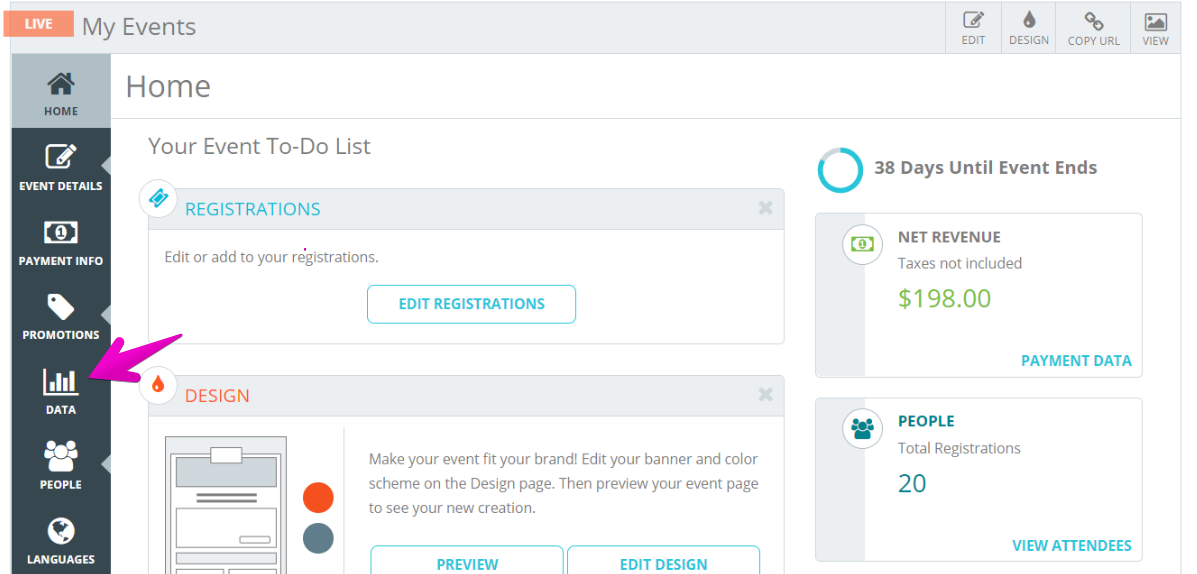
2. The Overview summary dashboard will appear by default (read about building your Overview Summary here). In the blue navigation tool bar, click Event Summary.

3. Scroll down to the Waiver Signatures section. This is where you can see a pie chart of how many people have Signed and Not Signed. You can download a spreadsheet for individual review and preview the reminder email. You are able to send the reminder email 3 times to communicate with your attendees.
This is what your attendees will receive:
Pro Tip: If you’ve used all of your Reminder Email sends, you can resend an attendee’s confirmation email, that will also give them a direct link to sign their waiver.
If you need help adding an electronic signature waiver please refer to this helpful article – Can I require an electronic signature for my event waiver?
Virtual content has become extremely important and often includes some additional info or links to share after someone has completed their order. We’ve recently added a secure way to share this with your attendees through the new Digital Event Page. This page gives you the space to add in some details and share some links with your participants. After they sign up, they are able to access the page within their Events.com accounts from their order. When you’re ready, you can start customizing your Digital Event Page with these steps:
1. Log In to your Events.com account and navigate to your event.
2. In your event, click EVENT DETAILS and then Digital Event Page.

3. Click CREATE PAGE to get started! The toggle to Make Digital Event page visible to Attendees is defaulted to YES. If you’re not ready to share the page, you’ll want to toggle to NO.
There are three page elements available to help you build your digital event page. Text for adding text or images, with or without hyperlinks in the Text Editor. You can add Video for an optional title and video link (to be embedded for viewing) or Live Stream for an optional title and streaming link. Click Add page element to get started. You can also add a Background Image. If your event page has a banner, you’ll have the option to USE BANNER IMAGE. If you didn’t have one, or would like to use something else, you’ll have the option to SELECT IMAGE. Click Preview Page to see how your page will appear to your attendees. Use the arrows on the left to move your page elements around, or the trash cans on the right to remove an element completely. You can add as many of each page element as you’d like for your Digital Event Page.
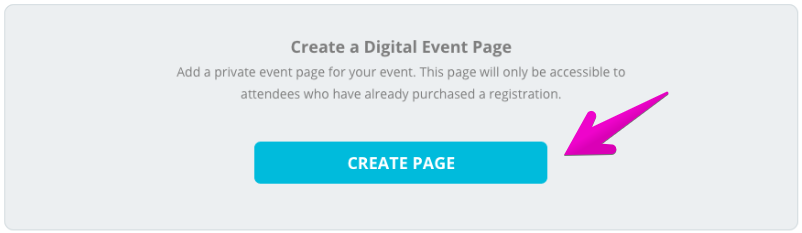
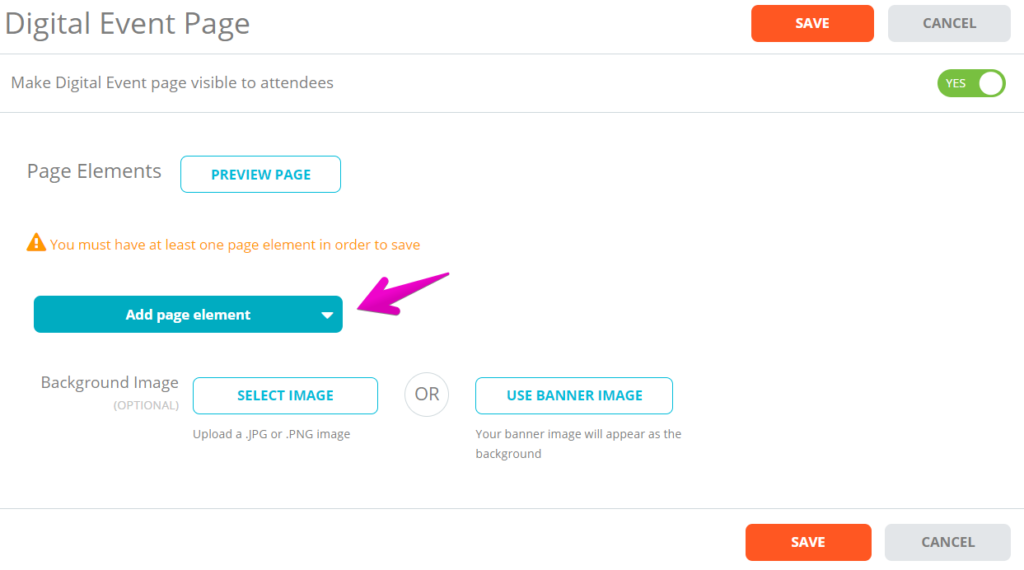
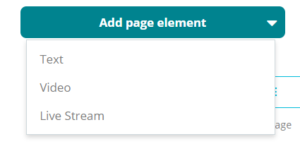
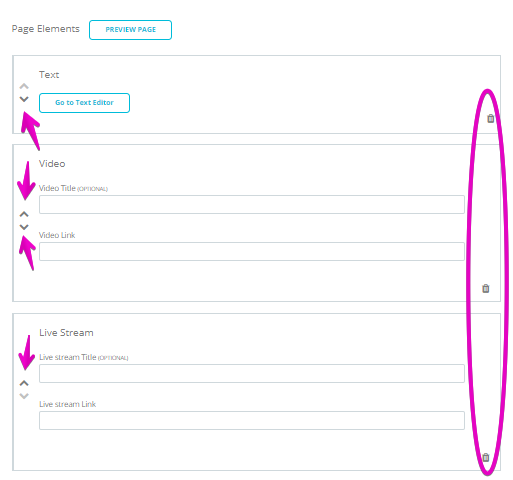
4. When finished, click SAVE. This page will now appear within your attendees’ Events.com accounts! (If your toggle was set to NO, your progress will be saved for later)
Attendees can access the Digital Event Page from within their Events.com accounts.
Or by clicking the link within their confirmation emails (attendees will need to Sign Up if they haven’t already created an account).
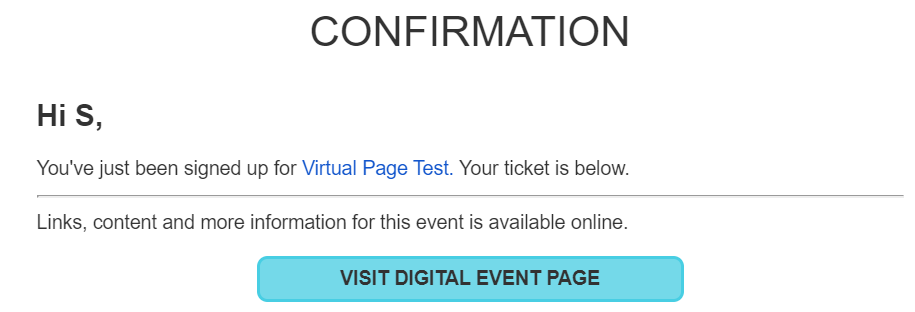
Pro Tip: If you have added another language to your event, you will also be able to offer your Digital Event Page in that language as well.
Sometimes people sign up for an event before telling all of their friends. They often find out someone wants to be on a team with them, or someone has a team they should have joined! Now if this happens, the attendee can easily create their own team, or join a friend’s team after they’ve registered. Find out how to allow attendees to create/join teams below!
1. Log In to your Events.com account.
2. Select the event in which you wish to enable team creating/joining for.
3. Click on EVENT DETAILS in the left side navigation and select Settings.
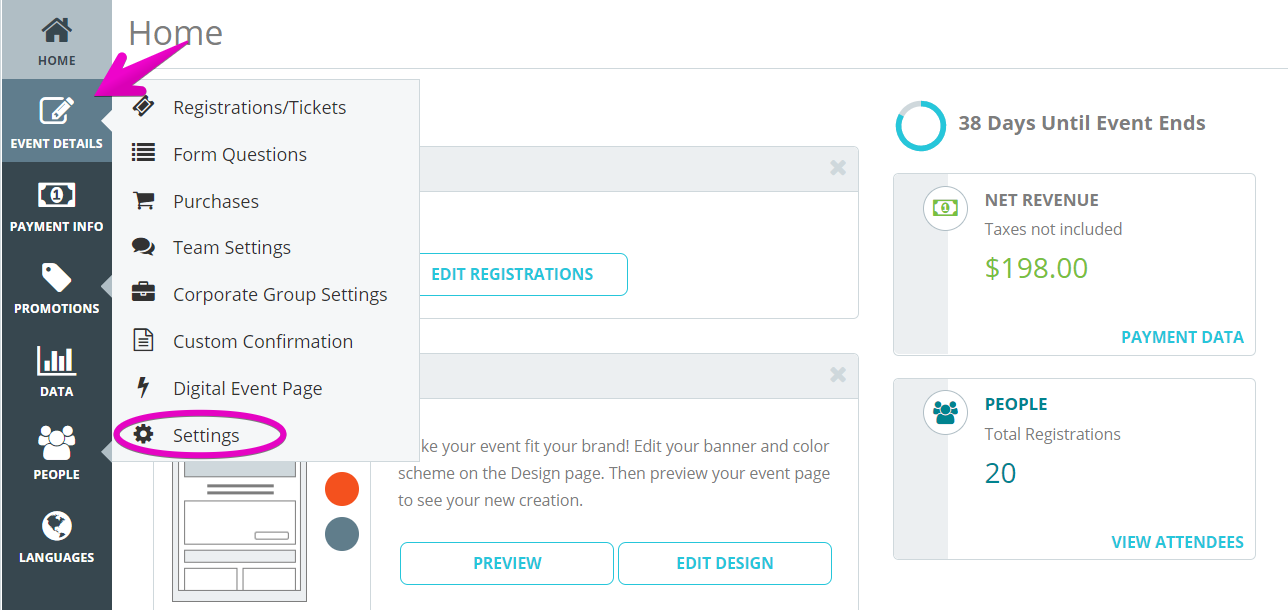
4. Open Post-Registration Options for Attendees by clicking the + to the the right.
5. Scroll down until you see the option Allow attendees to create/join a team, and toggle the option to YES.

6. Once enabled, you must now choose a start and end date between which your participants will be able to create or join a team after their order is complete.
7. Make sure to click the orange SAVE button found along the top or bottom of the screen and you’re done!
Yes they can! There may be different times that you want to add a new registration/ticket type but not want it displayed on your event page. With Events.com you can select whether or not you want to have the registration/ticket included in your post attendee change options.
1. Open Registrations/Tickets. You can add a new ticket or update an existing one. Click the gear icon to open the Settings. From here you can select whether the ticket is Public or Hidden, and if you want it available for changes. Please Note: The availability also depends on the calendars, make sure these are updated for the dates that you want people to select the ticket type.
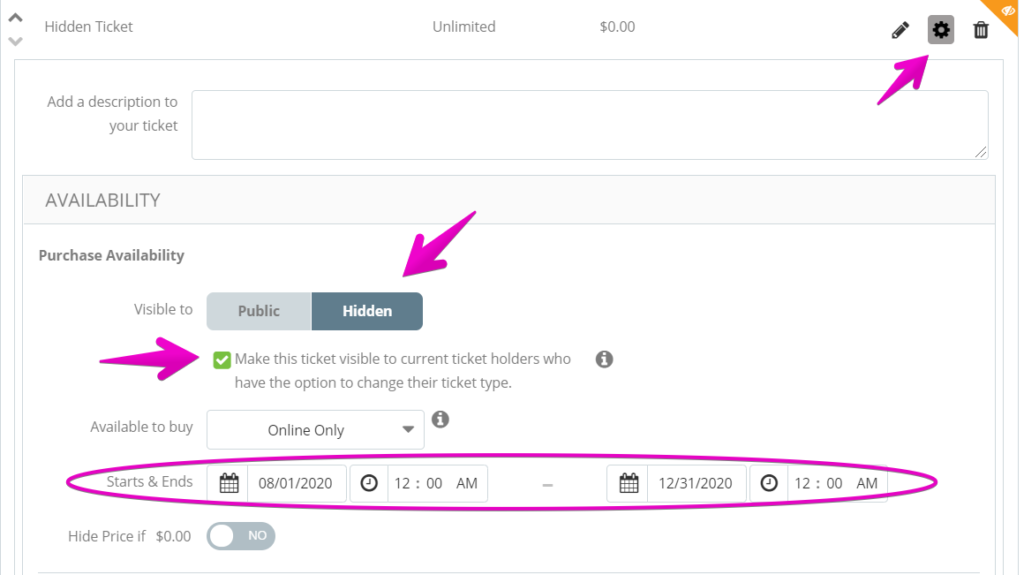
2. Then open the Event Details Menu, select Settings and open Post-Registration Options for Attendees.

3. Open Post-Registration Options for Attendees by clicking the + to the the right.
4. Toggle on Allow Attendees to change their ticket type. The default will apply this to All Tickets, which is why Step 1 is important (Hidden settings usually hide completely from attendees). If you have more tickets, you can select just the tickets available for change. After adjusting your Settings, click to SAVE.
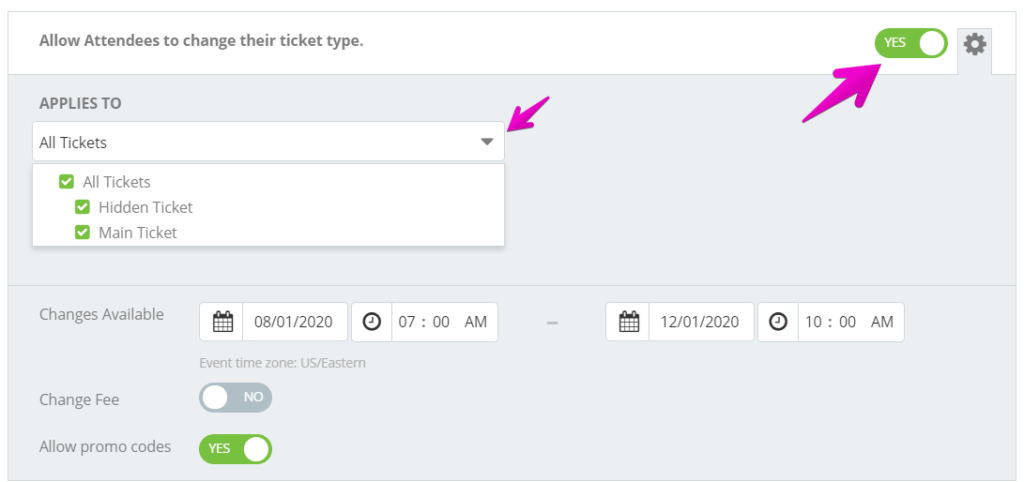
5. Now an attendee can log into Events.com and have the option to change into your Hidden registration/ticket.
As an Event Organizer, you may want to email your attendees some new or last minute information. Our Email Active Attendees feature will let you do just that! Please contact our Customer Success team at help@events.com to request access for your event and then you’ll be ready to follow the steps below!
1. Log In to your Events.com account.
2. As an organizer your first screen will be your organization data. You can select between your LIVE, DRAFT, and COMPLETED events and find the event for which you want to assign attendee numbers.
3. Click PEOPLE on the event card to open your Attendees page. Or PEOPLE and then Attendees, if you’re already inside your event.
4. Click the ATTENDEE ACTIONS drop down button on the right side and select Email Active Attendees.
5. Click COMPOSE AN EMAIL to open the email editor.
6. You can segment your Email recipients from your list of registrations/tickets and add a unique subject for your Email subject. Your event name will display in the From field.
7. Your Message to Recipient(s) can be customized with images, stylized font, alignment, lists and hyperlinks.
You have the option to send yourself a test by clicking SEND TEST EMAIL. It will deliver to the email of the logged in user.
When you finish your message, you have the options of Send now, Schedule send or Save draft. Clicking Send now will send your email to all of your active attendees in real time. After sending it will be available in your list and can be sent to new attendees. Schedule send will allow you to select the date and time you want your message to be sent. You can edit your message or change the date or if left it will send out on your set date/time. When you Save draft, you can also open your message later to edit to Send now or Schedule send.
Pro Tip: If you have a banner added to your Custom Confirmation Message, it’ll be added automatically for you to use in your communication to active attendees. (You can edit your Custom Confirmation Message, by opening Custom Confirmation from your Event Details tab)
On Events.com, yes you can! We all love when family and friends sign up for an event together, but we still want a chance to talk to them one on one. If you want to ensure that you’re getting unique email addresses for each person in an order, here’s how you can make it required:
1. While in your event, select Event Details – Settings
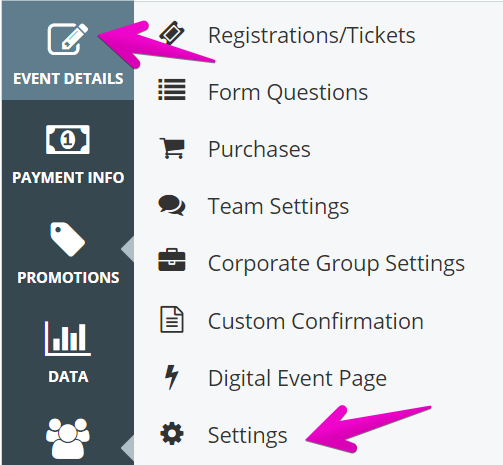
2. Open Pre-Registration Setup by clicking the +
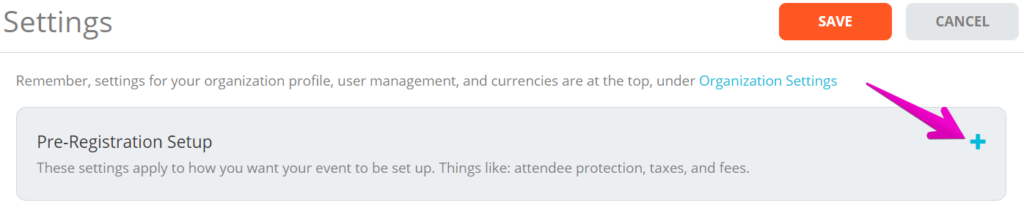
3. Scroll to Unique Email Address and toggle to Yes

4. When finished, click to Save! Your attendees will be required to provide unique email addresses for each person in their order.
Team work makes the dream work! If your attendee has thought of an even awesomer team name after registration and wants your help to change it, we’ve got your back!
1. Log In to your Events.com account.
2. As an organizer your first screen will be your organization data. You can select between your LIVE, DRAFT and COMPLETED events and find the event for which your attendee needs a hand.
3. Here you can click PEOPLE to go straight into your Attendees, or click PEOPLE in your event navigation (left side) to open Attendees.
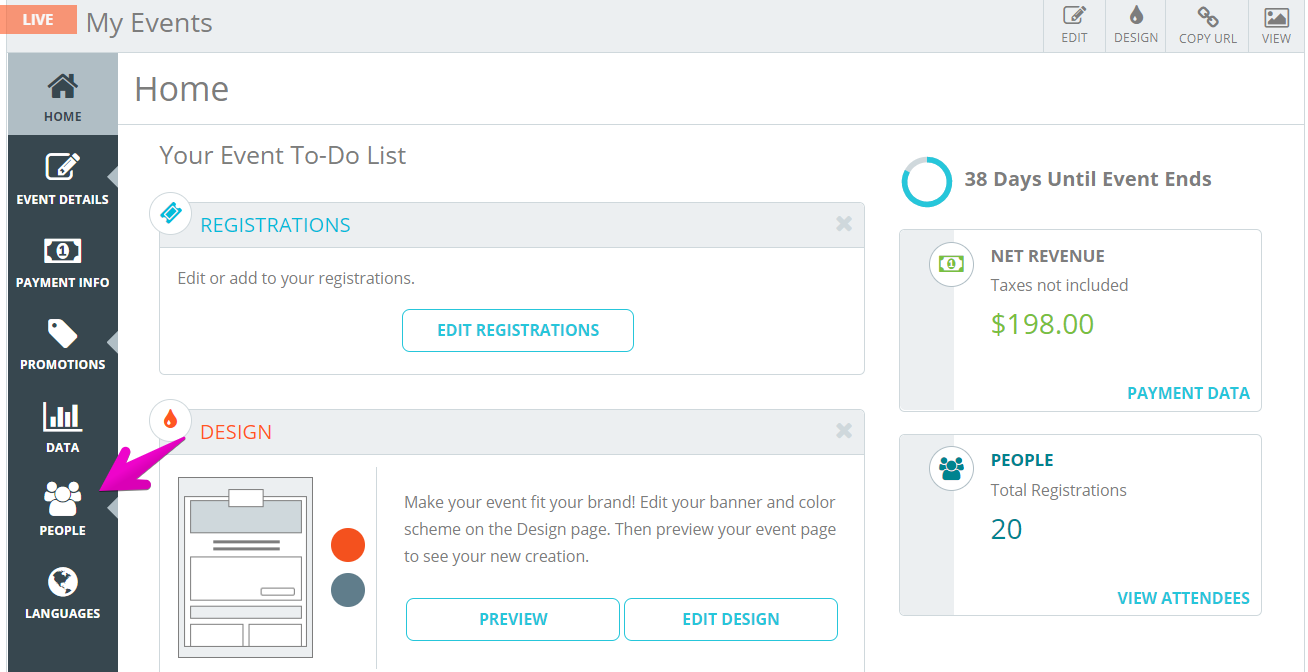
4. Search for the team, or someone on the team.
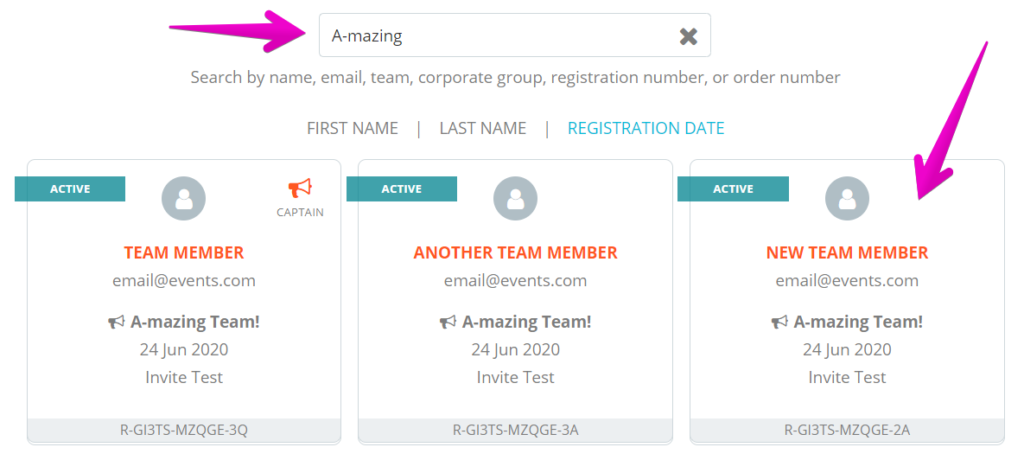
5. Click on one of the team member’s Registration/Ticket to open it and then on the team name to open the team.
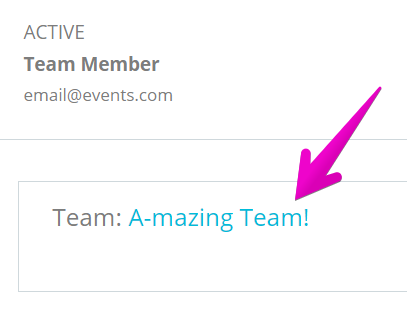
6. Click the pencil beside the team name to edit.
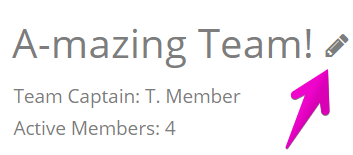
7. Enter a new team name and click SAVE! This team is now good to go!
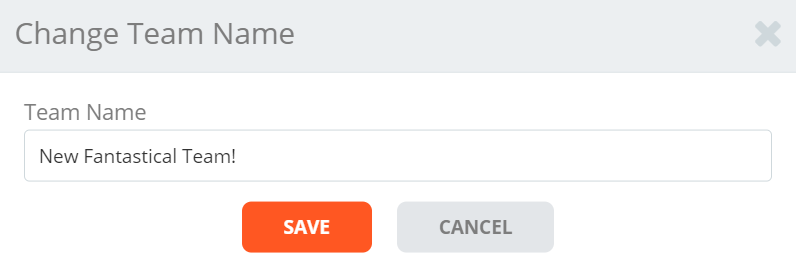
Manage Order Forms (20)
Being able to customize your registration form is very important because it allows you to place the questions in any order you want, delete questions that you do not need or require your attendees to answer certain questions. You may also choose which attendees will see and answer your questions based on their registration/ticket type. With that being said, let’s find out how you can customize your registration by following the steps below!
1. Log In to your Events.com account.
2. While in your event, click on EVENT DETAILS in your left side navigation, and then select Form Questions.
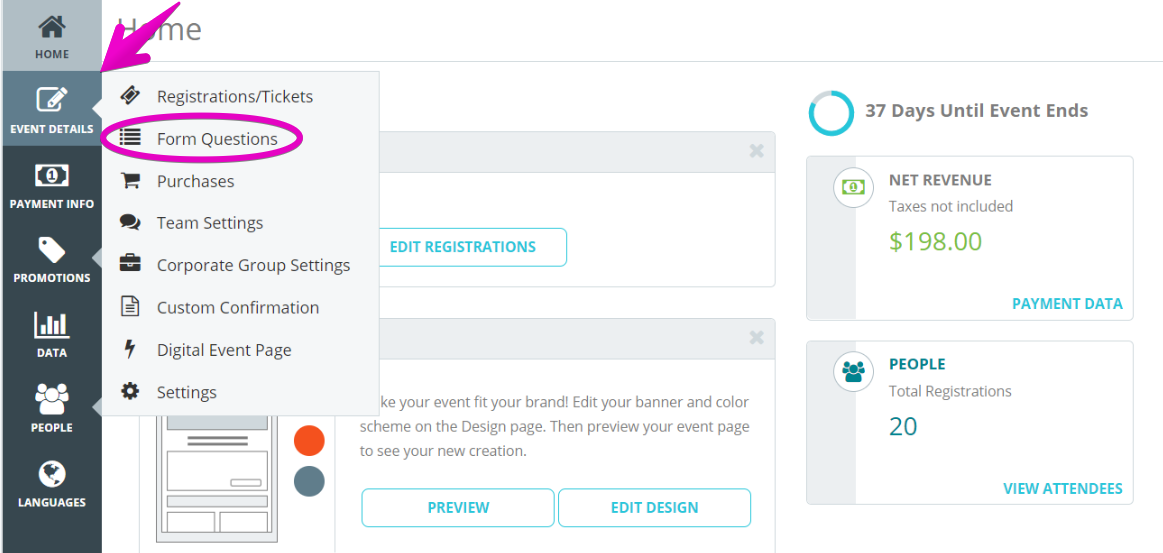
Note: There are two parts to Form Questions. You have the option of adding Buyer Questions which will appear once within an order and Attendee Questions which will be asked once for each attendee. If you would like to add to your Buyer Questions you can click on Buyer tab to see the form questions you can add. If you want to add to your attendee questions, click Attendee tab.
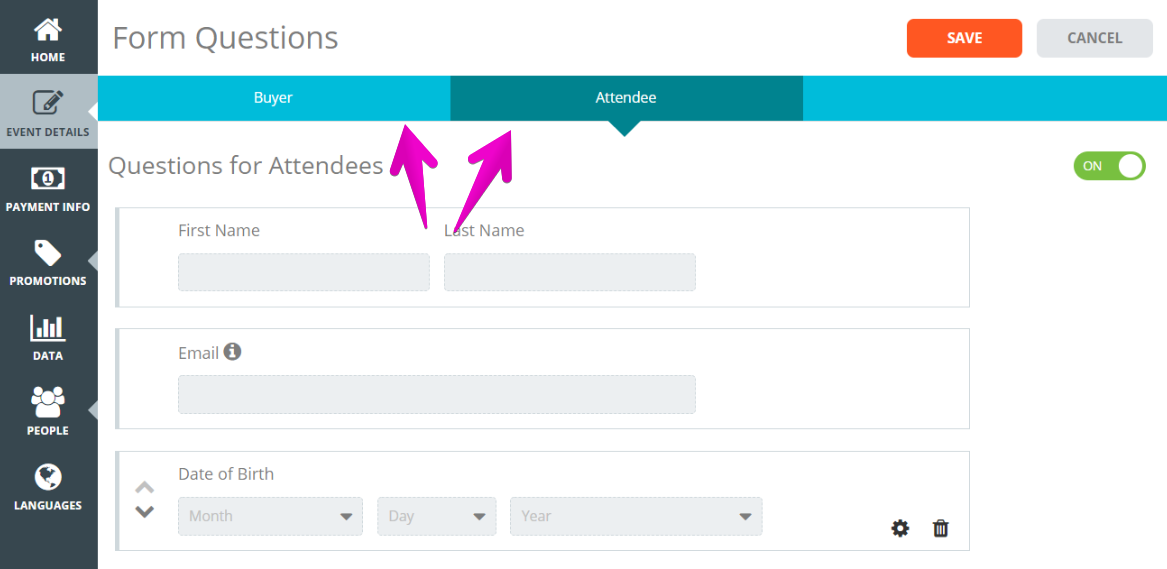
3. When questions are turned on for attendees, the standard form questions will be pre-selected. To change the orderof questions, click on the Up and Down arrows. To remove a question click on the trash icon. To access advanced settings on a question, click the settings (gear) icon.

4. If you want to add any custom questions, click the ADD QUESTION button at the bottom to add additional questions.
5. To add Section Headers to your registration form, click the ADD SECTION HEADER at the bottom.

6. Click the SAVE button to save your changes
Note: If you added Registrations to your event, the Attendee questions will default to ON because events that collect registrations usually need information from each attendee. If you added Tickets, the attendee questions will default to OFF. You can choose to change the default at any time.
By asking form questions, you’ll have the ability to customize who will see the question when attendees fill out the registration form. Let’s see how you can make specifications to your form questions!
1. Log In to your Events.com account and select the event for which you’d like to edit the form questions.
2. Navigate to the EVENT DETAILS tab on the left hand menu and select Form Questions.

3. Select the Setting (gear)icon on the question you’d like to edit.

4. The Visible to section allows for you to be able to toggle the question to be Public on your registration form or to Administrators to make it an admin only question.
5. The Apply to section allows for you to have the question visible to all ticket types or you can select certain ticket types that would see the question.
6. The Require section can be toggled to YES to have attendees answer the question in order to finish the registration process or NO to have it be an optional question.

7. After you’ve made your adjustments, click SAVE at the top or bottom of the page.
Requiring your attendees to answer form question can ensure that you get all the information you need from your attendees. First name, last name and email will always be required to answer. Your attendees will need to answer all the required questions in order to purchase tickets to your event. Find out how to do this be following the steps below!
1. Log In to your Events.com account.
2. Navigate to your event, then select EVENT DETAILS from the menu on the left and click on Form Questions.

3. Click on the Setting (gear) iconto the right of the question in which you wish to require an answer and switch the Require toggle to YES.

4. Click SAVE at the bottom or top of the screen.
Tip: Required is the default setting for Form Questions.
Managing the order of form questions can be really important if you want to have a certain question to be asked first when an attendee is registering for your event. Find out how manage form questions below!
1. Log In to your Events.com account and select the event for which you want to manage the form questions.
2. Once in your event, click EVENT DETAILS in the left side navigation and select Form Questions.

3. Use the up/down arrows that appear to move the questions in the preferred direction.

4. Scroll to the top or bottom of the page to SAVE your work.
Note: To avoid registrant confusion, First & Last Name and Email are not able to move from the top of the form.
Deleting a question is very simple to do and only takes a few steps. Let’s delete the question(s) you do not need!
1. Log In to your Events.com account.
2. In your event, select EVENT DETAILS from the menu on the left and click on Form Questions.
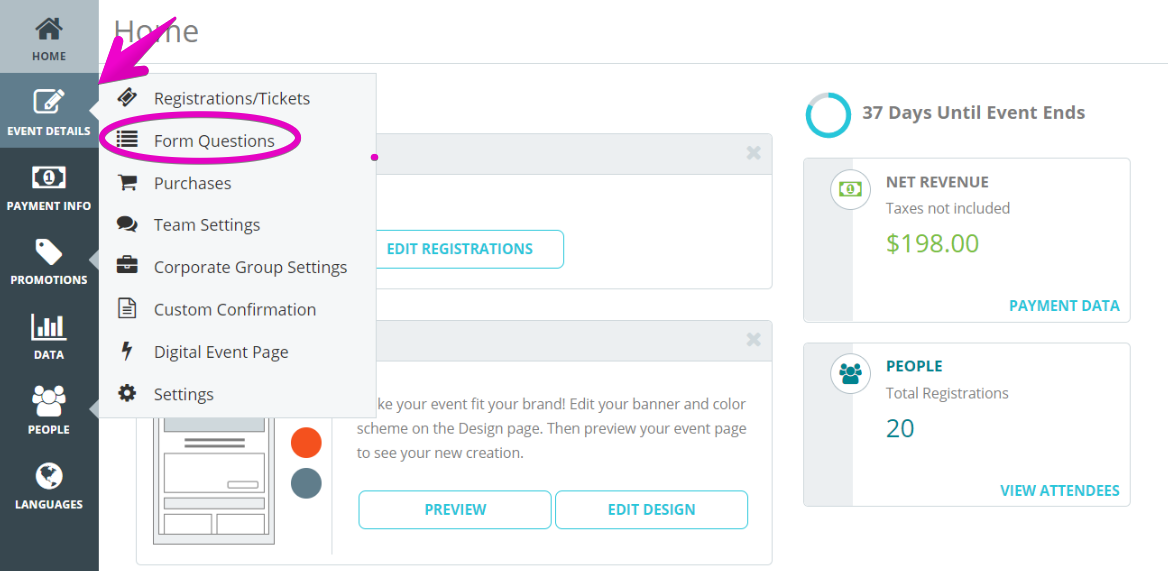
3. Click on the trash can to the right of the question you wish to delete. This will eliminate this question from your form.

4. Click SAVE when finished.
Note: If this question has already been answered by a registrant, you will only be able to do a “soft delete”, which will eliminate the question from the public, but will still exist for reference in your reports.
Yes. Simply click on the Settings (gear) icon to the right of the question to manage it. With the Apply to drop down, you can select which registrations/tickets your question will apply to. After you’ve made your selection, click SAVE at the top or bottom of the page.

Although these questions are similar in that they both offer a list of answer options, Dropdown questions will limit the user to select only one option. You would use a multi-select list for questions where the user can “Select all that apply,” or multiple responses.


*Dropdown questions can be used to create conditional questions within your registration form.
To add custom questions to your registration form follow these simple steps:
1. Log In to your Events.com account.
2. While in your event, click on the EVENT DETAILS icon on the left side navigation and select Form Questions.

3. Scroll to the bottom of your entry form and click ADD QUESTION.
4. Select the question type under Other Questions.

5. When you’ve finished selecting your questions, click SAVE at the top or bottom of the page before navigating to a new page.
Asking conditional questions is a great way to collect more specific information about your attendees. A conditional question is a clarifying question that is created based on the response to a previous question.
Example of a conditional question flow:
Question: “Are you a club member?”. If the attendee responds “yes”, an additional question will appear: “what is your membership number?”. If the attendee responds “no”, then no further question will appear.
This feature is available when adding a Dropdown question.
1. Log In to your Events.com account.
2. As an organizer your first screen will be your organization data. You can select between your LIVE, DRAFT and COMPLETED events and find the event for which you want to add conditional questions.
3. Go to EVENT DETAILS, and select Form Questions.
4. At the bottom of the page select the ADD QUESTION button. Then select Dropdown.

5. Create the initial Dropdown question and create as many answers choices as you need be selecting ADD CHOICE.

6. Click the Add option next to the answer for which you wish to add a conditional question. You can choose a multi-select question, a dropdown question or a text response.

7. Finally, add the additional clarifying question and press SAVE.
Pro Tip: Now, when an attendee answers Yes to the initial question – the sub question will appear. You can add a sub-question to each of the initial response for a more detailed understanding of your participants. If needed you can restrict to numbers only, or a certain amount of characters.
Waivers are a great way to provide a set of guidelines or rules that need to be followed at your event. When attendees click on the waiver box or enter their electronic signature, it stipulates that they have read the waiver and agree to abide by it. To add a waiver to your registration form follow these simple steps below!
1. Log In to your Events.com account.
2. Click on the EVENT DETAILS icon on the left side navigation and select Form Questions.
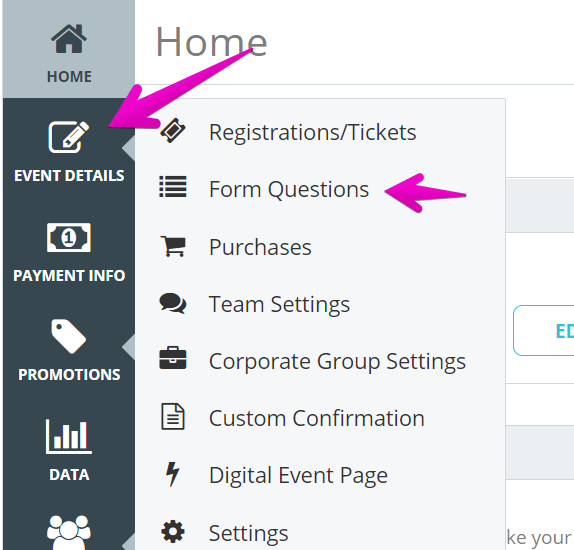
3. Scroll to the bottom of your entry form and click ADD QUESTION.
 4. Select Waiver, under Other Questions.

5. You have the choice of an Electronic Signature or a Check Box for the agreement type. Then you can give your waiver a different name which will appear to your attendees. Write, or copy and paste your waiver into the waiver body.
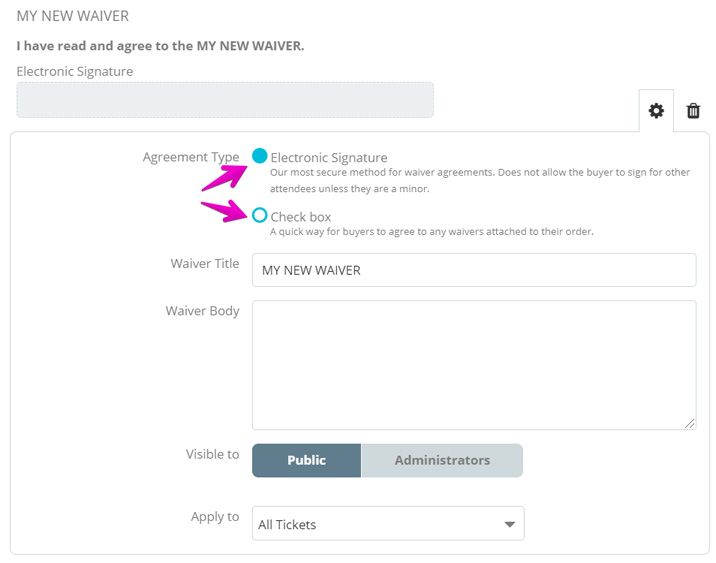
6. When you’ve finished adding your waiver, click SAVE at the top or bottom of the page before navigating to a new page.
Note: You can add as many waivers as necessary. To do this, simply repeat the steps above for each one. Waivers will always appear at the bottom of your form.
You can manage and edit the buyer form questions your participants have answered, though their first and last name as well as their email addresses will remain un-editable.
1. Log In to your Events.com account.
2. While in your event, click on PEOPLE and then on Buyers
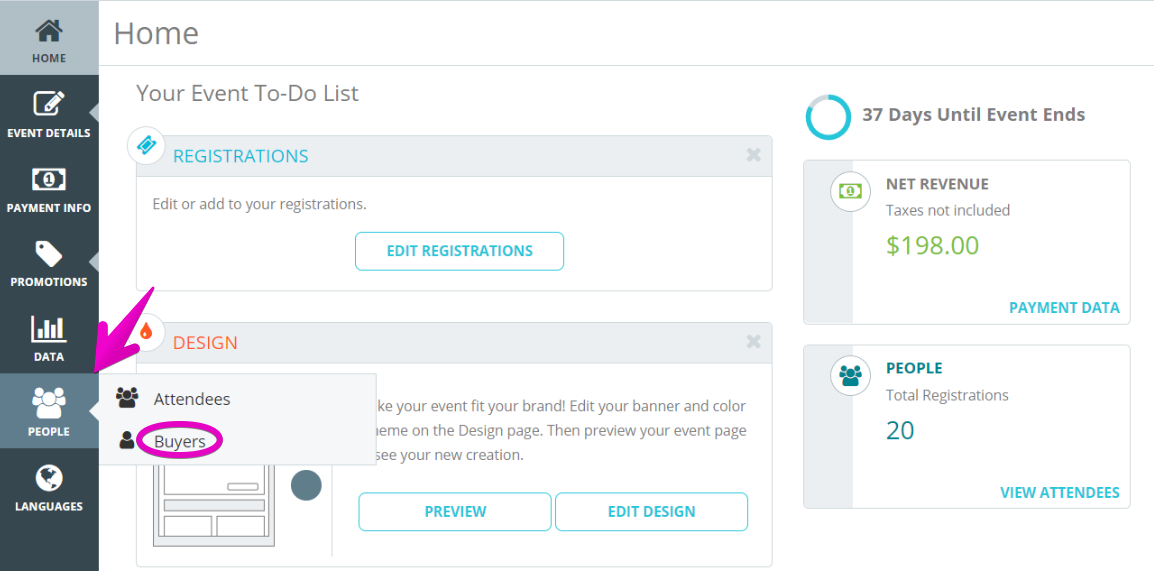
3. Use the search field and select the buyer whose answers you want to edit.

4. Click Manage Order and then Edit Form Questions

5. SAVE your changes, and you are done!
*Related Article: How do I view Buyer question answers for all my orders?
Once you have collected the information and answers to your Buyer Questions, looking them up is the simple matter of running a custom report.
1. Log In to your Events.com account.
2. Click on DATA and then on Downloads
3. Change the report from the default Registrations to New Custom Report
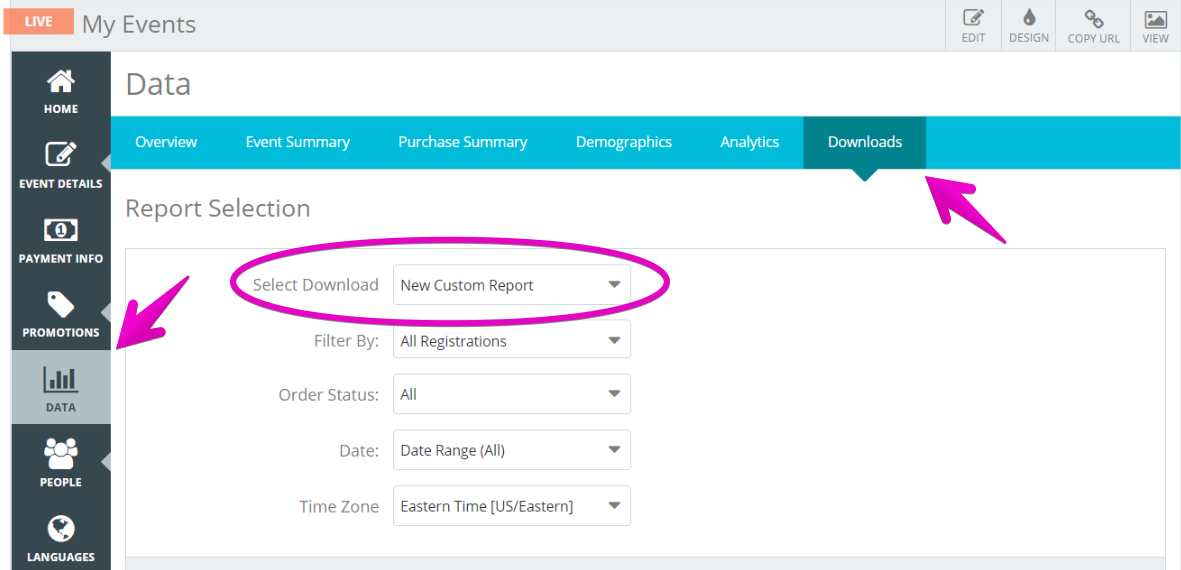
4. You can now select which buyer form questions you want included in your report. If you’d like to run this report ongoing, give it a Report Name it and click Download Report.


Note: If you need the report to be for a certain time period, you can adjust the date range before running the report.
Form questions are one the easiest ways to find out more about your attendees. When you turn on form questions, Events.com provides you with a preset list of questions that can not be changed. These are first name, last name, and email. It also comes with date of birth, gender, and address but these can be deleted if you feel that it does not pertain to your event. Find out how to add form questions to your event below!
1. Log In to your Events.com account.
2. Click EVENT DETAILS in the left side menu within your event, and select Form Questions.

3. Toggle Yes to turn on and access attendee form questions.
Note: If you added Registrations to your event, the Attendee Questions will default to ON because events that collect registrations usually need information from each attendee. If you added Tickets, the Attendee Questions will default to OFF. You can choose to change the default at any time.
4. First Name, Last Name and Email address are the required minimum questions if Questions for Attendees are on.
5. Click Add Question at the bottom of the standard form.
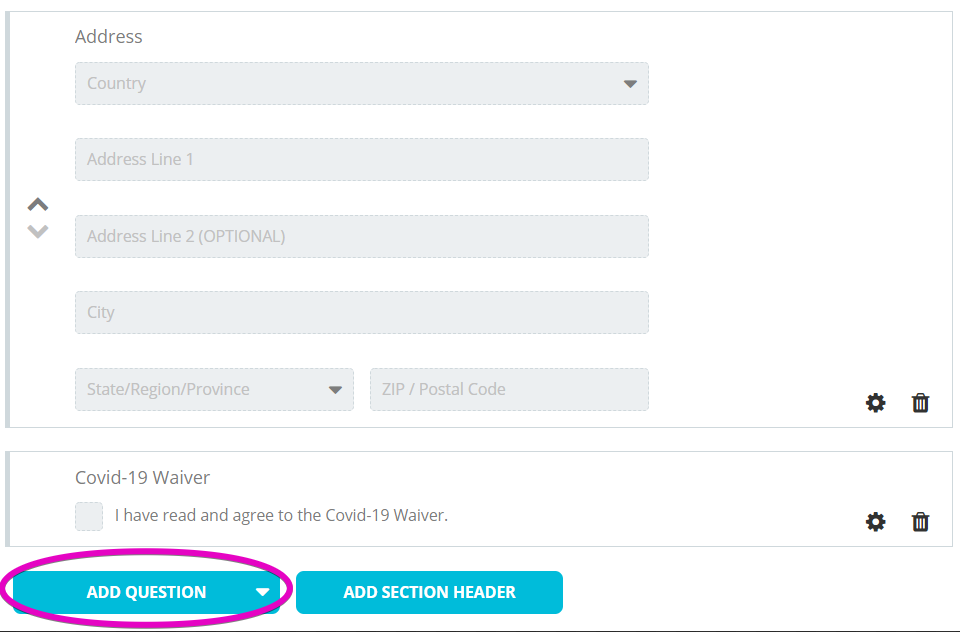
6. Select the question type under other questions. To find out more about the other questions click here.
7. Proceed to create the question and apply the settings for this new question.
8. Click SAVE to save your work.
When setting up form questions, there are a few default questions being first name, last name, email, date of birth, gender, phone and address. Depending on the type of event you are putting on, gathering as much information from your event goers can be extremely valuable. For example, you may need emergency contact information for each attendee if you are organizing a marathon or obstacle course. In any case, Events.com gives you all the control you need to create an entry form that fits your event’s needs. You may request as much information as necessary from your registrants, but know that Events.com only needs the Buyer’s first name, last name, and email address, to process an order. Let’s look at the different types of custom questions:
- Dropdown: With the Dropdown question, you are able to ask an initial question then ADD CHOICE to provide your attendees with various amount of answers to choose from. Attendees will only be able to select one answer choice. For each of the choices, you may ask one additional question by clicking the Add drop down menu. You are able to choose from another Dropdown question, Multi-Select List, Text Field or Other Address. This type of question is also called a conditional question. To find out how to add conditional questions and an example of one click here.
- Multi-Select List: The Multi-Select List is very similar to the Dropdown except Multi-Select List does not allow for an additional question to be asked depending on the answer choice that is chosen. Multi-Select List allows for attendees to choose either just one answer answer choice or multiple answer choices. An example for this question could be, “What years did you attend our festival?” and the choices could be “This is my first year, Attended in 2018, Attended 2017, Attended 2016, etc.”.
- Text Field: With this question, it allows for attendees to enter in information into a text box. You are able to get information from your attendee that you otherwise may not have been able to otherwise. An example of this question could be, “What brand of bicycle do you own?”. This could be useful if you want to find out what are the most common brands attendees use at your event.
- Waiver: This will allow for you to put in a set of guidelines or rules that your attendee would need to follow when participating at the event. By having them click on the box, it would stipulate that they have read the waiver and are agreeing to follow those guidelines. To see how to add a waiver to your event click here.
With Events.com, regardless of if you are selling tickets or registrations at your event(s), you can add form questions to be answered by each event goer. If you are adding an Address question, and you know most of your attendees will be coming from a specific country, now you can make it easy on them by selecting a Default Country for their address. This will reduce any room for error and allow the attendee to simply select their state/province that applies.
To add a Default Country to your form, please follow the steps below:
1. Log In to your Events.com account.
2. As an organizer your first screen will be your organization data. You can select between your LIVE, DRAFT and COMPLETED events and choose the event for which you would like to customize.
3. Go to EVENT DETAILS in your left side navigation, and then select Form Questions.

4. Find the default Address question and click on the Setting (gear) icon, to open the advanced settings for the question.

5. Set the Default Country.

6. Click SAVE.
The Events.com platform allows you to set up customized confirmation emails for your attendees so that you can provide them with pertinent information, specifically about YOUR event! You can also craft a customized message that appears when they complete their purchase. You can add images, links and all the information you want!
1. Log In to your Events.com account.
2. Go to the Events page on your Organizer navigation. Choose the event for which you want to add customized confirmation emails.
3. Click on EVENT DETAILS in the left side navigation, and then select Custom Confirmation.

4. Here, there are two sections: CONFIRMATION PAGE and CONFIRMATION EMAIL.
The CONFIRMATION PAGE is the Page that appears right after the transaction was successful.
The CONFIRMATION EMAIL is the custom text that will be added to the email the Event Goer will receive once they have completed their transaction.
5. Add text and images
- Add text (up to 3000 characters) and hyperlinks
- Add custom banner image for the email (Max size 585 x 162 pixels. Maximum size: 1 MB).
- You can create different confirmation emails for different registration categories if you need to provide these attendees with unique information related to their category.
6. Click the SAVE button at the bottom or top of the screen to save your changes.
Yes you can! Waivers are a great way to provide a set of guidelines or rules that need to be followed at your event. The form recognizes the Buyer as being the primary person, if they also sign up, they can sign their waiver right then. If they sign someone else up, the other person will receive directions in their confirmation email on how to sign their waiver (a youth registration will allow the signature of a parent/guardian after entering in their date of birth). To add a waiver with a required electronic signature to your registration form follow these simple steps below!
1. Log In to your Events.com account.
2. Click on the EVENT DETAILS icon on the left side navigation and select Form Questions.

3. Scroll to the bottom of your entry form and click ADD QUESTION.
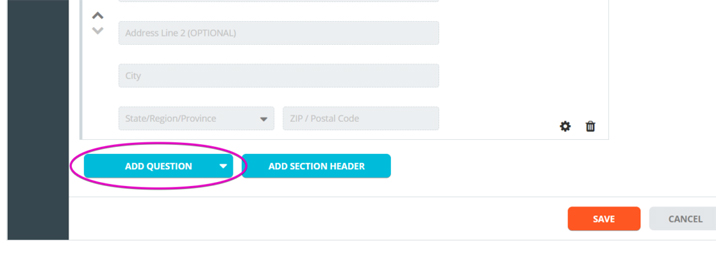 4. Select Waiver, under Other Questions.
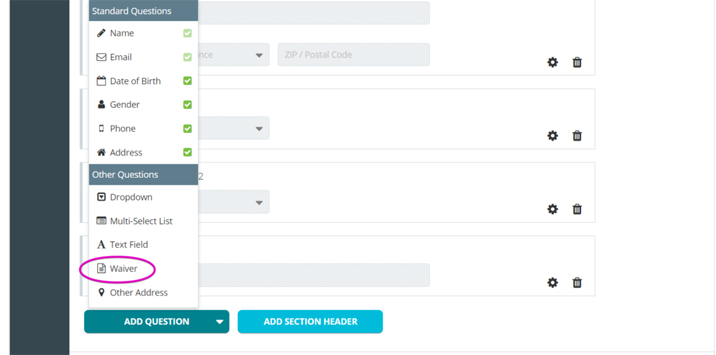
5. You have the choice of an Electronic Signature or a Check Box for the agreement type. To require an Electronic Signature, ensure you have that option selected. Then you can give your waiver a different name which will appear to your attendees. Write, or copy and paste your waiver into the waiver body.

6. When you’ve finished adding your waiver, click SAVE at the top or bottom of the page before navigating to a new page. Your attendees will now have a text field for their electronic signature in the registration form.
When people start registering, you can keep an eye on your attendees to see who has and has not signed and even send reminders with these easy steps:
1. Within your event, click DATA from the tools on the left.
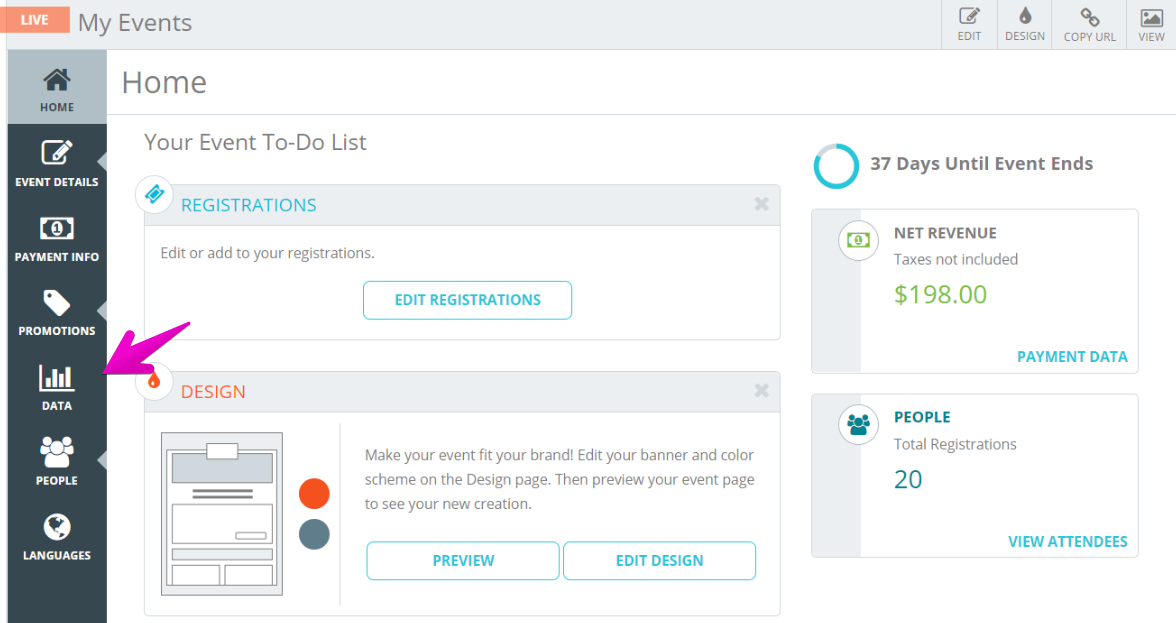
2. The Overview summary dashboard will appear by default (read about building your Overview Summary here). In the blue navigation tool bar, click Event Summary.
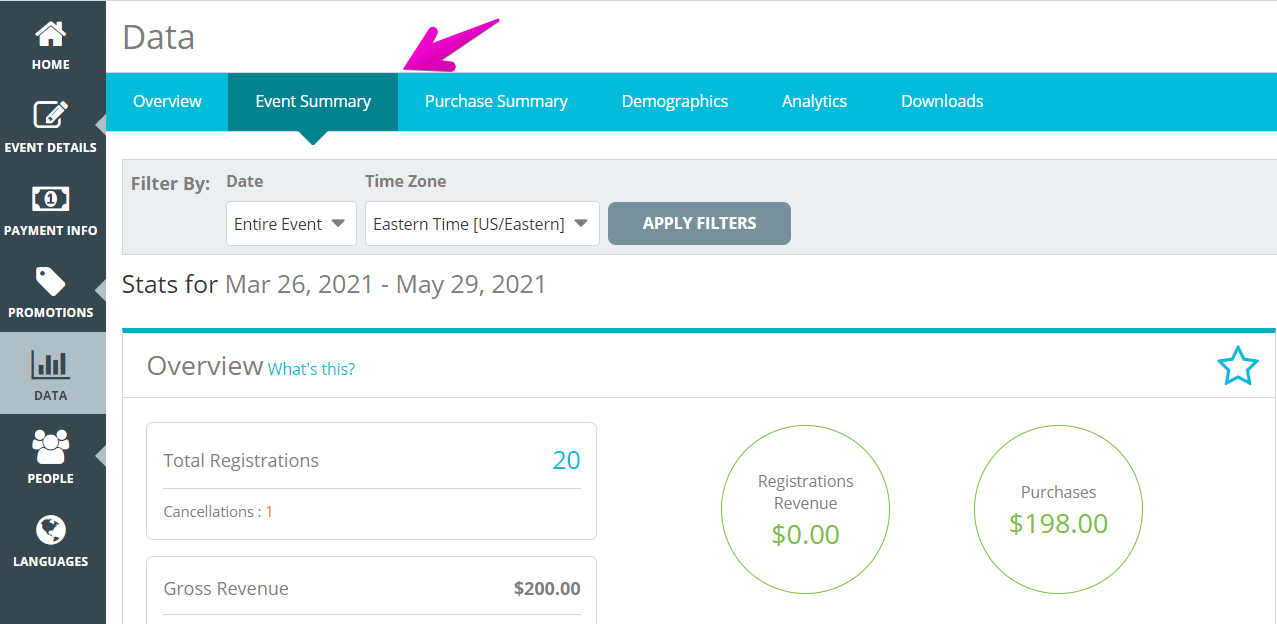
3. Scroll down to the Waiver Signatures section. This is where you can see a pie chart of how many people have Signed and Not Signed. You can download a spreadsheet for individual review and preview the reminder email. You are able to send the reminder email 3 times to communicate with your attendees.
This is what your attendees will receive:
Note: You can add as many waivers as necessary. To do this, simply repeat the steps above for each one. Waivers will always appear at the bottom of your form.
Absolutely! We understand that things can change in the event industry at any time. By adding an Electronic Signature Waiver, you can easily send out requests to your attendees to request they sign, and keep track of their progress. Pro Tip: This can be the first waiver or one of many!
If you need help adding an electronic signature waiver please refer to this helpful article – Can I require an electronic signature for my event waiver?
If you’ve added your waiver and are ready to notify your attendees please use the following steps:
1. Within your event, click DATA from the tools on the left.
2. The Overview summary dashboard will appear by default (read about building your Overview Summary here). In the blue navigation tool bar, click Event Summary.
3. Scroll down to the Waiver Signatures section. This is where you can see a pie chart of how many people have Signed and Not Signed. You can download a spreadsheet for individual review and preview the reminder email. You are able to send the reminder email 3 times to communicate with your attendees.
This is what your attendees will receive:
Virtual content has become extremely important and often includes some additional info or links to share after someone has completed their order. We’ve recently added a secure way to share this with your attendees through the new Digital Event Page. This page gives you the space to add in some details and share some links with your participants. After they sign up, they are able to access the page within their Events.com accounts from their order. When you’re ready, you can start customizing your Digital Event Page with these steps:
1. Log In to your Events.com account and navigate to your event.
2. In your event, click EVENT DETAILS and then Digital Event Page.
3. Click CREATE PAGE to get started! The toggle to Make Digital Event page visible to Attendees is defaulted to YES. If you’re not ready to share the page, you’ll want to toggle to NO.
There are three page elements available to help you build your digital event page. Text for adding text or images, with or without hyperlinks in the Text Editor. You can add Video for an optional title and video link (to be embedded for viewing) or Live Stream for an optional title and streaming link. Click Add page element to get started. You can also add a Background Image. If your event page has a banner, you’ll have the option to USE BANNER IMAGE. If you didn’t have one, or would like to use something else, you’ll have the option to SELECT IMAGE. Click Preview Page to see how your page will appear to your attendees. Use the arrows on the left to move your page elements around, or the trash cans on the right to remove an element completely. You can add as many of each page element as you’d like for your Digital Event Page.
4. When finished, click SAVE. This page will now appear within your attendees’ Events.com accounts! (If your toggle was set to NO, your progress will be saved for later)
Attendees can access the Digital Event Page from within their Events.com accounts.
Or by clicking the link within their confirmation emails (attendees will need to Sign Up if they haven’t already created an account).
Pro Tip: If you have added another language to your event, you will also be able to offer your Digital Event Page in that language as well.
On Events.com, yes you can! We all love when family and friends sign up for an event together, but we still want a chance to talk to them one on one. If you want to ensure that you’re getting unique email addresses for each person in an order, here’s how you can make it required:
1. While in your event, select Event Details – Settings
2. Open Pre-Registration Setup by clicking the +
3. Scroll to Unique Email Address and toggle to Yes
4. When finished, click to Save! Your attendees will be required to provide unique email addresses for each person in their order.
Manage Purchases (5)
To collect t-shirt sizes for your event, we recommend using an Attendee Item. This is one of our purchase questions, that is asked to each attendee. Attendee Items can be free or paid, required or optional, and you can set a specific inventory limit for each size. Even without set limits, inventory is tracked and can be viewed in the Purchase Summary tab of your event’s Data section. It is also available to be downloaded in your reporting when you need to know who gets what.
Here’s how you can add an Attendee Item into your registration form:
1. Log In to your Events.com account and open your event.
2. Click on EVENT DETAILS on the left side of the screen, and select Purchases.
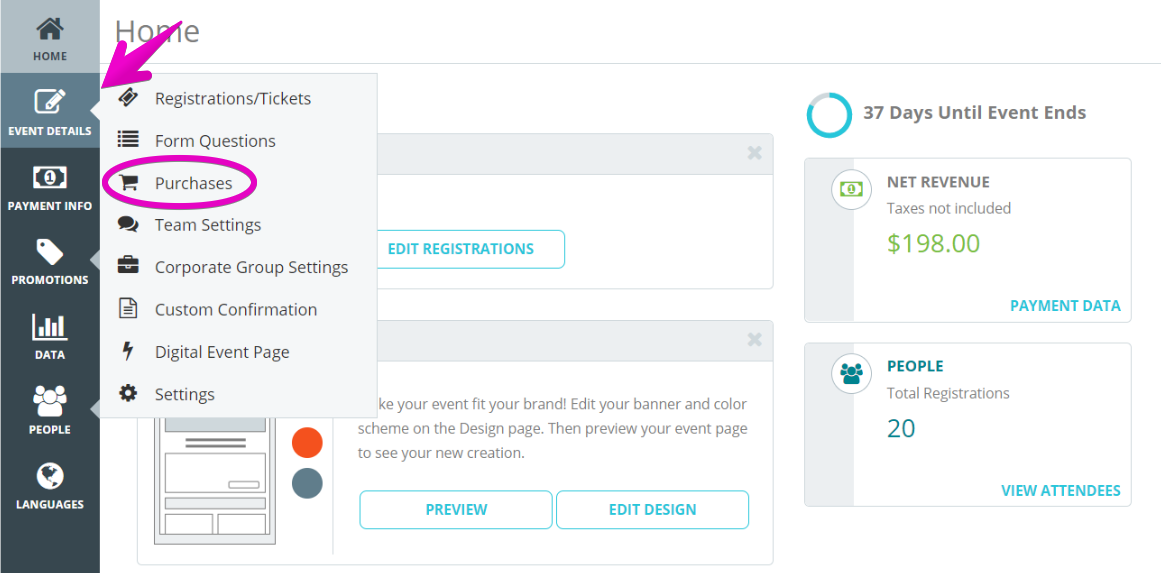
3. Then, click on ADD ATTENDEE ITEM.

4. Give your t-shirt question a NAME (e.g. “T-Shirt Size”). OPTION NAME is one size. If you have limited stock for a size, set that limit under INVENTORY to avoid selling more than you have. Since this is a complementary item, you can keep the price at $0.

5. To add another size, click on the plus symbol. You can add as many sizes as you want, with individual inventory limits and pricing. If an option’s position needs to be adjusted you can use the arrows to the left of the Option Name to move it up or down in the list (This is the order how they will appear in the registration form).
6. Click the gear icon to open Advanced Settings. Here you can choose to toggle Required to YES or NO, add Product Description, add a Product Image, the option to Hide Pricing, customize the Availability and add any Restrictions.
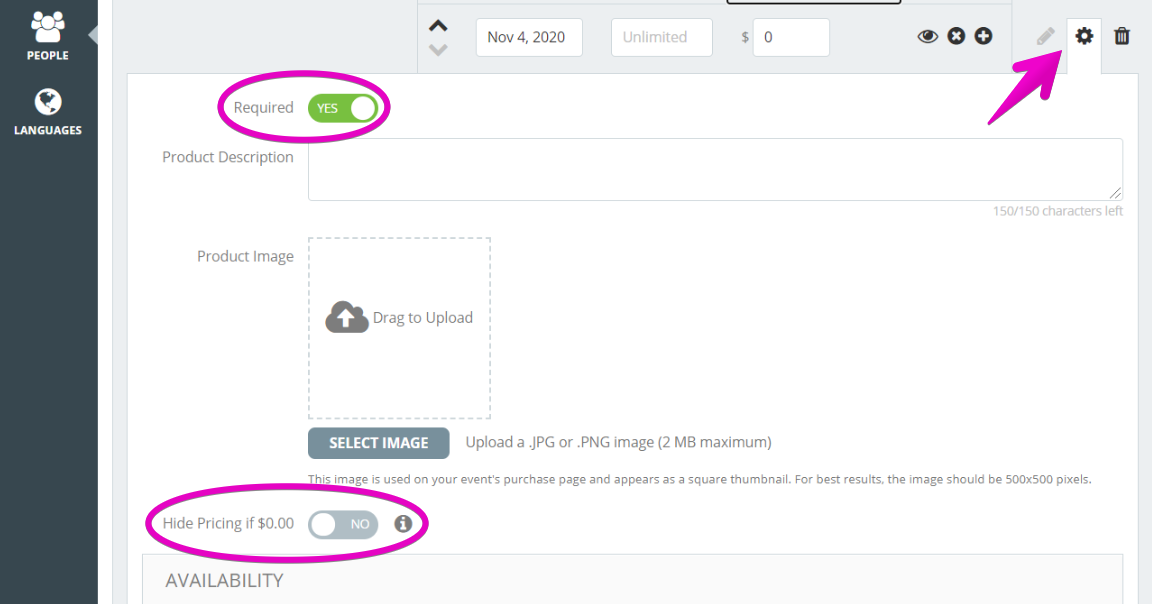
8. Click SAVE to save your changes.
Pro Tip: It is a good idea to add an image for any item that you offer or sell to get people excited about wearing your awesome brand. See How do I add an Image to Additional Purchases? for instructions.
Adding an image for each Additional Purchase that you offer can entice people to make more purchases.
1. Log In to your Events.com account.
2. Navigate to the Purchase page by clicking EVENT DETAILS and selecting Purchases.
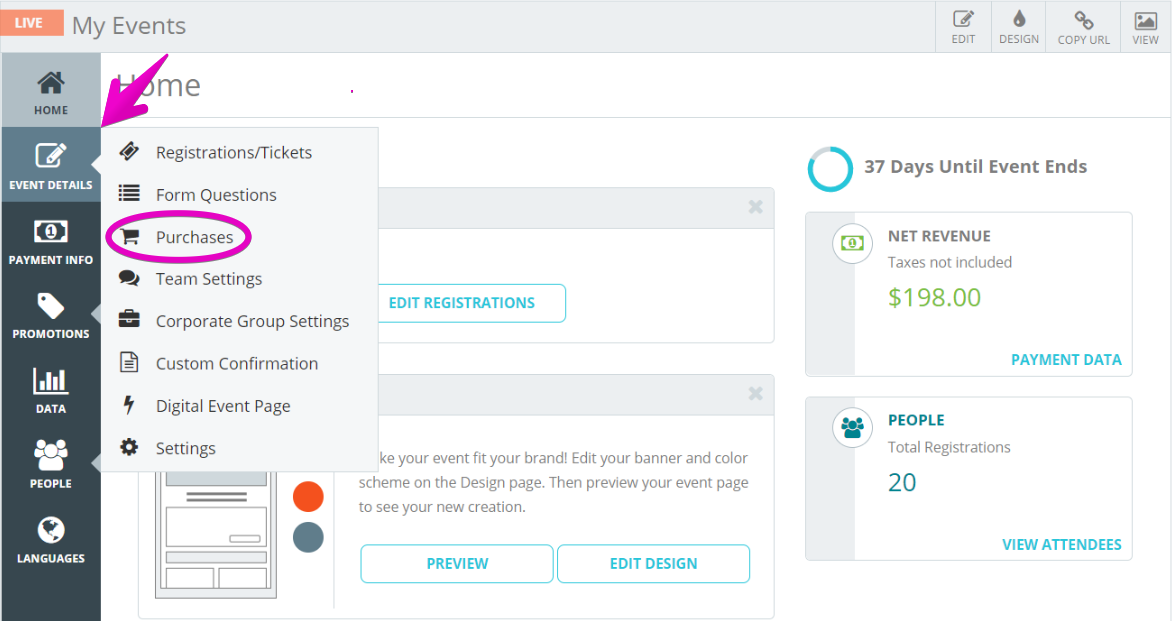
3. If you have not set up any purchases yet, you will need to add either an Attendee Item or Other Stuff by clicking the add option underneath your selection. Then click on the gear icon to the right of each item to open Settings.

4. Click SELECT IMAGE or drag and drop a .JPG or .PNG image (2MB maximum) to upload an image. Suggested size no smaller than 300 x 300. If your Item is required, a REQUIRED banner will appear at the top of the image so you will want to leave a blank space to avoid it from blocking your image.

Note: During registration, the image will have an enlarged view option.
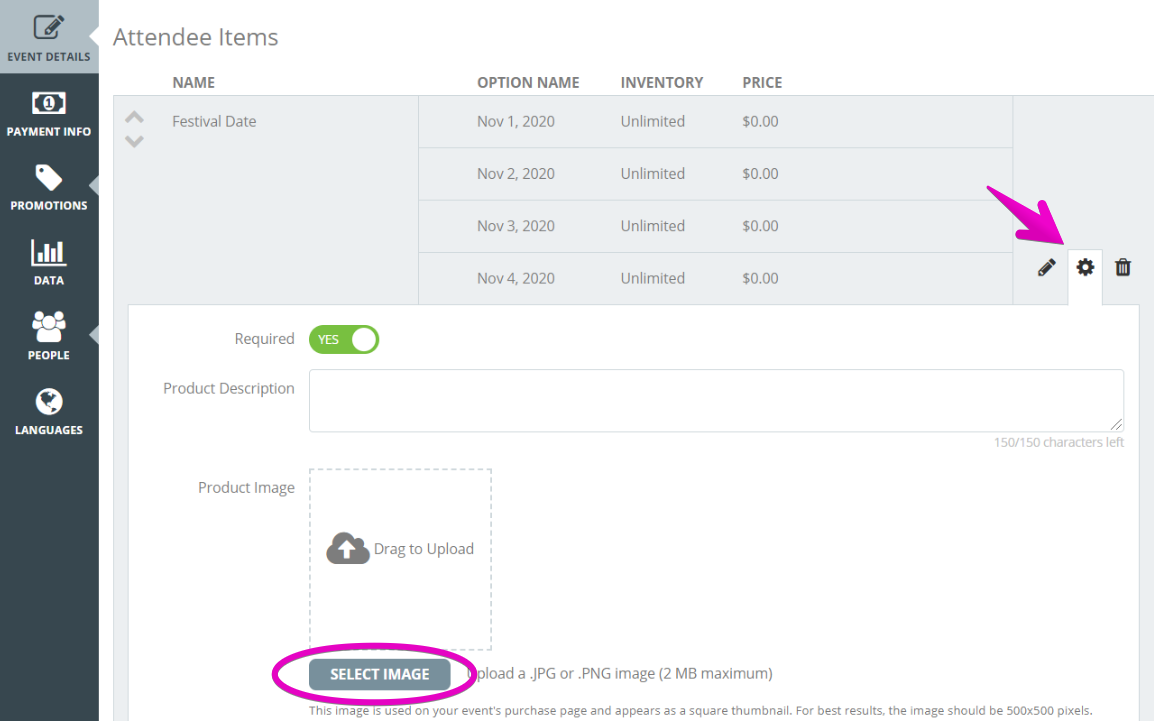
5. Click SAVE to save your work
If your event or brand sells merchandise, such as a hat or water bottle, you may want to allow people to purchase merchandise in addition to their registration/tickets. We call these items Other Stuff because they are not associated to a specific attendee and can be purchased by the buyer of the order. Attendees and Buyers can come back to Events.com to purchase other stuff at any time after the initial purchase. Events.com offers a clean design to allow you to add an online shopping experience to your order form. You can add images, manage inventory and build your brand loyalty all in one place.
1. Log In to your Events.com account.
2. Click on the EVENT DETAILS on the left side of the screen, and select Purchases.

3. Then, click on ADD OTHER STUFF under Other Stuff to get started.

4. Give your item a name (e.g. T-Shirt) and an option name (e.g. Small).
5. Set the price for the option, or leave it blank if it is free.
6. Set the inventory limits for each option so that you do not oversell your available inventory.
7. If there’s more than one option (e.g. Small, Medium, Large), you can add these by clicking on the plus icon. Each option can have a different name, inventory limit, and price.

8. In the Advanced Settings for each purchase, you can add a product description or image. Adding an image may help motivate people to buy the item.

9. Click SAVE to save your changes.
You may have additional items for your event that each event goer must select to complete a purchase, such as a t-shirt size or parking pass. If so, you’ll want to set this up under the Purchases tool. All items added to this portion of the registration flow will be listed for each registrant, and may or may not have a price associated to them. It is important to note that each registrant may only select each item once. For example, if you list a free t-shirt with the registration, each registrant may only select one size.
Follow these steps to add a purchase to one or more registrations in your order form:
1. Log In to your Events.com account.
2. Click on EVENT DETAILS on the left side of the screen, and select Purchases. Then, click on ADD ANOTHER ATTENDEE ITEM to get started.
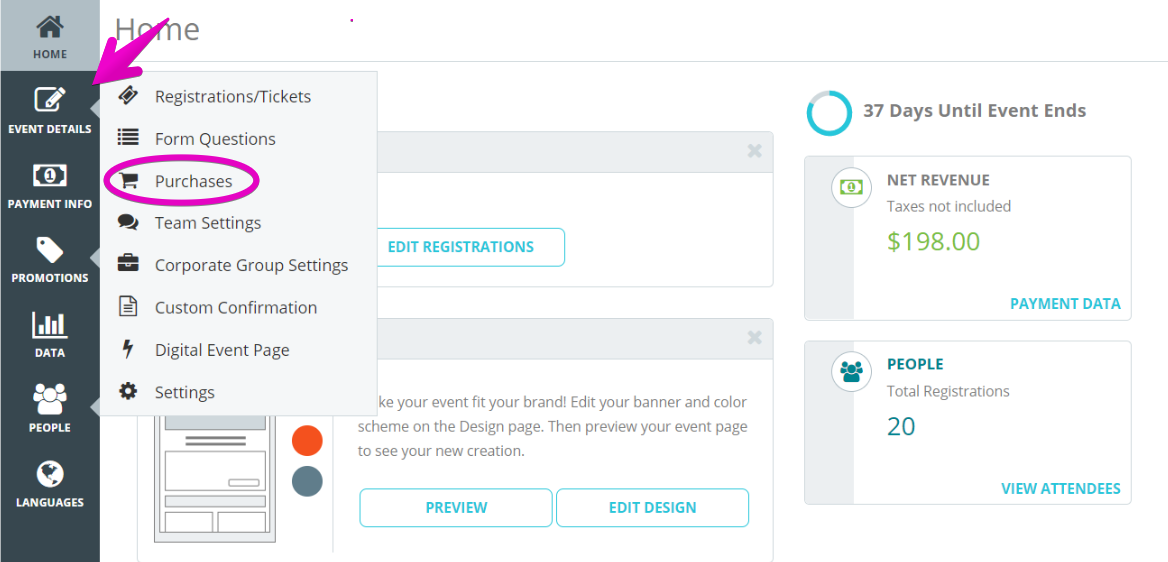
3. Give your purchase and option names (e.g. Purchase: Hat and Options: Black, Gray, Blue). Set the inventory limits for each option, so that you do not oversell your available inventory. Set the price for the option if it is not free.
4. Add more purchase options by clicking on the “plus” + icon. You can set a different name, price and inventory limit for each purchase option by repeating steps 2 through 4.
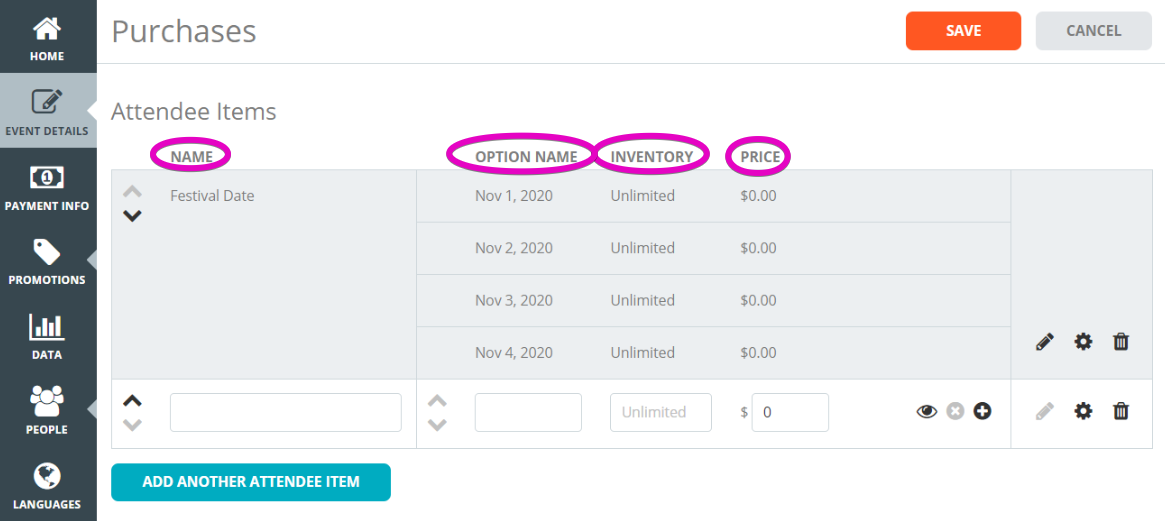
5. The Advanced Settings (gear icon) allows you to toggle Required to YES or NO (Whether an attendee will be stopped to answer the question), add Product Description, Product Image, the option to Hide Pricing and to customize the Availability.

6. Click SAVE to save your work.
Pro Tips: It is a good idea to add an image for any item that you offer or sell to get people excited about wearing your awesome brand. See How do I add an Image to Additional Purchases? for instructions on adding images for additional purchases. Remember, items are associated to registrations and inherit their availability restrictions. If a registration is no longer available, the associated purchase(s) will not be either.
Adding purchasable items is an easy way to upsell and make additional revenue at your event! Follow the steps below to add Purchases!
1. Log In to your Events.com account.
2. As an organizer your first screen will be your Org Summary. You can select between your LIVE, DRAFT and COMPLETED events and choose the event for which you want to set up additional purchases.
3. Go to EVENT DETAILS in the left side navigation, and then select Purchases.
4. Here you can add Attendee Items (items for each registrant) or Other Stuff (items you would like to upsell to your attendees that will appear once at the end of the order). To add purchases click the ADD button under the option you want.
5. Fill in the NAME (e.g. T-shirt), OPTION NAME (e.g. Small), INVENTORY (number available, if left blank it will be unlimited), and PRICE.

Use the different icons provided to make changes to your items.
- The “x” icon removes an item within the type of item (e.g. T-shirt size Medium)
- The “plus” icon adds a new item
- The “pencil” icon edits an item
- The “gear” icon opens advanced settings
- The “trash” icon removes the entire item (e.g. T-shirt)
- The “up” and “down” arrows allows you to re-order your items
6. The Advanced Settings are slightly different between the two types of purchases (click the “gear” icon to open).
For Attendee Items the Advanced Settings tab allows you to toggle Required to YES or NO (Whether an attendee will be stopped to answer the question), add Product Description, Product Image, the option to Hide Pricing, to customize the Availability and add geographic Restrictions.

To add geographic Restrictions, toggle to Yes. From the first Location menu, you can select whether to Include a location (only be available for) or Exclude a location (unavailable for). Then from the second drop down, select your desired country and click – Add. You will see it appear in the box below under the header of the restriction you selected (either Include or Exclude).
*You must have the Address attendee form question set up to use this geographic restriction. For help setting up Form Questions, view – How do I customize my registration form?
For Other Stuff the Advanced Settings tab allows you to add Product Description, Product Image, the option to customize the Availability and add geographic Restrictions.
7. To add more purchases, click the ADD button under your desired option and start the process again!
8. Click the SAVE button to save your changes
Pro Tip: Attendee items are always limited to one per attendee, Other Stuff will be unlimited unless a Max Allowed Per Order is set.
Manage Registrations/Tickets (14)
Creating tickets or registrations is very easy to do! Tickets usually collect minimal info whereas a registration often collects a lot of info but it’s up to you which you’d like to use. This will be asked when you’re creating your event draft. For more on the differences between tickets and registrations click here. Now let’s get started on creating your tickets or registrations by following the steps below!
1. Once your event draft has been created, you can add your Ticket or Registration for sale.
2. Select EVENT DETAILS on the left hand side menu and select Registrations/Tickets.
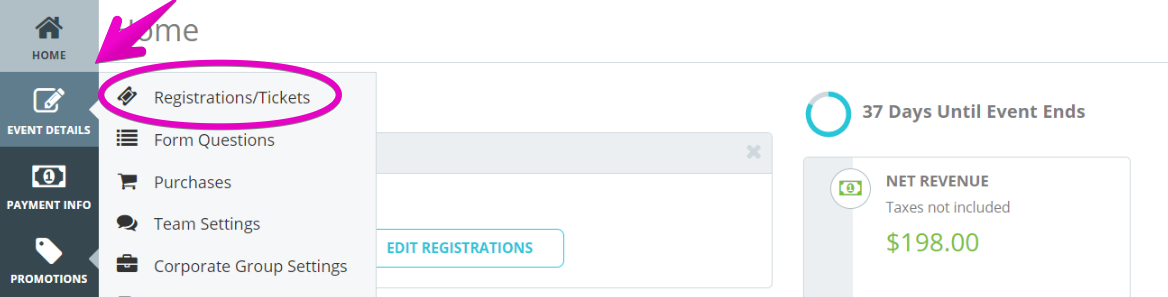
3. There are settings that will apply to all of the registrations/tickets. Event Capacity, Currency and a short cut to the Settings Page for fees and taxes. The default is for fees to be charged on top of the ticket price, and no taxes. If you change your mind about whether to sell Tickets or Registration, you can click the Change to Registrations (Tickets) at any time.
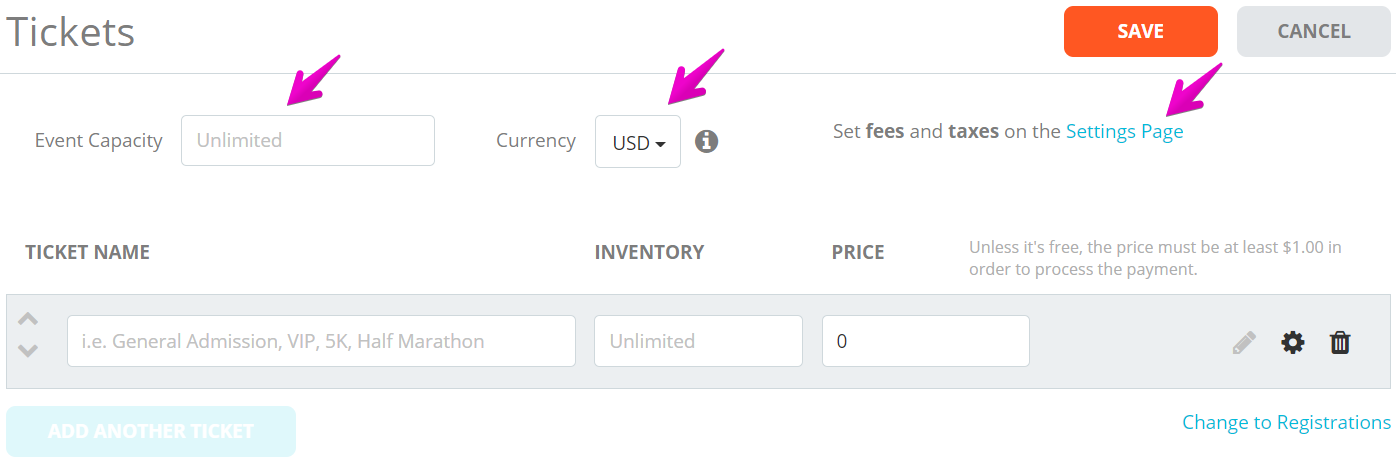
4. Give the Ticket a Name, add Inventory (if applicable, blank is unlimited) and Price. Clicking the gear icon will open the Settings.
There are several options for customizing your tickets. Description will appear on the event page under the name of the ticket.

The Availability section gives options for where the ticket will sell, and between which dates. If you’re hosting a free event, you can toggle to Hide Price if $0.00.
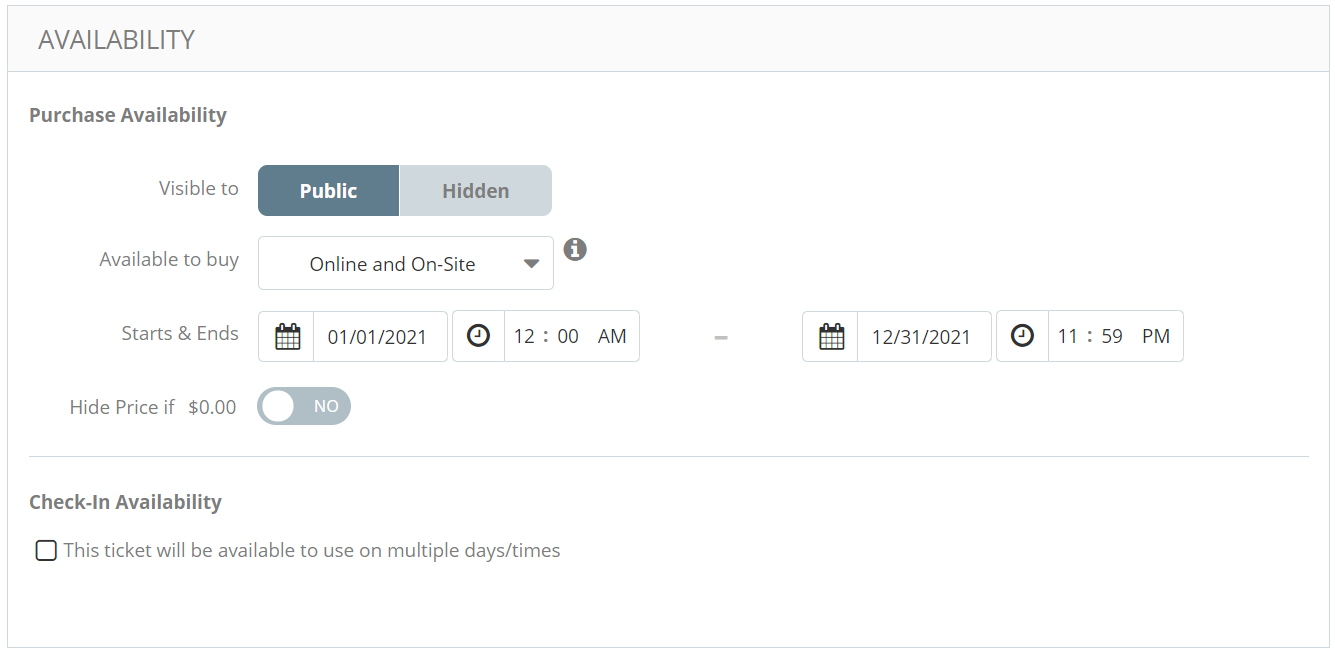
5. There are additional optional features that you can use by toggling them on.
Price Changes can be set in two different ways. Date & Time: by adding the start date of the new price and the new price. Inventory: by adding the number of the starting ticket with the new price. You can add multiple Price Changes.
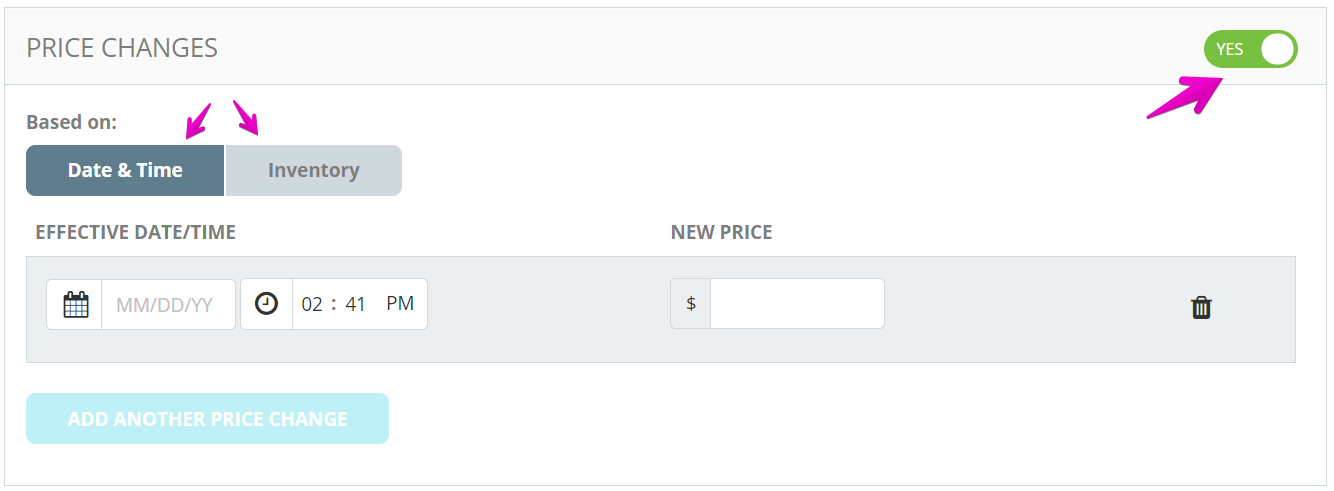
Restrictions on People gives you the options of adding restrictions by Gender, Age, Min and/or Max Purchase per Order and Location. You can also toggle on an Access Code. If you’re protecting a ticket/registration with an access code, someone will need to enter the access code before they can select the ticket/registration.

Payment Installments may not appear available to you right away, but please reach out to our customer success team at help@events.com to inquire about the feature. It allows you to split the order payment into two for your Attendees. For more info on Installments, click HERE.
6. To add more ticket/registration types click Add Another Ticket (or Add Another Registration) and customize their Settings as needed.

7. When done, click SAVE to save your work.
Pro Tip: When in Preview mode any ticket/registration purchases will not result in orders or registrations. You can test your form without adding any test data to your event.
With a new price transparency law (SB-478) in effect in California (as of July 1, 2024), and other states expected to follow, it’s important for event organizers to display their total price information, inclusive of all fees, up front.
We’ve included some instructions below for how you can add the required pricing information to your event in Events.com Sell. Having this pricing displayed will help ensure compliance with the law and protect you as an event organizer.
If your fees are absorbed in your registration/ ticket prices then you are already advertising the total price and do not have to make any updates. If your fees are being added on top of the registration/ticket price (i.e. $50 + $3.95 Service Fees = Total Price $53.95) these steps below are for you!
1. While in your event, click EVENT DETAILS on the left side menu and select Registrations/Tickets.
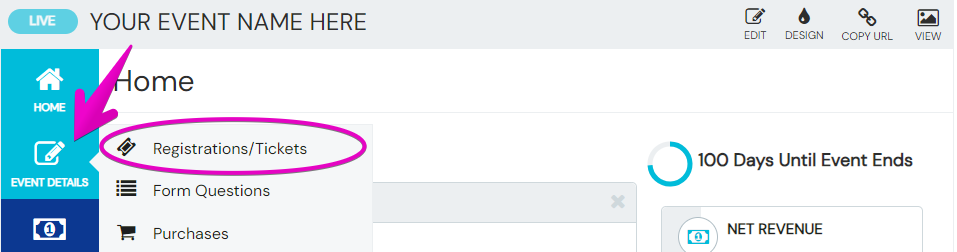
2. Click the gear icon to the right of the registration/ticket to open the Settings.
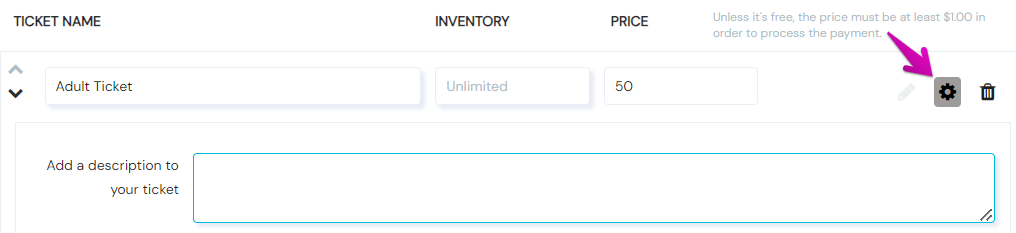
3. Enter your price information in the Add a description box. We suggest the phrasing Total Registration Price or Total Ticket Price. For example:
Total Ticket Price $53.95 ($50.00 + $3.95 Service Fees)
4. If you need help finding your fees, there are two ways to locate them.
- Visit your event page and open the registration/ticket (just like a regular purchase). Scroll down to the Order Summary and you’ll see the fees and total cost of the registration/ticket. You can copy these amounts to use.
OR
- Use our Events.com fee calculator, which you can find HERE
*Please note that the fee calculator displays the Events.com order fees and does not include payment processing fees. Depending on your fee setup the first option may be the best one for you.
5. After you’ve added a Total Price description to each of your registrations/tickets, click SAVE to save your work.
Pro Tip: If your event is LIVE, this description will appear on your event page in real time. Click VIEW in the upper right corner to open your event page and review your Total (Registration or Ticket) Price descriptions.
More Info about SB-478: SB-478, the “Honest Pricing Law” or “Hidden Fees Statute,” applies to the advertising and marketing materials for goods and services, including ticketing platforms and live events. Service fees and other mandatory fees must be included in the advertised price. However, taxes and shipping costs may still be added later. You can find more information about this California law in this FAQ from the California Office of the Attorney General.
Events.com has you covered when looking to expand globally with the ability to sell registrations or tickets in over 30 different currencies.
1. Log In to your Events.com account.
2. Click on the SETTINGS tab at the top right of your dashboard home screen.
3. Click on Currencies on the left toolbar, and simply click on all forms of currency of which you wish to accept and SAVE when finished.
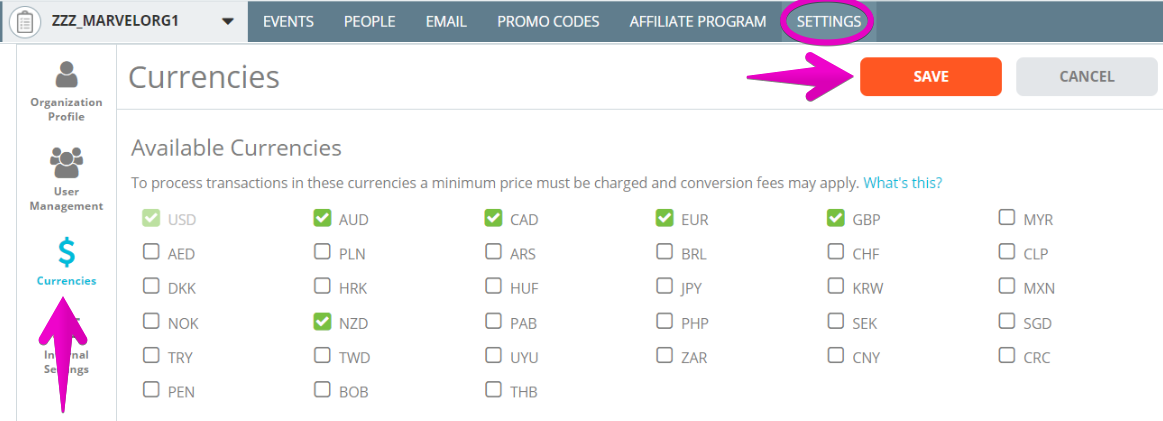
Here is a list of ALL currencies supported by Events.com:
USD – United States Dollars – available by default & cannot be removed from your organization
CAD – Canadian Dollars – available by default
AUD – Australian Dollars – available by default
GBP – British Pounds – available by default
EUR – Euro – available by default
AED – United Arab Emirates Dirham
ARS – Argentine Peso
BOB – Bolivian Boliviano
BRL – Brazilian Real
CHF – Swiss Franc
CLP – Chilean Peso
CNY – Chinese Renminbi Yuan
CRC – Costa Rican Colon
DKK – Danish Krone
HRK – Croatian Kuna
HUF – Hungarian Forint
JPY – Japanese Yen
KRW – South Korean Won
MXN – Mexican Peso
MYR – Malaysian Ringgit
NZD – New Zealand
NOK – Norwegian Krone
PAB – Panamanian Balboa
PEN – Peruvian Nuevo Sol
PHP – Philippine Peso
PLN – Polish Złoty
SEK – Swedish Krona
SGD – Singapore Dollar
THB – Thai Baht
TRY – Turkish Lira
TWD – New Taiwan Dollar
UYU – Uruguayan Peso
ZAR – South African Rand
Note: In order to process payments in any of these currencies a minimum price must be charged at checkout. Check out the list below to find the corresponding minimum for each currency.
If you are receiving remittance in a currency different from the one your event(s) transacts in, a currency conversion fee will apply.
*Only USD and CAD will allow you to receive remittance via ACH direct deposit.
Here is a list of the minimum prices required:
- USD -1.00
- CAD – 1.00
- AUD – 1.00
- EUR – 1.00
- GBP – 1.00
- NZD – 1.00
- AED – 4.00
- ARS – 10.00
- BRL – 4.00
- CHF – 1.00
- CLP – 700
- DKK – 7.00
- HRK – 7.50
- HUF – 290.50
- IDR – 13592
- JPY – 125
- KRW – 1156
- MXN – 16.75
- MYR – 4.50
- NOK – 8.75
- PAB – 1.25
- PHP – 47.50
- PLN – 4.00
- SEK – 8.75
- SGD – 1.50
- TRY – 3.00
- TWD – 35.00
- UYU – 30.00
- VND – 22395
- CNY – 6.50
- CRC – 531.75
- PEN – 3.75
- BOB – 7.00
- THB – 36.00
- ZAR – 14.75
If a registration or ticket option is only available for a specific period of time, you can set these specific date availability for each category option you offer. When would you need this? If you have a multiple day event with different registration/tickets for each day, you might not want to sell ‘Day 1’ tickets at the same time as ‘Day 2’ or ‘Day 3’. You would be able to close ‘Day 1’ tickets, without closing ‘Day 2’ or ‘Day 3’ tickets.
1. Log In to your Events.com account.
2. Navigate to the event in which you wish to add the date availability to.
3. Click on EVENT DETAILS and select Registration/Ticket.
4. Click on the Setting (gear) icon to the right of the registration/ticket name.
5. Enter the date it will become available (start date) and the date it will close (end date).

6. Press SAVE when finished!
If your event has tiered pricing, you can preset your registration/ticket types to change price automatically. You have two options, either to set them by date, or by inventory.
1. Log In to your Events.com account.
2. Navigate to the event in which you wish to add the price increase to.
3. Click on EVENT DETAILS and select Registration/Ticket.
4. Click on the Setting (gear) icon to the right of the registration/ticket name.
5. Toggle PRICE CHANGES to YES and select whether you want the price changes to happen based on a date and time, or based on inventory sold. You will be able to add as many price changes as necessary.

Pro Tip: If you select Based on Date & Time, the new price will take place at the moment you indicate. If you select Based on Inventory, the new price will take place when the available inventory for this category is equal or less than the quantity you indicate.
When creating or editing a registration/ticket type, you can add custom restrictions. Restrictions can be set for a various amount of reasons but in this article we will cover age and gender. Lets get started!
1. Log In to your Events.com account.
2. Navigate to the event in which you want to add or edit the Registration/Ticket type.
3. Click on EVENT DETAILS and select Registration/Tickets.
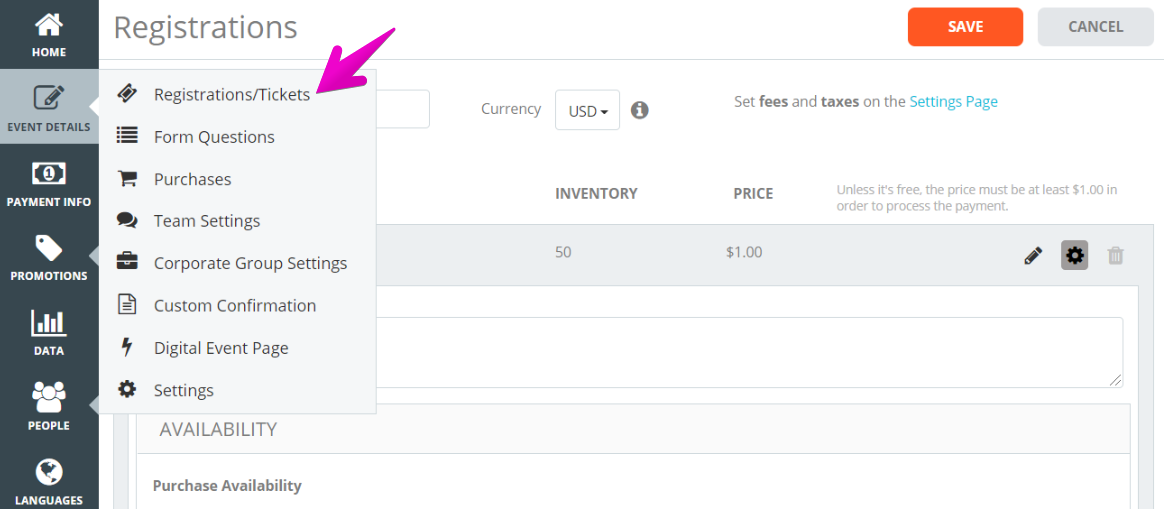
4. Click on the Setting (gear) icon on the registration/ticket type you wish to add the restriction to.
5. In the RESTRICTIONS ON PEOPLE section toggle the setting to YES.

6. Now you can set a gender or age restriction to your registration/ticket type.
Pro Tip: If you are setting an age restriction, you can set an age as of the event start date, registration date, or enter a custom date.
If your event requires you to gather detailed information on each attendee, you’ll want to offer registrations. Some examples of registered events are: Running Events, Races, and Conferences.
If your event experience does not depend on you having detailed information for each attendee, you might want to offer tickets. Some examples for ticketed events are: Festivals, Concerts, Art fairs.
You’ll be asked to decide while you’re creating an event, but you can also change your choice from the Registration/Ticket page. This is really up to you, and how you decide to present your options to your attendees.

Pro Tip: Adding questions to collect detailed information can be done through Form Questions. Please check out this helpful article to get started! – How can I collect additional information from my event goers?
We are thrilled to say YES! If you are offering a $0 registration or ticket you can hide the $0.00 pricing from your event detail page.
1. Log In to your Events.com account.
2. If your registration/ticket type is created, go to it and open the Advanced Settings by clicking on the Setting (gear) icon.
3. In the Purchase Availability section toggle Hide Pricing if $0.00 to YES and voilà! You’re all set!

4. Press SAVE when finished.
Tip: If you’re looking to create a totally free event, you should check out the full steps for creating a free event in the article – Can I create a FREE event?
Give buyers the flexibility to pay for their ticket or registration in payment installments. A great option for events at a higher price point. With this feature, you can set up a ticket or registration that allows buyers to make two payments—(1) a Down Payment and (2) a Final Payment. The down payment is due at the time of purchase and the final payment is due at a later date.
1. To enable the Payment Installments feature please start by contacting us at help@events.com.
2. Log In to your Events.com account and select the event for which you want to set up Payment Installments.
3. Go to your Registrations/Tickets in the Event Details side navigation.
4. For the ticket or registration you would like to enable installments for, click the gear icon to access the advanced settings.

5. At the bottom there is a box that says Payment Installments. Toggle YES to activate.
6. You will see several prompts for you to fill out. Please make sure you set a Down Payment Amount which would be the amount your attendee pays at first checkout.
Tip: The credit card information entered during the purchase will be automatically used for the Final Payment which can be calculated or entered below on the date that you specify. We also allow you to charge an optional Installments Fee. The attendee can update their card info if needed before the payment – How do I update my payment information for my second installment?

7. Make sure to click SAVE so that your settings are captured. Once saved, your attendees will be able to pay in installments.
Due to US Marketplace Facilitator sales tax regulations, Events.com will automatically calculate, collect, file and remit sales tax revenue on behalf of our US Event Organizers.
For tax automated Event Organizers, it will be necessary to select tax categories for your tickets/registrations and purchases. For Event Organizers outside of the US, you can customize your tax settings in the Pre-Registration Settings.
If you have any questions, please contact us for more information help@events.com
Automated Tax Setup
For Registrations/Tickets:
1. While in your event, go to EVENT DETAILS in your event navigation (left side), and then Registrations/Tickets
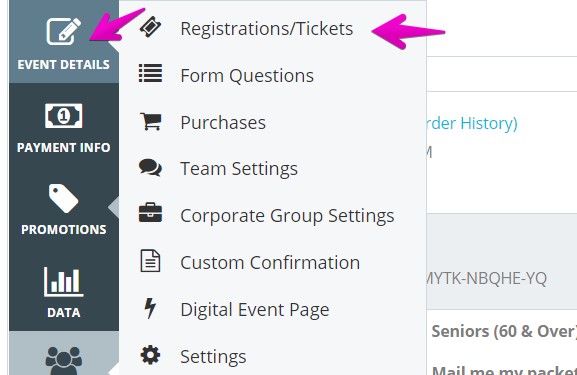
2. Fill in the registration/tickets fields, and then open the Advanced Settings by clicking on the gear icon to select your Tax Category. *for extra description and examples of the tax categories, please refer to the Tax Category Chart below.
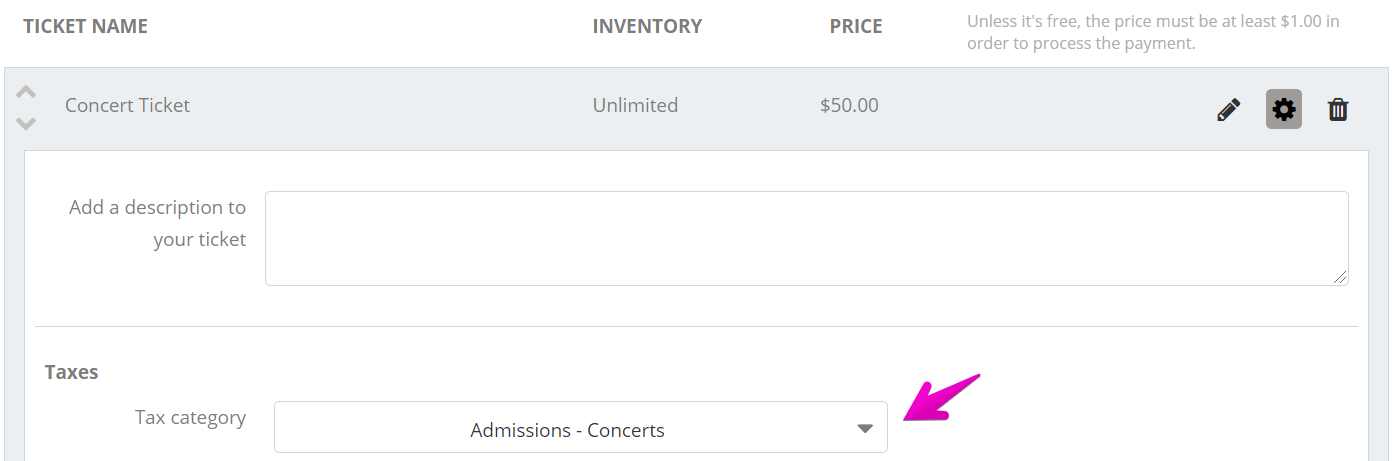
3. SAVE all changes.
For Purchases:
1. While in your event, go to EVENT DETAILS in your event navigation (left side), and then Purchases
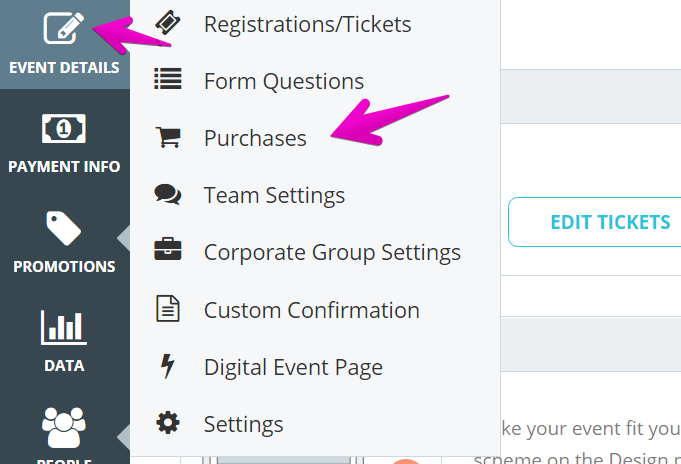
2. Fill in the purchase fields, and then open the Advanced Settings by clicking on the gear icon to select your Tax Category. *for extra description and examples of the tax categories, please refer to the Tax Category Chart below.

3. SAVE all changes.
Custom Tax Settings
1. Go to EVENT DETAILS in the left-side navigation, and then Settings.

2. In the Taxes section simply toggle Add tax to the price of Registration/Tickets to YES. Then type in the TAX NAME, the PERCENTAGE and select which Registrations/Tickets it APPLIES TO.

3. If any of your Purchases are taxable, you can toggle on Add tax to the price of additional purchases for this event. Then type in the TAX NAME, the PERCENTAGE and select which Purchases it APPLIES TO.
4. SAVE all changes.
Tax Category Chart
| Tax Category | Description | Examples |
| Admissions – Performing Arts | Ticket for admissions to concerts, theatrical performances, opera, and recitals. | 1. Tickets for an operatic performance; 2. Tickets for community theatre plays; 3. Tickets for concerts |
| Admissions – No Entertainment or Amusement | Ticket for admissions that do not include entertainment or amusement | 1. Ticket for community event that does not include rides |
| Admissions – Entertainment or Amusement | Ticket for admissions that include entertainment/ amusement | 1. Tickets to a state or local fair that includes rides |
| Beverages (Non-alcoholic) | Ready-to-drink beverages (non-alcoholic) | 1. Soft drinks; 2. Iced tea or lemonade; 3. Fruit punch |
| Beverages (Beer) | Ready-to-drink beer/hard ciders | 1. Beer by the glass; 2. Hard lemonade/Hard soda; 3. Hard ciders |
| Beverages (Wine) | Ready-to-drink wine | 1. Wine by the glass |
| Beverages (Hard Liquor) | Ready-to-drink liquor and cocktails | 1. Mixed drinks: Margaritas/ Martinis; 2. Shots of alcohol |
| Charity Donation | Any item/monetary amount being donated to charity | Any item/monetary amount being donated to charity |
| Clothing | General Clothing Items | 1. T-shirts; 2. Pants; 3. Jackets/Hoodies |
| Default – Any item not categorized | Any item not categorized | Any item not categorized |
| Food | Ready-to-eat food | 1. Sandwiches; 2. Burritos/Wraps; 3. Desserts: Cakes/Pies |
| General Tangible Items | Any physical item that you sell not listed in another category | 1. Bumper stickers; 2. Keychains; 3. crafts |
| Hats & Caps | Hats/baseball caps for sale | 1. Baseball cap; 2. Visors |
| Parking | Charges for parking a vehicle | 1. Parking within a garage/lot; 2. Bike rack rental |
| Rent- Space in a Facility | Rental/Lease of Commercial Property | 1. Rental of booth at a craft fair or flea market; 2. Rent of space in a building for an event (does not include guest rooms in a hotel) |
| Rented Tangible Property | Short-term rental of property | 1. Renting golf clubs for a golf tournament; 2. Rent of museum handsets |
| Shipping and Handling | Shipping and handling charges for items to be shipped to customer, whether at the event or to another address of the customer’s choosing | 1. Shipping and Handling cost; 2. Delivery fee for courier/third-party delivery |
| Transportation | Transportation Services – does not include monies to be deposited to pay for a group bus charter | 1. Bus seat; 2. Ride-share service; 3. Taxi service |
| Water | Individual Bottles of Water | 1. Aquafina |
As we roll out our new sales tax system, we will be listening to your feedback and concerns. Events.com will calculate, collect and file sales taxes due on your behalf. However, and most importantly, Events.com does not provide tax, legal or accounting advice; if you have questions about the implications and effects of our new sales tax system on your business, you should discuss these concerns with your tax professional and/or a tax attorney. This material has been prepared for informational purposes only, and is not intended to provide, and should not be relied on for, tax, legal or accounting advice. Events.com makes no representations, warranties, or assurance as to the accuracy, currency or completeness of the information provided in this email. Accordingly, you are solely responsible for any inaccuracies, late fees, interest payments, and other tax implications that arise due to such tax system. As such, you agree to indemnify and hold harmless Events.com and its Providers and each of their respective current and former directors, officers, founders, employees, agents, assigns and any other person for whom it is in law responsible from and against any and all expenses, damages, claims, suits, losses or actions (“Claims”) brought against Events.com and its Providers, including but not limited to Claims with respect to such Sales Tax decisions, charges, fees, and implications. You will be automatically enrolled in Events.com’s tax system and authorize Events.com to calculate and pay your sales taxes on your behalf. If you wish to opt-out of such system, please or contact Events.com at help@events.com.
If you are planning an event that takes place on multiple days, and need the registrations/tickets to be available for check-in throughout the duration of the the event, follow these steps during set-up:
1. Log In to your Events.com account
2. Click on the event for which you wish to make registrations/tickets apply to multiple days
3. Click on EVENT DETAILS, then select Registrations / Tickets
4. Next, click on the Settings (gear) icon within the registration/ticket type, and scroll down until you see the option box under Check-in Availability, and click on This ticket will be available to use on multiple days/times (or registration depending on your event).
5. Enter the specific dates of which you wish to allow for check-in, and make sure to click the orange SAVE button at the top or bottom of the page.
Pro Tip: On each new day, any attendees for this Registration/Ticket type will appear like brand new people ready to be checked in. The Events.com report will record the specifics for when they checked in on which day for you. A pop up on the app will tell you if you’re trying to check in someone outside of their check-in.
When creating or editing an attendee item purchase, you can add custom Restrictions based on Gender, Age and/ or Location. Maybe you want youth (up to age 15) to have a special t-shirt, maybe there are male and female race categories or you want to offer something based on the person’s home address. You can apply these restrictions to your purchase. Then during the purchase flow, after asking the associated form questions, only eligible attendees will be able to make selections. For ineligible attendees, the questions will be hidden. Let’s look at adding those restrictions!
1. Log In to your Events.com account.
2. Navigate to the event in which you want to add or edit the Purchase Restrictions.
3. Click on EVENT DETAILS and select Purchases.
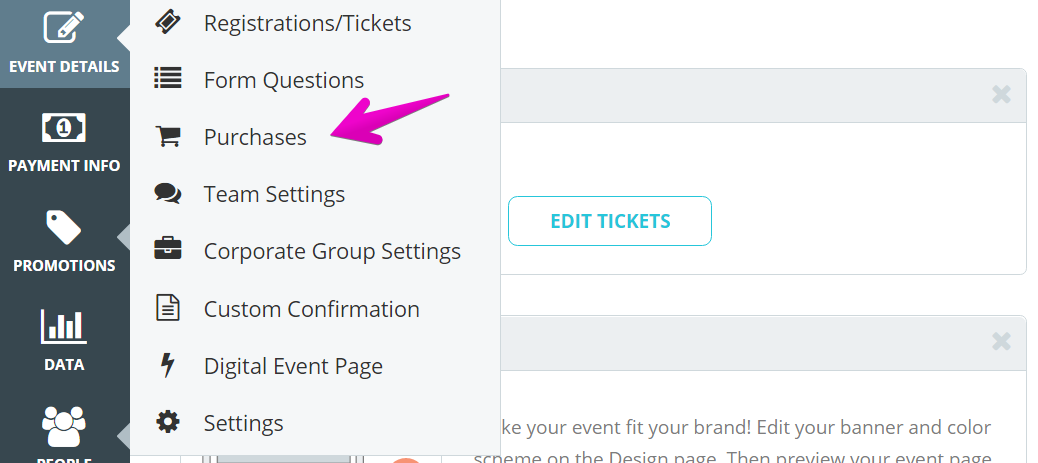
4. Click on the Setting (gear) icon on the purchase you wish to add the restriction to.
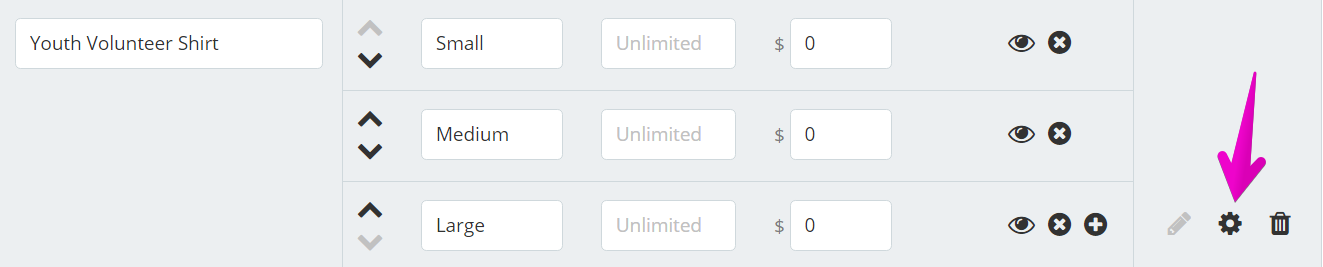
5. Toggle RESTRICTIONS to YES.
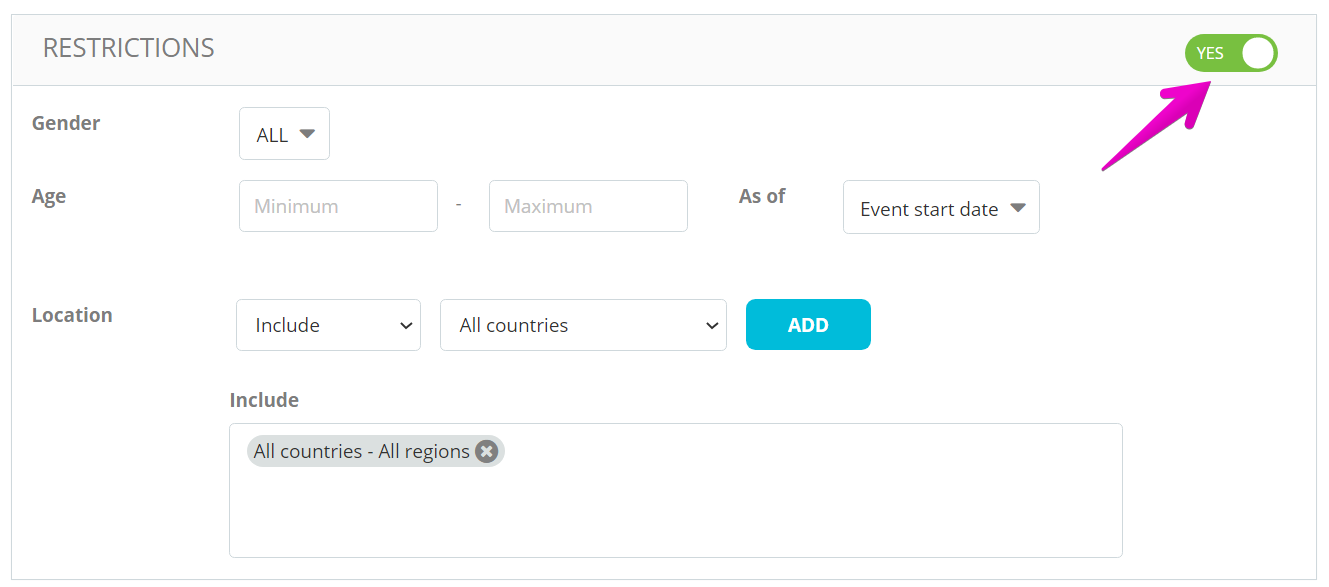
6. Now you can set a Gender, Age or Location restriction to your purchases. These restrictions will be based off of the attendees responses to the corresponding Form Questions: Gender; Date of Birth; Address. Make these are in your order form!
Pro Tips: Purchases are a great way to track inventory, prices can be set to $0 and Hidden if there’s no cost involved. If you are setting an age restriction, you can set an age as of the event start date, registration date, or enter a custom date.
When you’ve added restrictions for your attendees on purchases, they can see this in two places – within your order form, and in their Events.com account after their purchase.
If your youth volunteers get a cool shirt you can set a restriction that it’s for anyone 15 years of age and under (based on how you set the restriction).
Order Form
When the order form is blank, the attendee will see the item and the restriction.
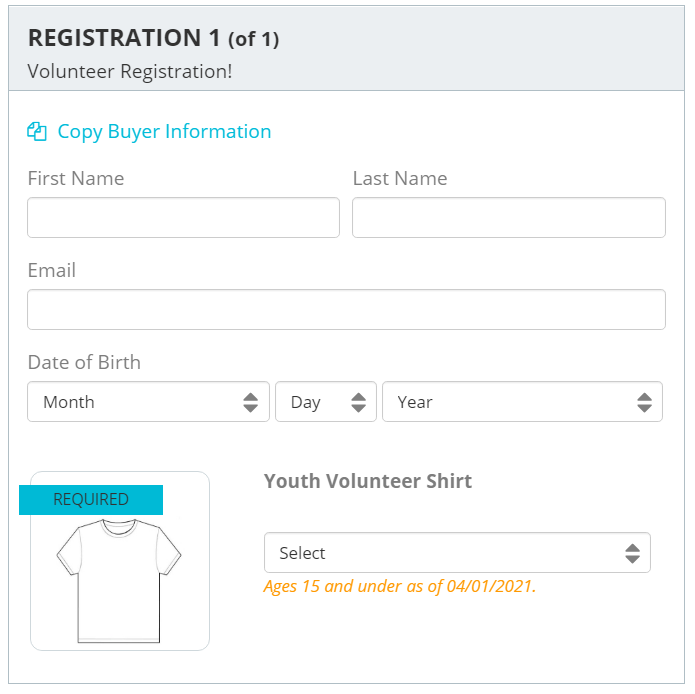
If they meet the restriction they can make their selection:

If they are not eligible based on the restriction the item is hidden:
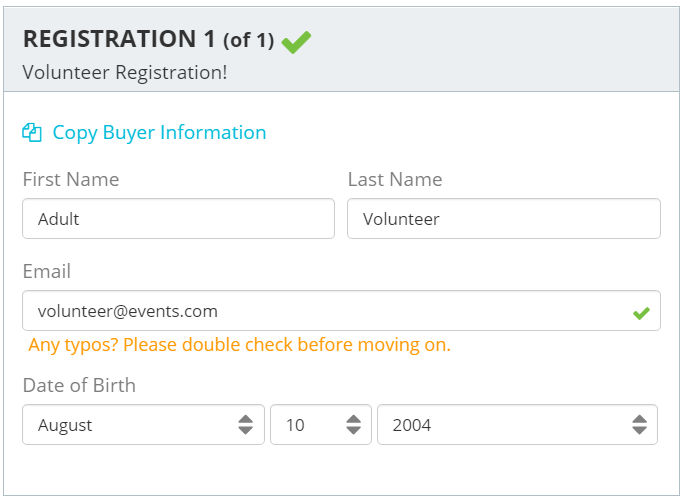
Consumer Portal (the attendee’s Events.com account)
An attendee can log into Events.com to view their order at any time, or if the settings have been turned on (by you, the organizer) they can make edits to their information. When you have Attendee Items with restrictions we recommend not making attendee items editable. Any attendee item that was not answered will not display in the attendee’s order view. However, any unanswered would appear in the editable view and the attendee would not be able to make any updates to their order.
If an attendee makes an update making them ineligible for an attendee item, they will receive an error pop up alerting them that they are no longer eligible and the item will display a message directing them to email you for help.
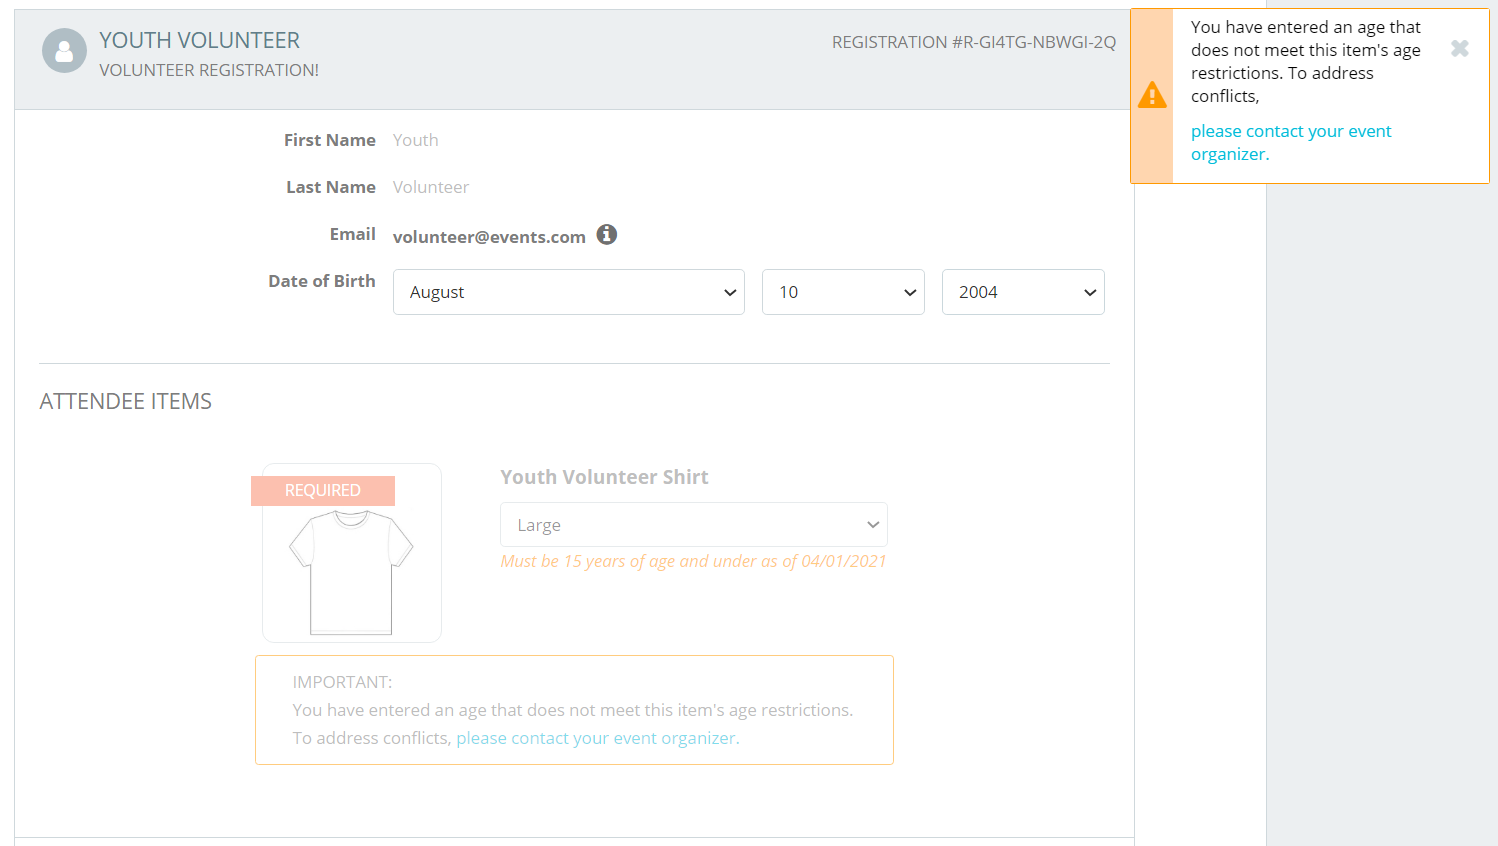
At Events.com we know that every athlete participating in a USA Triathlon (USAT) event needs to have a USAT membership. We’re thrilled to offer an integration with USAT! This integration verifies memberships and makes purchasing memberships a breeze for your attendees!
Connect your USA Triathlon Event
1. Log In to your Events.com account.
2. As an organizer your first screen will be your organization data. Choose the event for which you want to add USAT.
3. Next, go to EVENT DETAILS in the left side menu and select Settings.
4. Open Pre-Registration Setup by clicking the + on the right.
5. Scroll to the USA Triathlon section. Is this a USA Triathlon® sanctioned event?. Toggle this to YES and enter your USA Triathlon® Event ID #.
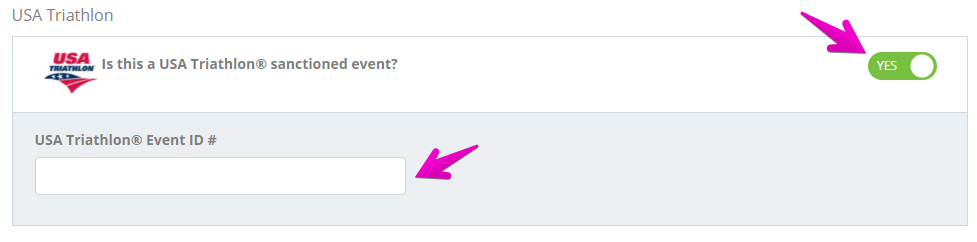
6. The Event ID # field will display your event name underneath, or let you know if the number is invalid. When you’ve entered in the correct Event ID #, press SAVE. The default will add USAT to each of your tickets. If you need to remove the requirement you can turn it off in Registrations/Tickets Settings.
Registrations/Tickets settings for USAT
7. Go back to Event Details and click Registrations/Tickets.
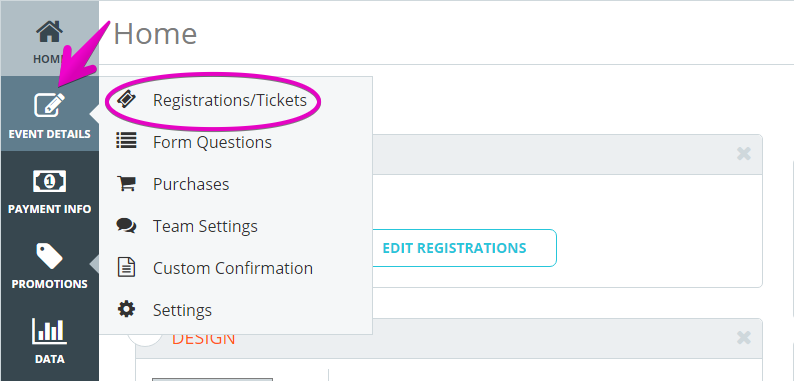
8. Open the Settings for the registrations or tickets that do not require USAT and you can remove the check for USA Triathlon® Membership.
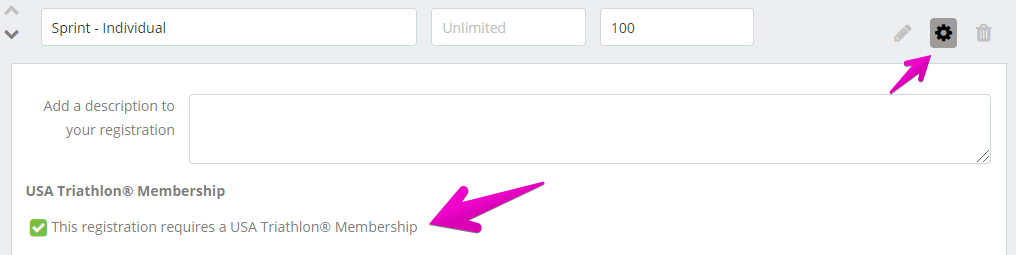
9. Press SAVE on this page and voilà! The registrations requiring USAT have a description displayed. And your order form will now collect, verify and help purchase USAT memberships for your USAT registrations/tickets. *Gender and Date of Birth will become required Form Questions for these registrations/tickets as they are required by USA Triathlon.

Pro Tips: Changes and Transfers can be allowed between USAT required registrations/tickets. The new registration/ticket will verify the membership. *Global Event License Memberships will need to be updated for a new registration, please have those athletes reach out to our customer success team at help@events.com.
After registration, athletes can view their USAT membership numbers in their Events.com accounts. Organizers will be able to view the USAT membership numbers upon viewing individual registrations or by downloading a registration report. The registration report is located in the Data Download Center.
If you require any additional info on our USA Triathlon integration, please Contact Us.
USA Triathlon is the national governing body for the multisport disciplines of triathlon, duathlon, aquathlon and winter triathlon in the United States. Please visit their website for more about their organization and memberships – https://www.teamusa.org/usa-triathlon
Manage Your Event Page(s) (14)
Events.com makes it easy to link your event page to your website (or any website you want), as well as your Instagram, Facebook, and Twitter feeds. We don’t have to tell you how important social media can be when you’re trying to encourage the masses to share and promote your event. You can add Facebook, Twitter and Instagram when you Create an Event, or follow the steps below if you are already working on a draft.
1. Log In to your Events.com account and navigate to your event.
2. While in your event, click on EDIT in the upper right navigation.
3. Scroll to the SOCIAL section.
4. Enter your Facebook page name – pagename (the URL will display after clicking Save).
Note: Facebook does not allow “Event” pages to be shared, so please make sure this is your Facebook “Page”.
5. Enter your Twitter handle.
6. For Instagram integration, you will need to authorize that your images can be published publicly. To do this, you’ll need to log in to your Instagram account first. But no worries, it’s very simple and just a couple of extra steps. See below.
- Click on Log in to Instagram
- Login to Instagram and Authorize Events.com to access your photos and post them on a public site.
- Once you click Authorize, you will be taken back to your page to continue working on your event. That’s it!
7. Be sure to click SAVE when you’re done to capture all your hard work!
Adding a video to your event page is quick and easy! There are two places you can add a video that will show under the description on your event page.
Add a video while creating an event
1. Click the Create an Event button in the top right of your navigation
2. Follow steps 2-4 above.
3. Press SAVE
2. On the Create an Event page, in Step 2 Details, you’ll see an Add Video button.
3. After clicking this you’ll see a text box where you can add your video URL. The video must be hosted on YouTube or Vimeo.
4. If you want to add more videos click the Add Another Video button
5. Finish the rest of the steps, and click GET STARTED!
Add a video after you’ve created your event
1. While in your event, click on EDIT in the upper right, then go to the DETAILS section
2. Follow steps 2-4 above.
3. Press SAVE
Forgot to add something to your event when you created it? No problem! After you have created event, at any point you can EDIT your event to have all the information that it needs. To see how to EDIT your event follow the steps below!
1. Log In to your Events.com account.
2. In your event, click the EDIT button towards the top right corner.

3. To ensure the best possible experience for your audience, add as much detail and branding as possible.
4. Add your event’s description. You may add as much information as needed. We recommend something short and sweet to allow for a quick understanding of your event by your audience.
5. Link your event details page to a website by adding the URL under Your Event URL. Please note this is optional.
6. Be Social! We highly suggest that you add social media feeds to your event details page, to drive brand loyalty and increase conversion.

7. Click Save to finish and save your work.
8. If no edits are needed, simply click GO LIVE.
Your event par link can be very useful when you want to possibly send it out to a mass group of people or to have it in the bio of your social media account(s). Find out how to access it below!
1. Log In to your Events.com account to access your event DRAFT.
2. Next to the EDIT view, click GO LIVE in the top right corner.

3. Click Copy URL to be able to paste it elsewhere– or –

4. When viewing either the LIVE page, or the PREVIEW page, copy the URL out of your browser’s address bar.
At any time during the setup process you can PREVIEW your event and run through as many registrations as you like before going live. This is a great way to see what your participants see and make sure your registration flows the way you want it to.
As soon as you have entered the basics for your event such as time and location you will have access to the PREVIEW button, which is at the top right of your HOME dashboard.

Clicking it will bring you to a preview of your event’s registration landing page. Provided you have prepared registration types and form questions, you can go through the process of buying tickets to your event.
The registration flow will be exactly the same as what your participants will see but no data will be collected to skew your reports and no credit card information is needed to reach the confirmation page.
Sometimes our organizers prefer to go back to the drawing board by deleting a draft event and starting new. A draft event can be removed from your organization page to make room for new exciting events!
1. Log In to your Events.com account
2. Go to your Org Summary page by selecting EVENTS, and then DRAFT in your Org Summary.
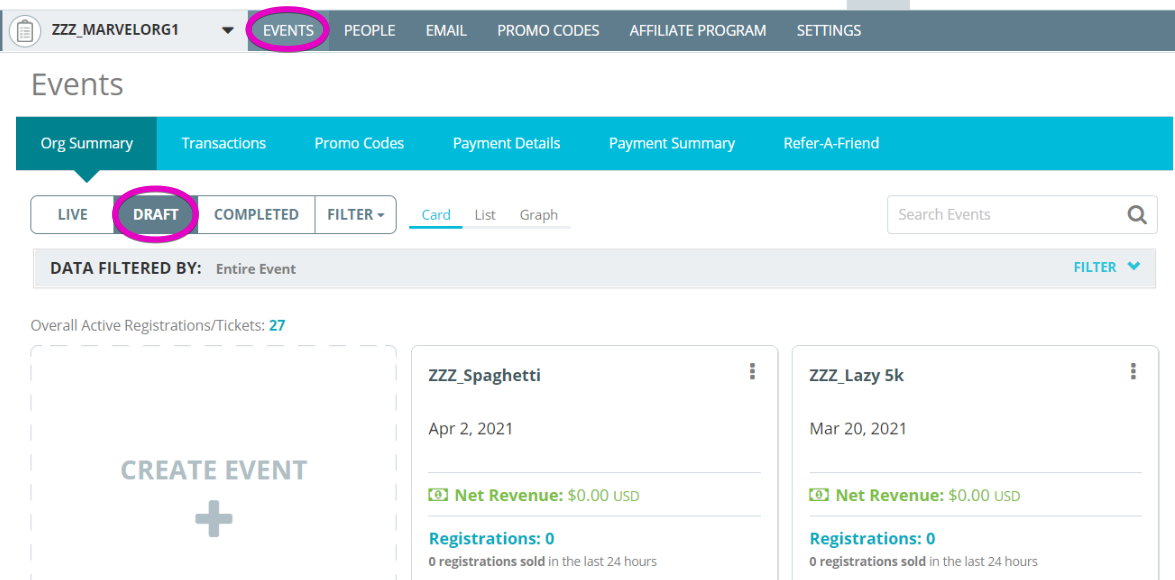
3. Select the three dots to open the More Options Menu and then select Delete.

4. Pressing Delete will launch a pop-up requesting you to confirm if you are certain with the deletion.
5. Press YES, DELETE completely remove your draft event.

Note: Users can only delete DRAFT events, no LIVE or COMPLETED events can be deleted from Events.com. Once a draft event is deleted, it is permanently gone, so make sure you are certain you wish to have the draft removed.
The event Home page is designed to give you a quick snapshot of your event stats, along with providing guidance on features and tools to make your event the best it can be.
1. When you Create an Event or go into an existing event, the Home navigation item is on your left navigation.
2. Here you can view event stats on the right side, or features/tools to utilize on the left.
3. If a feature/tool does not pertain to your event, simply click the “X” to hide it.
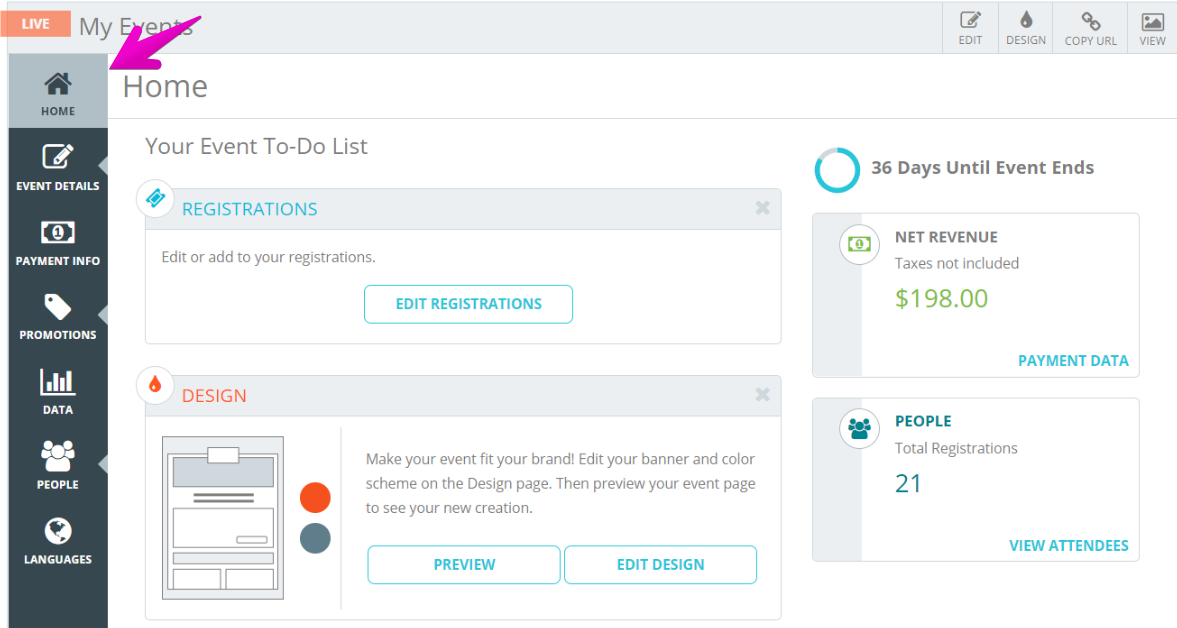
Looks like you’re ready to make your event page look awesome – so let’s do it! We recommend starting by reviewing your details, adding a description, videos and linking to social media.
1. Log In to your Events.com account.
2. In your event, click on EDIT in the upper right navigation.

3. You can edit your event’s basic information at any time. This includes the information you entered when you first created your event (event name, type, category, location, date, and time).
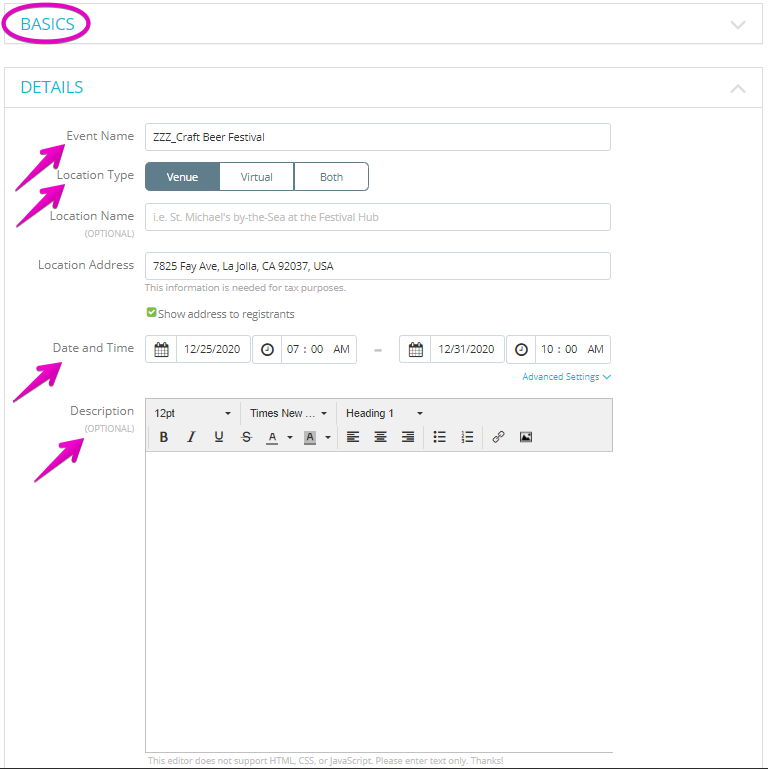
4. We recommend that you add a description to your event to include further information such as:
– Schedule of events
– Parking
– What to bring
– Hotel accommodations
Note: You can add images, and links to your description.
5. After you’ve finalized your details, go back up to the right corner and click on DESIGN.

6. Select a layout by clicking the thumbnail. Clicking Sample below each layout will show you an example page to give you an idea of what your page will look like.
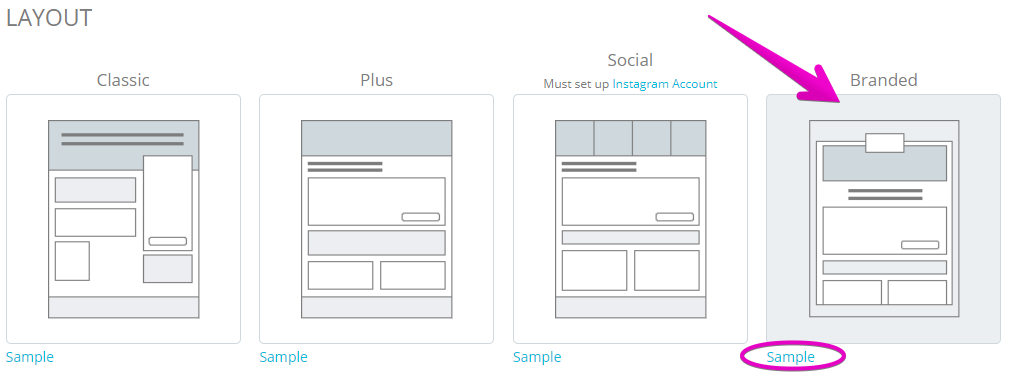
7. Personalize your COLOR SCHEME. There are three ways to set your primary and accent colors on your page.
The eyedropper opens a multi option color picker.
- Color Spectrum tab
- RGB Sliders tab
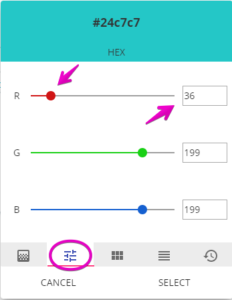
- Generic Palette tab

- Material Design Palette tab
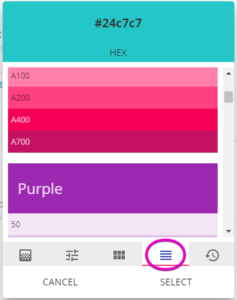
- History tab
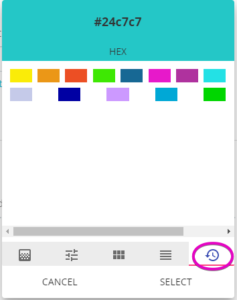
In the second spot, if you know your brand’s hex color code, you can enter it into the hex fields to add the color(s).
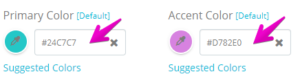
The third option is to open the Suggested Colors. This gives you a quick list of popular colors to choose from.
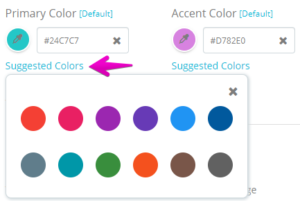
8. Upload a BANNER IMAGE that is 2732 x 700 pixels
9. For the BACKGROUND IMAGE, either upload an image that is 1920 x 1045 pixels or use a blurred version of your BANNER IMAGE

10. Upload an EVENT LOGO that is 544 x 200 pixels. This is displayed on the top of the banner (positioning can be viewed in the layout sample). Please email our support team at help@events.com if it’s not available for you
11. Click SAVE before leaving the page
Now you can click PREVIEW or VIEW to see your custom page!
It’s time to deck out your Event page! Add imagery, details of your event, and social media links to engage your attendees.
1. Log In to your Events.com account.
2. To deck out your event, in the top right corner select DESIGN for step 3 or EDIT for steps 4-6.

3. Add a banner image (OPTIONAL). Drag an image to the “Drag to Upload” section within the dotted line, or click the SELECT IMAGE button. This image will serve as your event’s banner image.
Note: We recommend choosing something without text since the image could be cropped on certain devices.

4. Choose a category (OPTIONAL). A category for your event type helps your attendees search and pinpoint what type of event you are throwing. (e.g. A Race event could have a Cycling category type). Add as many categories that apply to your event.

5. Add a description (OPTIONAL). Add a description of your event and any important details you want to share with your attendees.
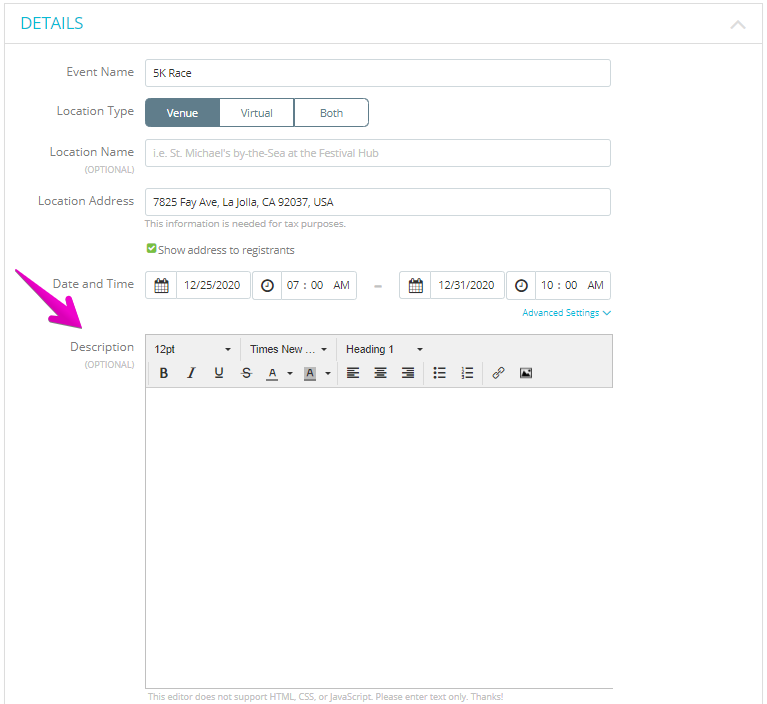
6. Add website and social media links (OPTIONAL).
- Add your event website url (Note: the http:// is already included, so add the URL starting after this.
- Add your social media links. (Note: Instagram and Twitter only require your handles (e.g. @eventsdotcom). Facebook requires the full Facebook URL)

With Events.com you have many options to customize your event page (your event’s landing page) to better fit your organization’s look and feel! Now, you can go to the DESIGN tab, select a LAYOUT, customize a COLOR SCHEME, insert a BANNER IMAGE and a BACKGROUND IMAGE. Follow the steps below to customize your event page!
1. Log In to your Events.com account and navigate to your event
2. In your event select the Design tab in the top right corner
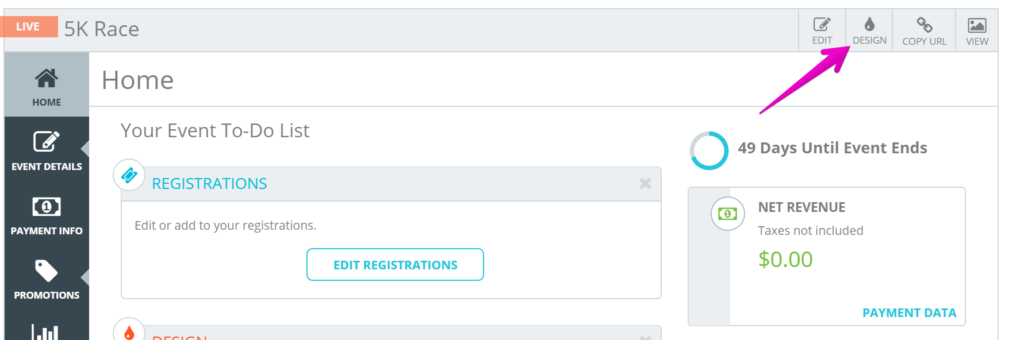
3. Select a layout by clicking the thumbnail. Clicking Sample below each layout will show you an example page to give you an idea of what your page will look like.
4. Personalize your COLOR SCHEME. There are three ways to set your primary and accent colors on your page.
The eyedropper opens a multi option color picker.
- Color Spectrum tab
- RGB Sliders tab
- Generic Palette tab
- Material Design Palette tab
- History tab
In the second spot, if you know your brand’s hex color code, you can enter it into the hex fields to add the color(s).
The third option is to open the Suggested Colors. This gives you a quick list of popular colors to choose from.
5. Upload a BANNER IMAGE that is 2732 x 700 pixels
6. For the BACKGROUND IMAGE, either upload an image that is 1920 x 1045 pixels or use a blurred version of your BANNER IMAGE
7. Upload an EVENT LOGO that is 544 x 200 pixels. This is displayed on the top of the banner (positioning can be viewed in the layout sample). Please email our support team at help@events.com if it’s not available for you
8. Click SAVE before leaving the page
Now you can click PREVIEW or VIEW to see your Branded page!
Sometimes you need to delete a live event because you may have been testing out the functionality of it or need to cancel an event. As long as you haven’t collected any money on this event, you will be able to complete the event in just a few steps so no one can register for it. If you have collected money on this event from attendees, you will need to process a refund to those attendees before completing the event. Click here to see how to process a refund to attendees if needed.
1. Log In to your Events.com account and navigate to your event
2. Once in your event, in the top right corner select the EDIT button
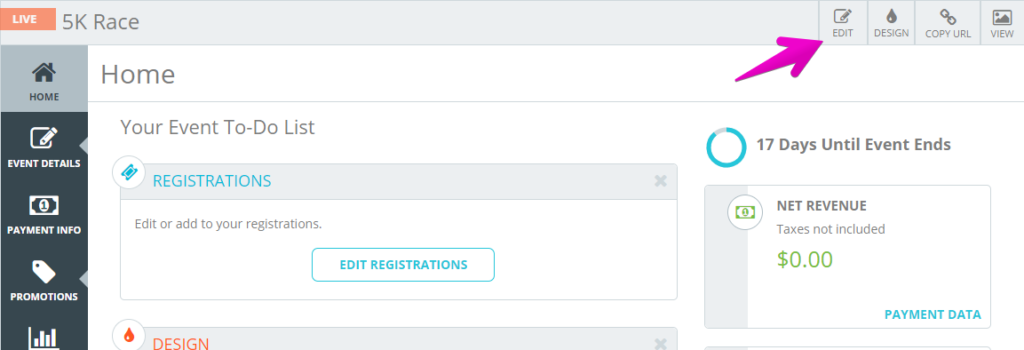
3. In the DETAILS section, go down to the Date and Time field. Select an end date to one that has already happened.
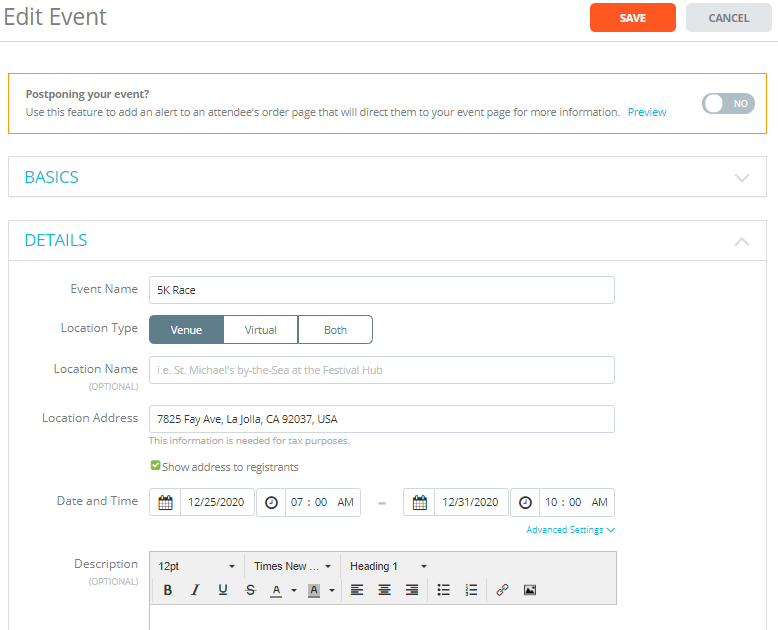
4. Click SAVE to finalize this change.
5. Once saved, your event will appear in COMPLETED tab which will prevent anyone from registering for your event!
Pro Tip: If you want to remove any of your information, we recommend changing the event name, hiding the location and deleting the description.
Want to hide your event’s times and dates from your registrants? We have you covered, you can toggle the viewability of your event’s Start Date, Start Time, End Date, and End Time.
Brand New Event
- If you have not created the event just yet, start by either clicking the CREATE AN EVENT button in the top left corner, or while on your events page click the CREATE EVENT + box.
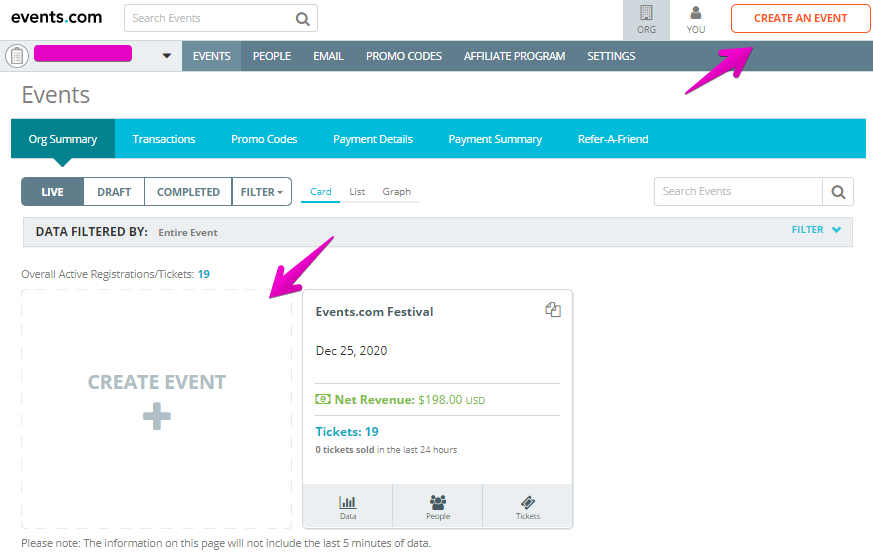
2. Fill out the BASICS info on your event, then move onto the DETAILS section, while in there in the Date and Time section, select the Advanced Settings to open up an additional section.
3. There are 4 options you can toggle on or off (please note that by default they will all be checked off), select which ones you wish to remove.
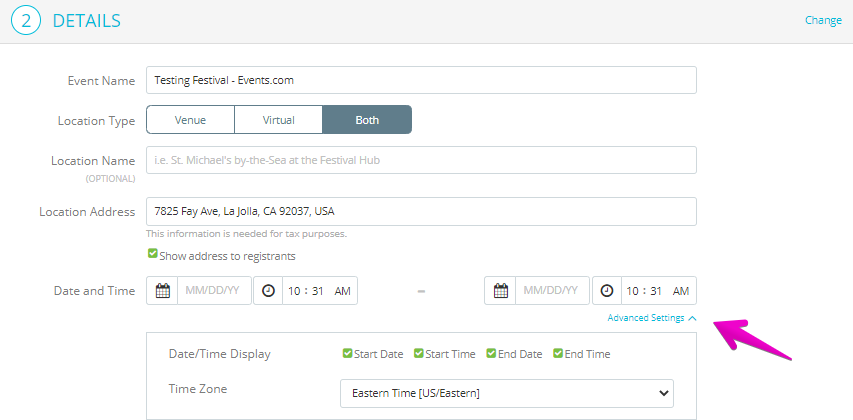
4. Once you select your choices, finish the event creation and select save.
Existing Event
- If you currently have a live event that you want to update, start by opening up the editing page of the specific event that you wish to update.
- Select the EDIT button in the top right area
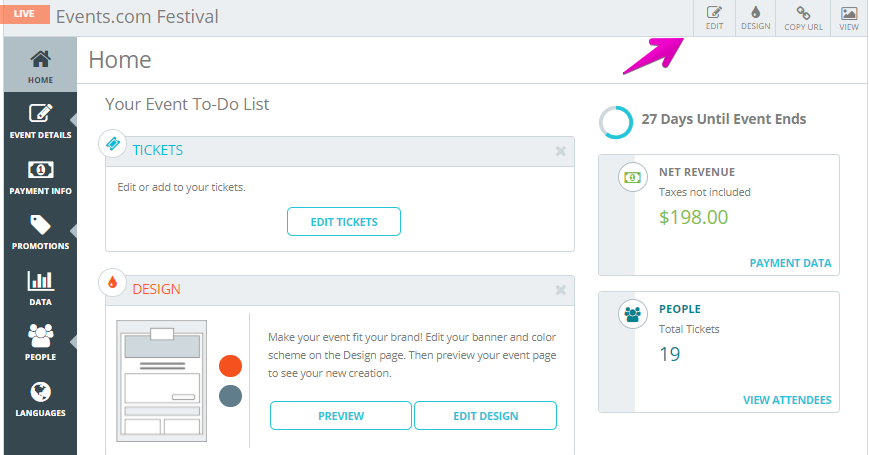
3. Under the Details section, scroll to the Date and Time section, and click the Advanced Settings button to open the settings.
4. There are 4 options you can toggle on or off (please note that by default they will all be checked off), select which ones you wish to remove.
5. Once you select your choices, finish the event creation and select save!
At Events.com we know that every athlete participating in a USA Triathlon (USAT) event needs to have a USAT membership. We’re thrilled to offer an integration with USAT! This integration verifies memberships and makes purchasing memberships a breeze for your attendees!
Connect your USA Triathlon Event
1. Log In to your Events.com account.
2. As an organizer your first screen will be your organization data. Choose the event for which you want to add USAT.
3. Next, go to EVENT DETAILS in the left side menu and select Settings.
4. Open Pre-Registration Setup by clicking the + on the right.
5. Scroll to the USA Triathlon section. Is this a USA Triathlon® sanctioned event?. Toggle this to YES and enter your USA Triathlon® Event ID #.
6. The Event ID # field will display your event name underneath, or let you know if the number is invalid. When you’ve entered in the correct Event ID #, press SAVE. The default will add USAT to each of your tickets. If you need to remove the requirement you can turn it off in Registrations/Tickets Settings.
Registrations/Tickets settings for USAT
7. Go back to Event Details and click Registrations/Tickets.
8. Open the Settings for the registrations or tickets that do not require USAT and you can remove the check for USA Triathlon® Membership.
9. Press SAVE on this page and voilà! The registrations requiring USAT have a description displayed. And your order form will now collect, verify and help purchase USAT memberships for your USAT registrations/tickets. *Gender and Date of Birth will become required Form Questions for these registrations/tickets as they are required by USA Triathlon.
Pro Tips: Changes and Transfers can be allowed between USAT required registrations/tickets. The new registration/ticket will verify the membership. *Global Event License Memberships will need to be updated for a new registration, please have those athletes reach out to our customer success team at help@events.com.
After registration, athletes can view their USAT membership numbers in their Events.com accounts. Organizers will be able to view the USAT membership numbers upon viewing individual registrations or by downloading a registration report. The registration report is located in the Data Download Center.
If you require any additional info on our USA Triathlon integration, please Contact Us.
USA Triathlon is the national governing body for the multisport disciplines of triathlon, duathlon, aquathlon and winter triathlon in the United States. Please visit their website for more about their organization and memberships – https://www.teamusa.org/usa-triathlon
Yes there is! When you have a website, Events.com recommends directing traffic through it to your event page. This helps keep your messaging cohesive for all your advertising and marketing efforts. And then from your website you can easily link out to your event page by embedding your custom code from the Design Center.
1. Log In to your Events.com account and navigate to your event
2. In your event select the Design tab in the top right corner

3. Scroll down to EMBED “REGISTER NOW” BUTTON. The button utilizes the primary color that you selected, this section will give you a preview.
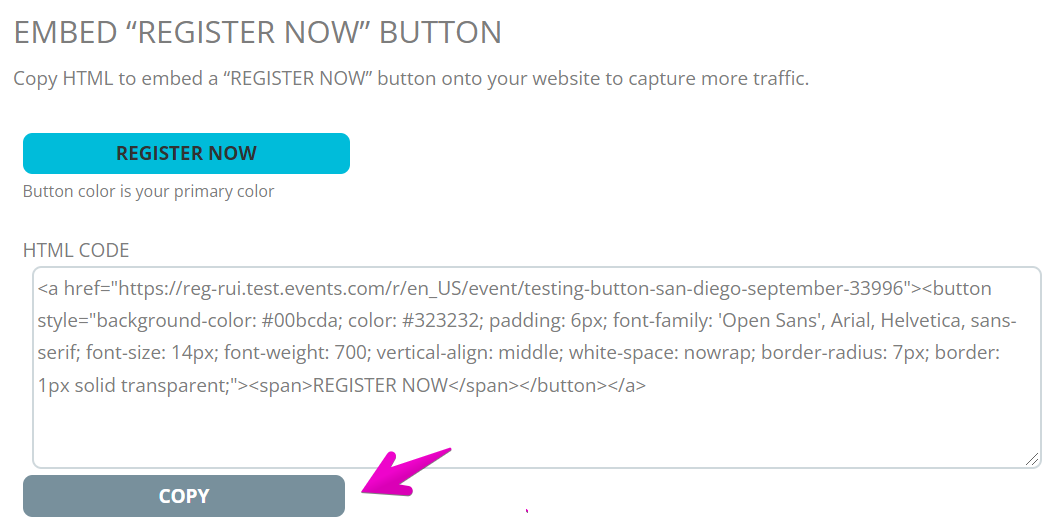
4. When ready, you can click COPY to copy the code to your clipboard and paste to your website!
Manage your Organization (9)
As an organization putting on multiple events a year, or the same event year over year, you need a way to view all of your events’ data and performances. Your Organization Dashboard allows you to get a real-time snapshot of this data with a few simple clicks.
Currently the Organization level dashboards will show you:
- Registration/Tickets Sold: An overall count of registrations/tickets sold minus all registrations/tickets canceled across all events.
- Net Revenue by Currency: The net revenue across all registration/tickets, purchases and user-defined taxes, minus refunds, discounts and fees per currency across all events.
- Live, Draft, or Completed: You can change the view to see all events that are live, in drafts, or completed.
- Filter: With any of the options in this article, the filter can be added to further narrow your search of information.
- List View: This will show you the information placed out in a list format similar to how an excel spreadsheet would appear. You can view the active registrations, net revenue, discounts, refunds, taxes, and currency. This is all arranged by the events within your live, draft, or completed folders.
- Graph View: Selecting the graph view will allow you to see specific events registrations and revenue compared to other events, this can be chosen by clicking the Graph button.
Note: Transactions processed within the past 10 minutes may not be included in the dashboards.
You can zero in on a specific date range when viewing your organization summary, letting you compare your events’ sales over a set period of time and allowing you to better track the impact of your latest marketing push.
1. Log In to your Events.com account and select the event in which you’d like to view the data.
2. On the left side navigation, click on DATA and select Event Summary in the blue navigation tool bar.
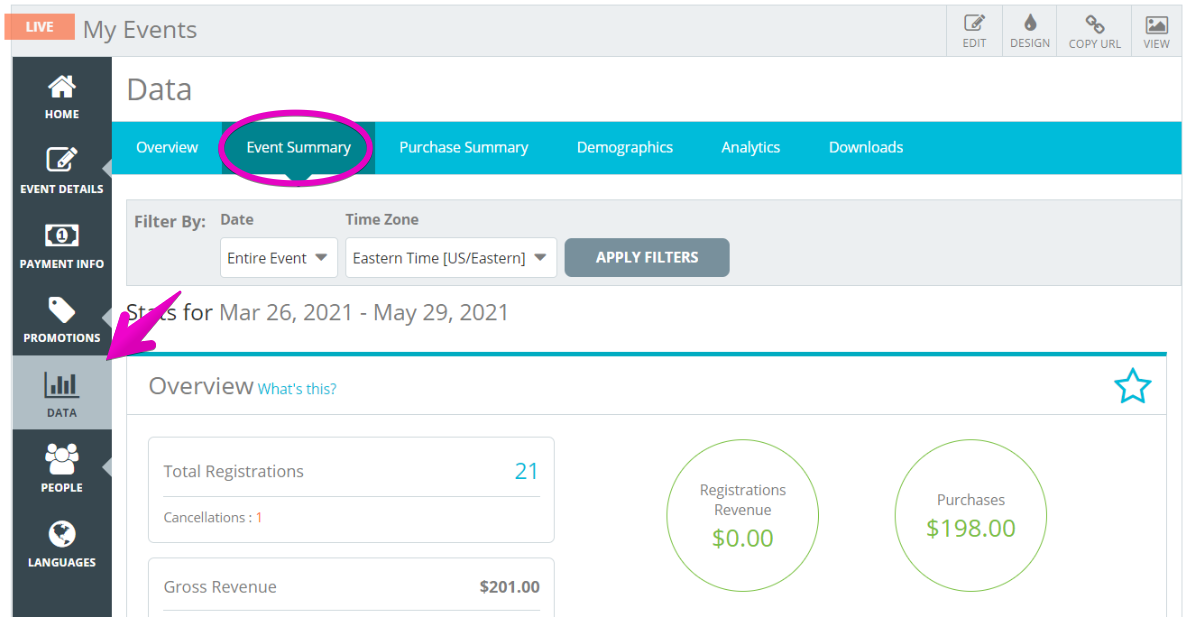
3. By default, all data from the entire event will be shown. In the Filter By field you can choose to display your event data using our pre-set date ranges in whichever time zone you prefer or customize your own.
4. Once you have made your selection, click Apply Filter.

Pro Tip: All data shown in the Overview, Revenue Over Time, Registration Summary, and Top Promo Codes displays will now be limited to the date range you chose.
The company, team, or individual in charge of putting on an event is considered “The Organization” on Events.com. This is the name we will be sending payments to, so please make sure you enter it correctly.
Short answer, yes! Now as you can imagine there is a lot tied to your Organization and we wouldn’t want anything to get overlooked when you make this change. So for now, we’ll need to help you with this one!
Send an email to help@events.com with your request, and we’d be happy to take care of it for you!
Events.com wants to make sure your entire team is able to take advantage of our platform to streamline day-to-day operations. However, we understand not everyone in your team needs access to every portion of your event(s). In an effort to simplify access management and your team’s operations, we built a tool for you to invite team members and grant access to permissions based on the role you assign them. To invite users to help manage your organization, follow the steps below!
1. Log In to your Events.com account.
2. Click on SETTINGS in the top navigation bar.
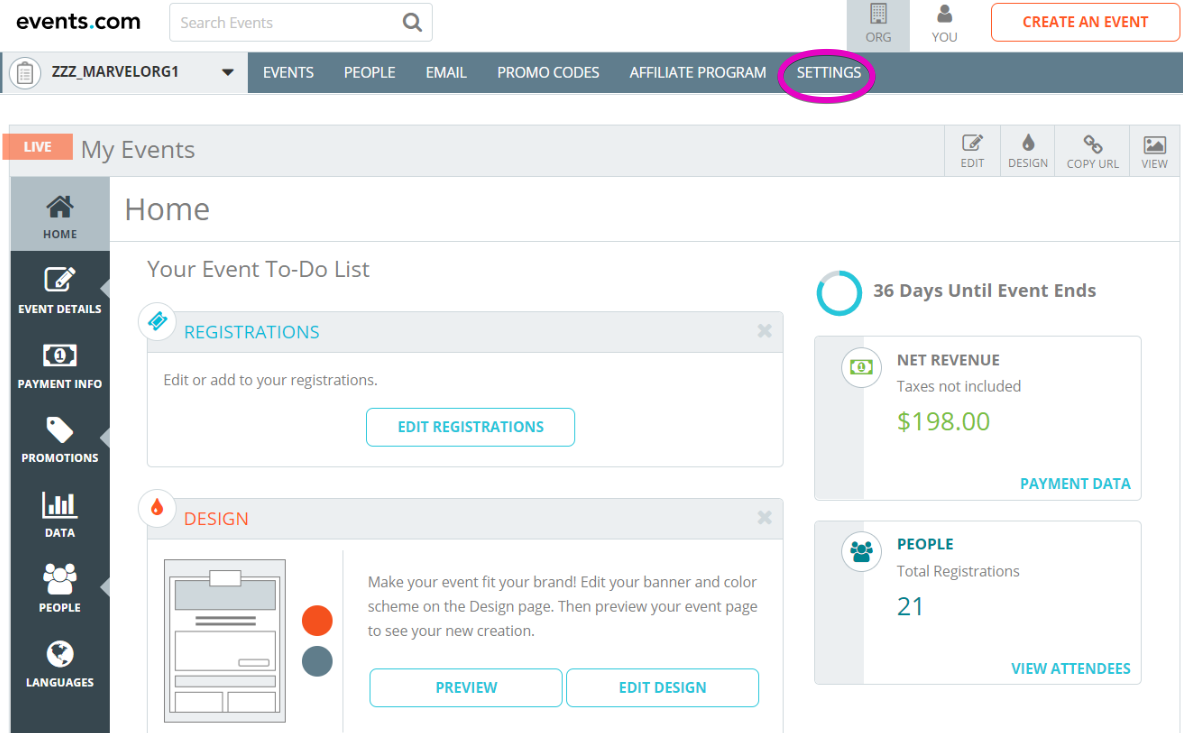
3. Then select USER MANAGEMENT in the left hand tool menu.
 4. Click ADD USER and proceed to enter the user’s name, email, and applicable role. Pres SAVE USER when complete.
5. Once you invite someone to your organization, they will receive a confirmation email. An inactive Events.com account will be created for them if they did not already have one.
Below are permissions for each role that you can assign to team members. Users with an Owner or Accountant role will have access to all events, and all others roles can have access limited to one or more events within your organization.
- Owner: Total access to the entire organization and all associated events.
- Manager: Total access to one or more events only.
- Coordinator: Broad access to one or more events, but cannot access financial information.
- Assistant: Limited access – can manage event goer orders/info, view limited reports and manage post-registration options.
- Accountant: Limited access – can view transaction related and manage payment options. Has access to all associated events.
- Timer: Minimal access – can view registration reports only.
Note: At any time, you can change a user’s role to update their permissions or remove them from your organization. Additionally, you can invite as many people to help manage your organization as you’d like.
Yes. By having this information, it can be available for Attendees to see on your ticketing page if you choose to make it available to them. This allows for attendees to get any clarifications that they might need on the upcoming event. Find out how to update your Organization’s information below.
1. Log In to your Events.com account.
2. In the top navigation bar, select the SETTINGS option.

3. Here you can add or edit the information that’s being used for public view as well as the information used by Events.com
Note: You will notice that Organization Name is read only. Learn more on how to change your Organization’s name here.
Using our MailChimp integration is a great way to sync your attendee’s information with MailChimp lists. After you have synced your list, you can log in to Mailchimp and create an email campaign. We recommend MailChimp’s support center if this is your first time using their platform. Here are a few steps to help you get started.
1. While on your dashboard, click on the Audience tab in top left part of the screen. Select the Current Audience (your contact list). Click on the Manage Audience dropdown menu and select Manage Contacts. Once in there, you may filter deeper by using the Group or New Segment field.

2. Groups: You can select the Events.com registration events group to further filter by different events that sync to the same MailChimp list.
3. Merge Fields: In the Audience tab, click on the Manage Audience dropdown menu and select Settings. Once in there, select Audience fields and *|MERGE|* tags. Here you can see the different merge fields that are available with the tags to use in your email templates.

For your merge fields to contain data, you must set these up as form questions in Events.com. For instance, an address will not appear for an attendee in a merge field if you do not collect that information in the registration on Events.com.
Tag Field Name
*|FNAME|* First Name
*|LNAME|* Last Name
*|LOCALE|* Locale
*|DATE_OF_BIRTH|* Date of Birth
*|GENDER|* Gender
*|PHONE|* Phone
*|ADDR1|* Address 1
*|ADDR2|* Address 2
*|CITY|* City
*|PROVINCE_STATE|* Province / State
*|POSTAL_CODE|* Postal Code
*|COUNTRY|* Country
Already connected a MailChimp account to Events.com but need to change the account? You can do that in just a few short steps!
1. Log In to your Events.com account.
2. Click on EMAIL in the top navigation bar.
3. Click LOG OUT OF MAILCHIMP.

4. A pop up window will ask if you’re sure. Click LOG OUT to continue.
Note: The page will refresh and you’ll be ready to log into a different account. If you need a refresher on setting up or syncing please take a look at our following articles:
How do I contact my attendees?
How do I manage my MailChimp account after I sync my lists on Events.com?
Events.com understands that there are many points in the event cycle where an organizer might like to contact their attendees, such as promotion of new products, up-selling, relaying or reminding of important information. We have integrated with MailChimp, a popular email marketing service, to help make this happen. You can sync your MailChimp account to your event, so your attendees can be added to your contact list automatically.
To start syncing…
1. Log In to Events.com
2. Click on EMAIL tab in the top Organizer navigation
3. Log in to your MailChimp account (you will be prompted to create an account if you are a new user).
4. Find your listed event and select desired MailChimp Lists from the dropdown. If you would like to create a new list, click CREATE NEW LIST and name your new list.
5. To ensure your list is up to date, click SYNC. The date of the last sync will display in the status column. The lists will automatically sync every 24 hours.
6. After the syncing is complete, you can log into MailChimp and begin using your list right away!
If you’d like any tips on creating a MailChimp Campaign, please check out our helpful article – How do I send an email in MailChimp?
Note: Due to anti-spam laws, a street address may be required in order to sync. This can be added in your organization Settings (top Organizer navigation).
Payment Info and Reports (8)
Remittance Reconciliation Report
Events.com provides you with multiple dashboards and downloadable reports for you to track your business’ data and performance. Some of these reports include payment reconciliation (what amounts you have been paid, when and for what).
If you are using Stripe as a standalone account with Manual Transfers selected, you will not be able to take advantage of our Remittance Reconciliation Report. This type of setup does not allow Events.com to regularly pull information from Stripe about the payment history as it is not recurring.
If you are currently using this setup, you can go directly to Stripe, login and click on Transfers on the left hand side of the screen for more information on your payment history.
If you’d like to move away from Manual Transfers, check out these articles Stripe Help Articles:
When you’re set up for a Direct Deposit with Events.com we provide you with different tools to reconcile and verify the activity of your event. For a quick reference, you can view a list of all the past remittances of your organization by bank account.
1. Log In to your Events.com account.
2. Make sure you are seeing your organization data, select PAYMENT SUMMARY.
3. You will see a chart of your Current Remittance Amount with a line for each account that you’ve associated with your organization. To see a more detailed history, click SHOW HISTORY.

4. You can also use filters to pull specific data such as time zone, payment account, and specific dates. We also offer date ranges allowing you to do a more refined search between two specific dates.
5. Clicking SHOW HISTORY will display the last 6 remittance amounts. To see more, you can click LOAD MORE.
Note: Numbers reflect Direct Deposit payments only and within the Events.com standard remittance cycle.
Viewing payments is very simple to do and only takes a few clicks. Follow the steps below to download your payment report!
1. Log In to your Events.com account select the event in which you wish to view the payment report.
2. Click Data on the left hand side event menu.
3. Select Downloads in the blue navigation tool bar.
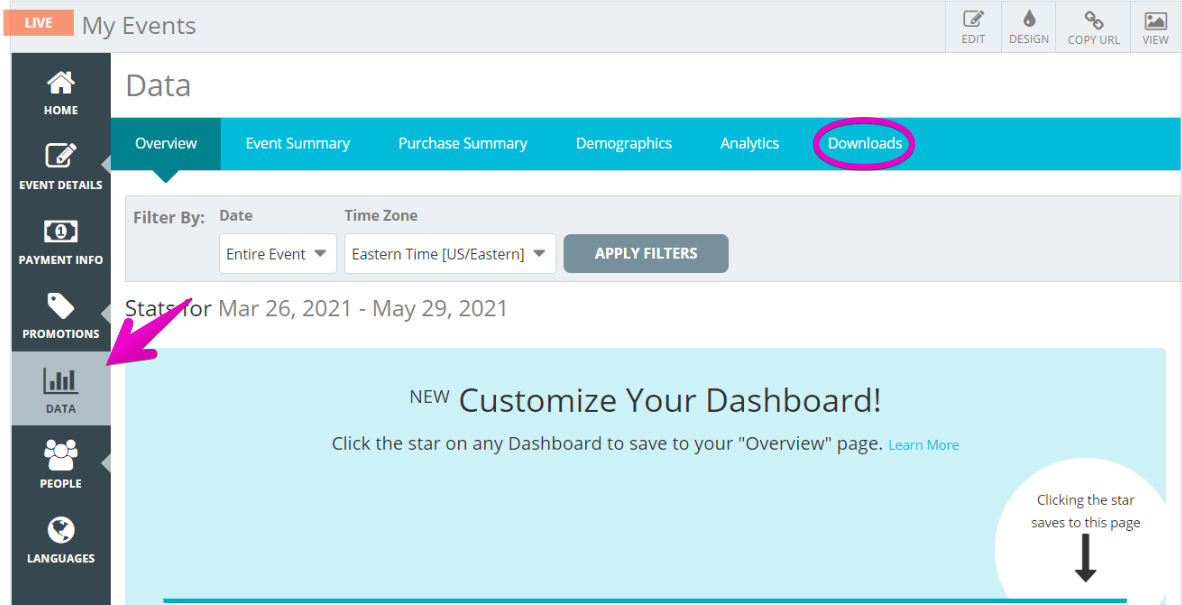
4. In the Select Download dropdown menu, select Transactions.

5. Select your Filters, Payment Type, Date Range, and Time Zone if you wish to have your report meet certain criteria.
6. Click Download.

7. The .CSV file will appear in the bottom left of your browser, click on it to download it to your computer.
Reports contain some of the most information from your events! Within our DATA section, we have three dashboards that allow you to have a quick over view of your events data. We also have a Downloads dashboard where you can specify the type of report you wish to download. Find out more about what we offer in our different DATA dashboards below!
1. Log In to your Events.com account.
2. Find the event for which you wish to run a report on in the Org Summary and click Data from the event card. From within the event, click DATA in the left hand event menu.

3. From within the event, click DATA in the left hand menu.
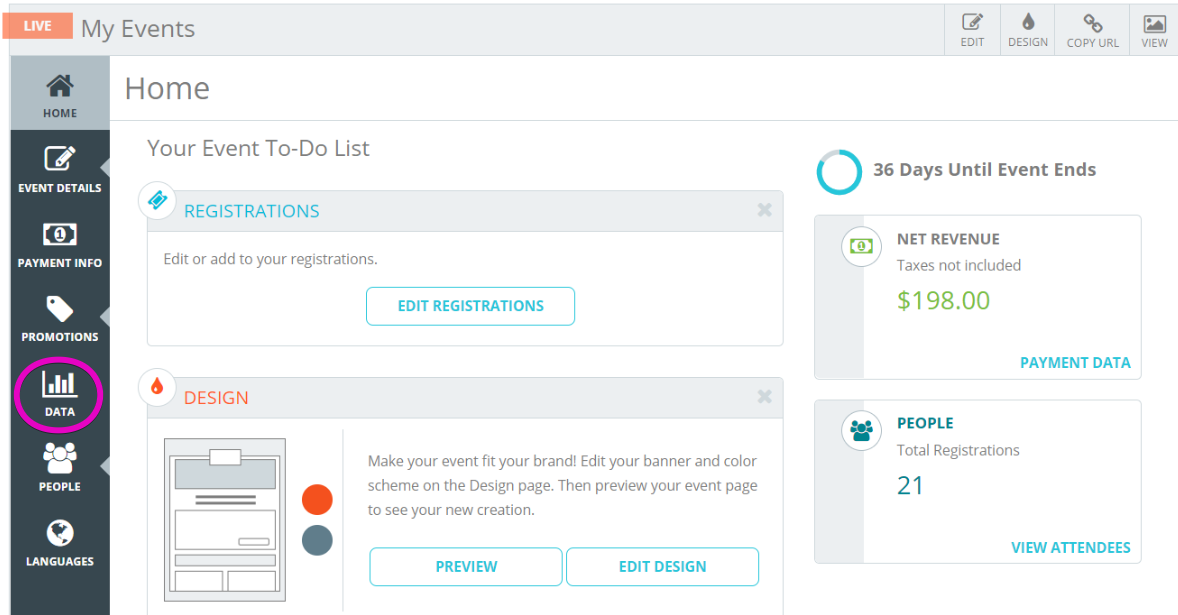
4. Select the dashboard corresponding to the information you want to view. The first three dashboards can give you quick overviews of some important event information. For instance:
- Event Summary – Net Revenue, Revenue Over Time, Registration/Tickets Summary & Top Promo Codes.
- Purchase Summary – Purchases and attendee items data
- Demographics – Gender, Age, Location & Source of Traffic/User Information.

5. To download a detailed report, select Downloads for reports in .CSV format.

6. Create your desired report:
Select Download:
- Registration (Registration/Ticket information)
- Transactions
- Cart Abandonment
- Check-In
- Invitations
- Transfers
- Refer-A-Friend
- Donations
- Box Office Summary
- New Custom Report
- Saved Custom Report
Filter By: specific registration/ticket types.
Order Status: All, Active, or Cancelled registrations/tickets.
Payment Type: All, Credit Card, Offline, External Payment.
Date: All, Today, Yesterday, This week (Sun-Sat), This month (1st-last), This year (Jan 1st – Dec 31st), Payment Period, Custom Date.
Time Zone: all global time zone options.
7. Click START DOWNLOAD.

8. Open in Excel by clicking download when the report has loaded in your report list.
Note: If you wish to learn more about how to do a New Custom Report click here!
With Events.com you can easily download your event data in several different report formats. In this case, you will need to follow these steps in order to download a customized report.
1. Log In to your Events.com account.
2. As an organizer your first screen will be your Org Summary. Your payment reports are available below your Organization Management Menu, in your Data Menu from the tab – click on Payment Summary.
3. In the Payment Summary tab under the Filters section, click the dropdown under Select Download, and click on Remittance.

4. In the Payment Account filter, it will automatically pre-select your connected Stripe account, then you can select a date range in the Date filter and hit Start Download.

*Please make sure that you are only selecting dates for when you collected data.
When you create your own Stripe account, you will be able to choose your own schedule for when you want to get paid out from your event. You’ll receive a payment summary listing the dates and amounts deposited. Find out how to easily set up your Stripe account below!
1. Log In to your Events.com account.
2. As an organizer your first screen will be your organization data. You can select between your LIVE, DRAFT and COMPLETED events and find the event for which you want to set up payment.
3. Here you can click the name of your event to open your event and then click PAYMENT INFO in your event navigation (left side).
4. Click STRIPE CONNECT.
5. This next page contains all of the information necessary to create a Stripe account. If you already have a Stripe account, you can click Sign In and connect it to your event. If you’re brand new, Stripe has provided helpful links throughout the form to answer questions along the way.

To register for a Stripe Account, you or the person or people submitting the application (your “Representative”) must provide Stripe with your business or trade name, physical address, email, phone number, business identification number, URL, the nature of your business or activities, and certain other information about you that Stripe requires. Stripe may also collect personal information (including name, birthdate, and government-issued identification number) about your beneficial owners, principals, and your Stripe Account administrator. Until you have submitted, and Stripe has reviewed and approved all required information, your Stripe Account will be available to you on a preliminary basis only, and Stripe may terminate it at any time and for any reason.
Read Stripe’s full service agreements here US, CANADA
6. When complete, click Authorize access to this account. You’ll be taken back to Events.com and be ready to start selling!

If you’ve set some price increases for your registrations/ tickets you might be curious as to how many sold at each price. With our Registration Summary report you’ll be able to see the exact number of registrations/tickets sold at each tier.
1. From within the event, click DATA in the left hand menu.
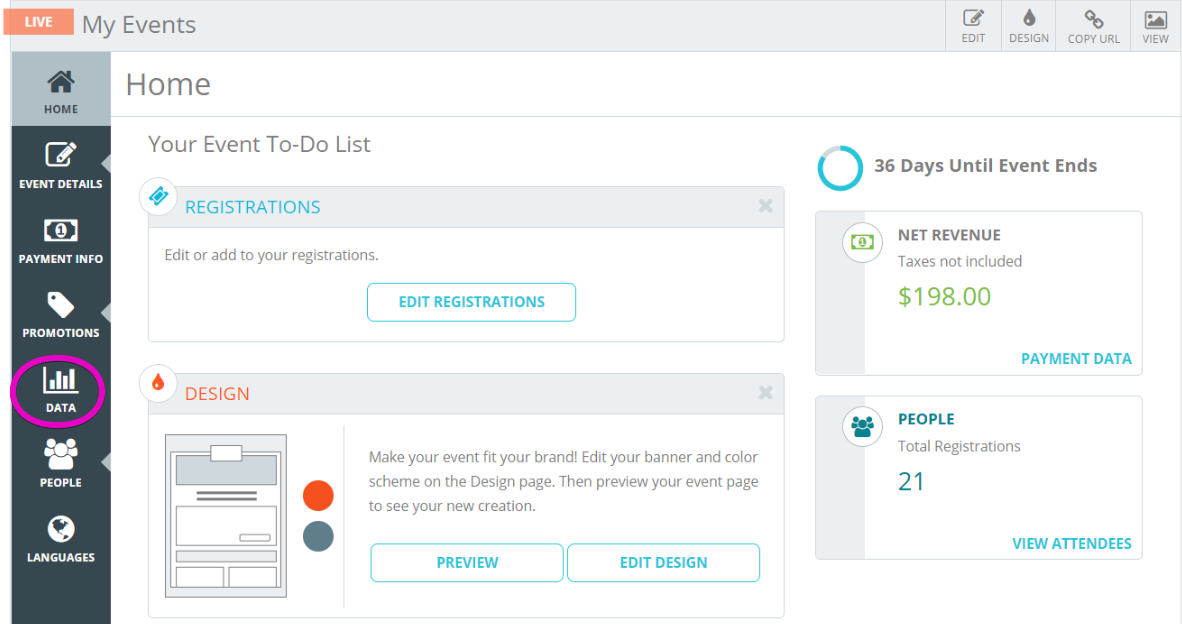
2. Select Downloads for your report options
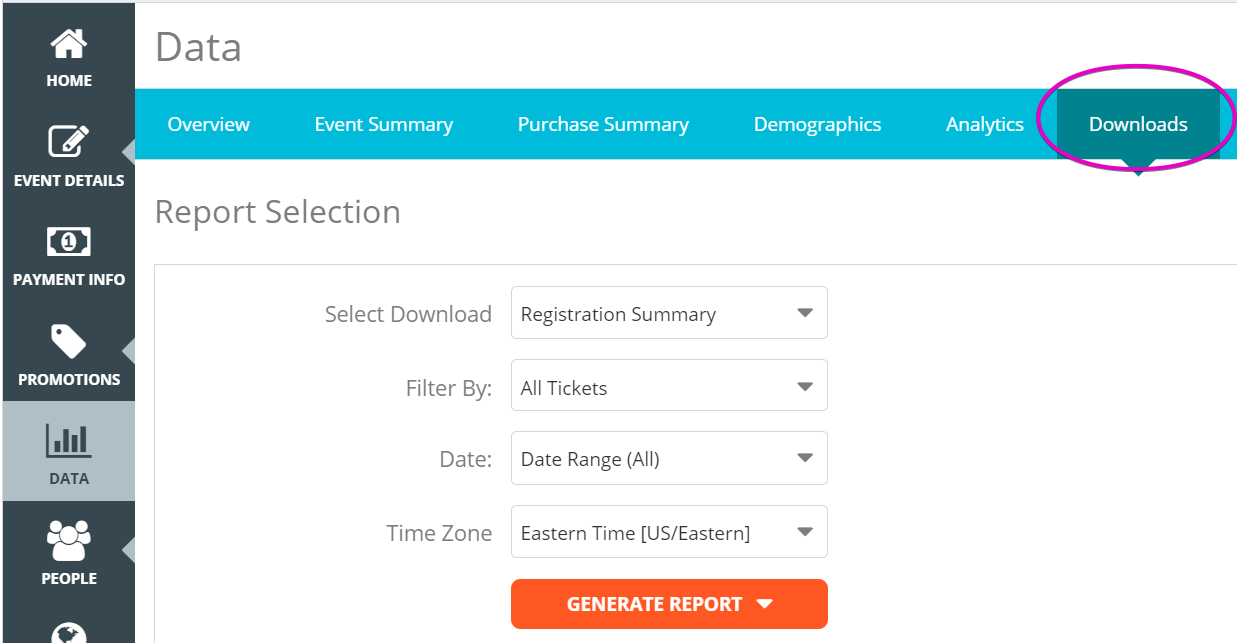
3. In the Select Download drop down, select Registration Summary.
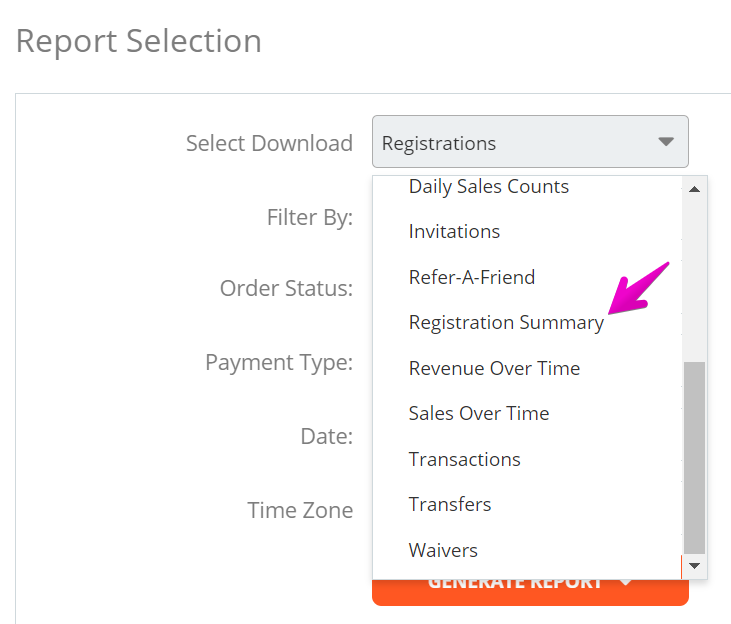
And if you have any other specific perimeters, you can further customize your report with the other drop downs:
Filter By: specific registration/ticket types.
Order Status: All, Active, or Cancelled registrations/tickets.
Payment Type: All, Credit Card, Offline, External Payment.
Date: All, Today, Yesterday, This week (Sun-Sat), This month (1st-last), This year (Jan 1st – Dec 31st), Payment Period, Custom Date.
Time Zone: all global time zone options.
4. After reviewing your selections, click Generate Report. You have the option between an Excel and a CSV.
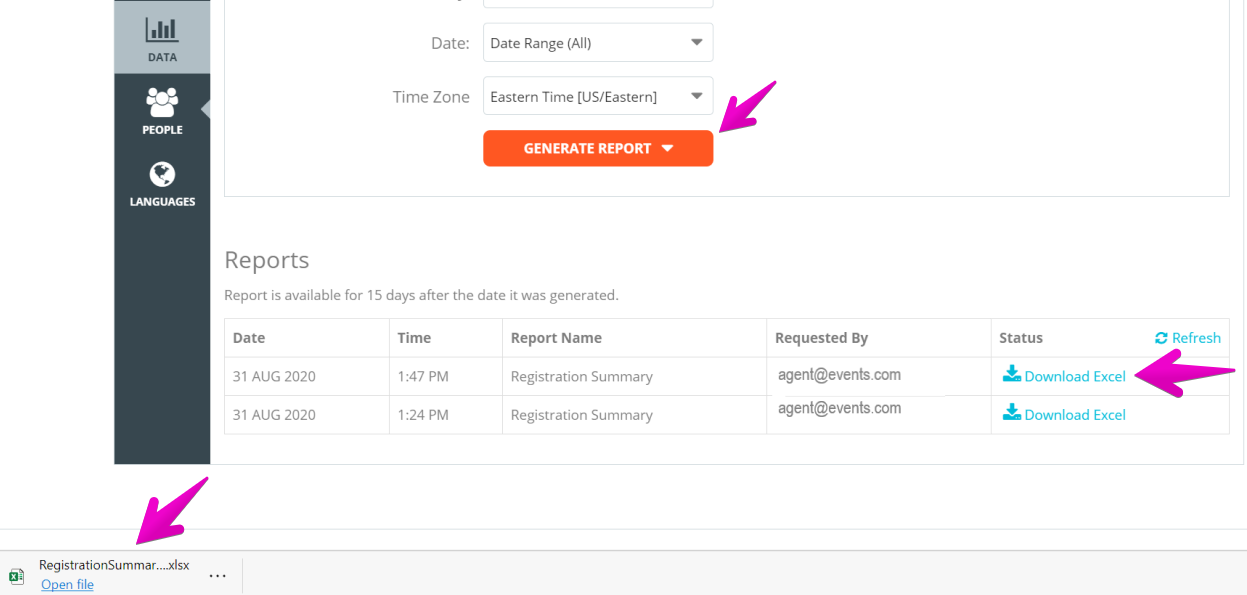
5. And when the report has finished generating – Download. You can then click to open and review. It has the following columns:
- Registration (or Ticket) – Displaying the name of the registration or ticket based on your Registration/Tickets Settings.
- Pricing tier – Displaying the price of the tier.
- Revenue – The revenue collected at the price tier.
- Tax – The tax collected at the price tier.
- Active – The number of Registrations/Tickets sold at the price tier.
- Discounts – Any discounts used to purchase registrations/tickets at the price tier.
- Refunds – Any refunds issued on registrations/tickets at the price tier.
- Cancelled – The number of registrations/tickets cancelled at the price tier.

A dispute, or chargeback is a situation in which the purchaser questions the validity of a charge with their bank. After a purchaser has disputed a charge, their bank issues them a conditional refund. This is where the chargeback name comes from, the funds are taken from the vendor and given back to the purchaser. The purchaser’s bank sends a request for evidence to investigate the dispute to be provided by the vendor.
Understanding Disputes for Direct Deposit
When you’re set up for direct deposit with Events.com, our team of specialists monitor and manage disputes for you. If a dispute is refunded after your revenue has been paid out, your bank account will be debited. If won, the funds will be returned to you and paid out in your next scheduled payout. This activity is updated in your reporting in real time.
There are multiple reasons a purchaser may dispute a charge:
credit not processed
duplicate
fraudulent
product not received
product unacceptable
In response to every dispute, our team first sends notification emails to the purchaser and the event organizer. Next we compile evidence based on the reason of the dispute to provide to the bank. These are things such as a copy of the confirmation email and order summary, the main details of the event, the refund policy if applicable and where the purchaser either viewed or agreed to the policies. We will also review if the event has already taken place and include this information as well.
It may take 60 – 120 days for a dispute to be resolved by the purchaser’s bank. If we receive notification of a lost dispute we will cancel the order at that time. A won disputed order will remain active.
What you can do about Disputes
You can reduce the risk of disputes by having a clear event description, defining a refund policy and responding quickly to refund requests (and when possible offer other alternatives if your policy is No Refunds). Although, even with a No Refunds policy, banks can still initiate a chargeback and resolve in favor of the purchaser.
You are welcome to reach out to the purchaser directly, especially if it’s very close to your event date. In this situation, you may want to cancel their order in advance and have them purchase a new order.
If your event has already taken place, you can share any results or photos on your website or social media. This will help our team find this information quickly.
If you have any questions about disputes, or our dispute process please reach out to our customer success team at help@events.com
Team (or Group) Settings (6)
Having teams for your event can be a great addition to help bolster attendance! Find out how to add teams to your event below.
1. Log In to your Events.com account.
2. Click on EVENT DETAILS on the left side of the screen, and select Team Settings.
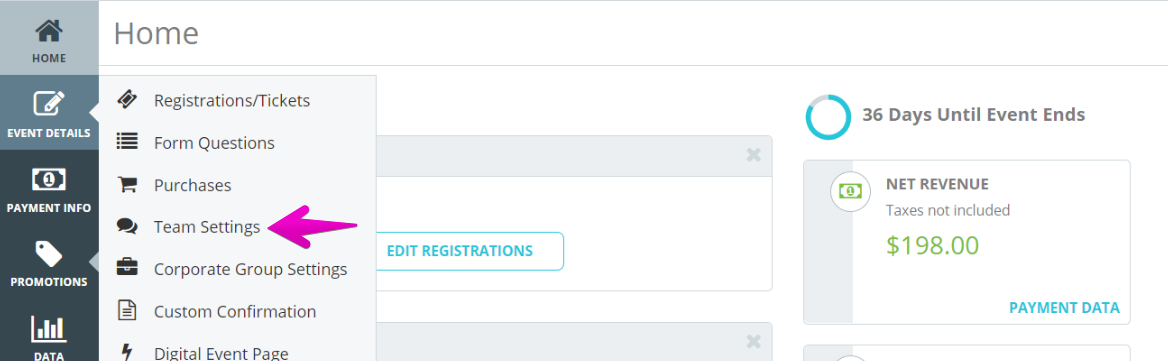
3. If it is your first time on this page, it will ask you – Do you have teams for your event? Select Add Team Settings.

4. Start filling out your Team Settings:

- Click on the Applies To dropdown to select which registrations/tickets you would like to make teams available for.
- Add a minimum and maximum team size. For teams with no maximum (unlimited size), leave the field blank.
- The default name is Team but you can also update the setting terminology to whatever best suits your event.
5. Click on the gear icon to access the advanced settings.

- Selecting Require Teams will remove the ability for event goers to sign up as individuals under the selected registrations/tickets.
- If you toggle Require Minimum at Team Purchase to ON,event goers purchasing the associated registrations/tickets cannot purchase less than the team minimum – ensuring your team minimums will always be met.
- Team Captain Must Create Team Access Code requires all teams to have access codes.
- Allow Positions gives event goers the ability to have different positions (e.g. Swimmer, Biker, Runner)
6. Click ADD TEAM SETTING to create another team setting.

7. Scroll to the top or bottom of the page to SAVE your work.
Note: You can add multiple team settings. For example, if you have one ticket ‘3 Legged Race’ and another ticket ‘5k Fun Run’, you can create separate team settings for each. The ‘3 Legged Race’ can have required teams of 2, and the ‘5k Fun Run’ can have a minimum team size of 4.
Yes! When creating your team setting, you may specify the minimum and maximum team size. You can choose to leave the minimum at 1 and/or the maximum at unlimited. You also have the option to specify maximum team size when there is a hard limit.
1. Log In to your Events.com account.
2. While in your event, click EVENT DETAILS in the left side navigation and select Team Settings.
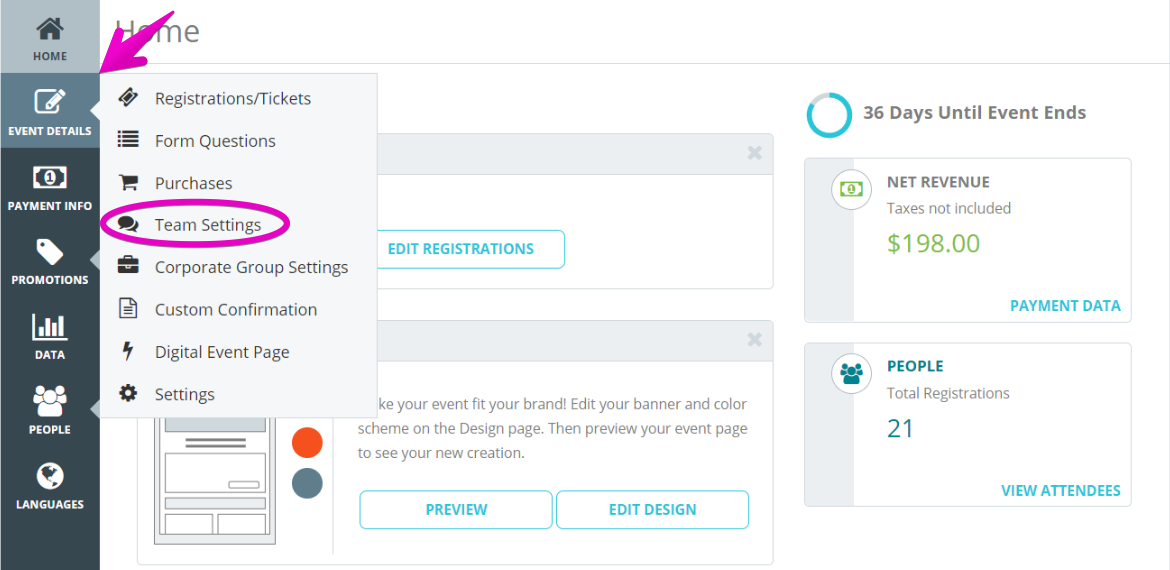
3. When creating your team settings, enter a minimum team size and maximum team size if there is one
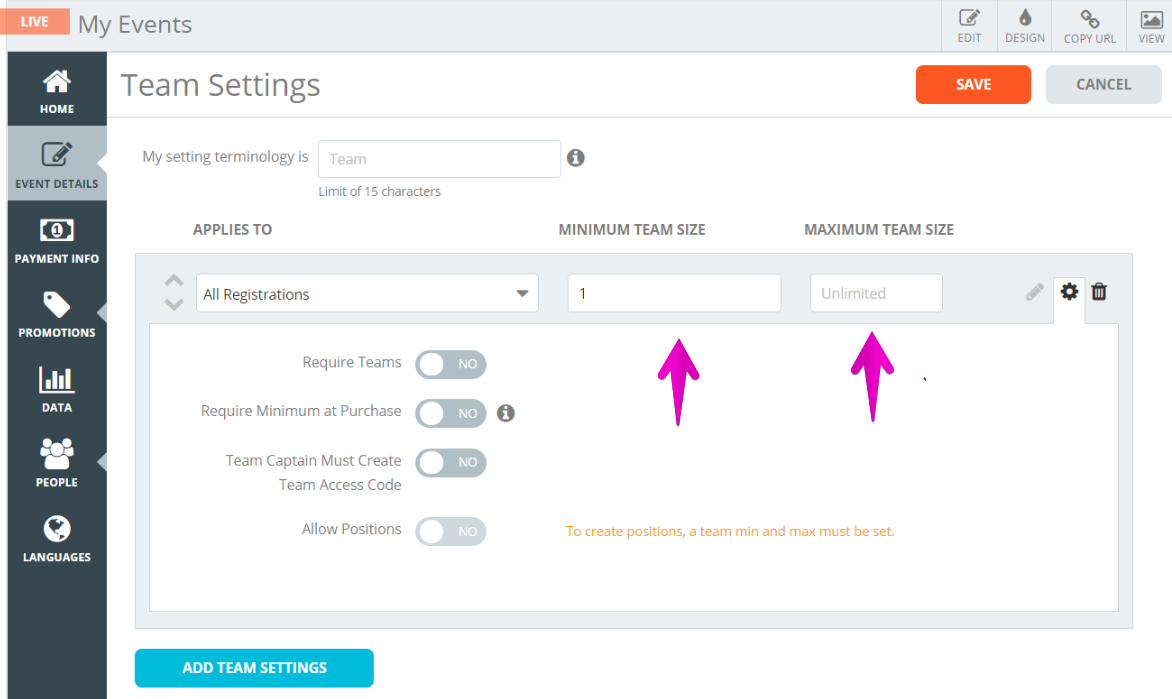
4. Click SAVE at the top or bottom of the page before navigating to a new page
Tip: Team size will be communicated to attendees before they select the registration on the event page. Once a team maximum has been met, no additional attendees will be able to join the team. Find out how to ensure that team minimums are always met by clicking here.
Yes! With Events.com, you ensure all your team minimums get met with one setting.
1. Log In to your Events.com account.
2. While in your event, click EVENT DETAILS in the left side navigation and select Team Settings.
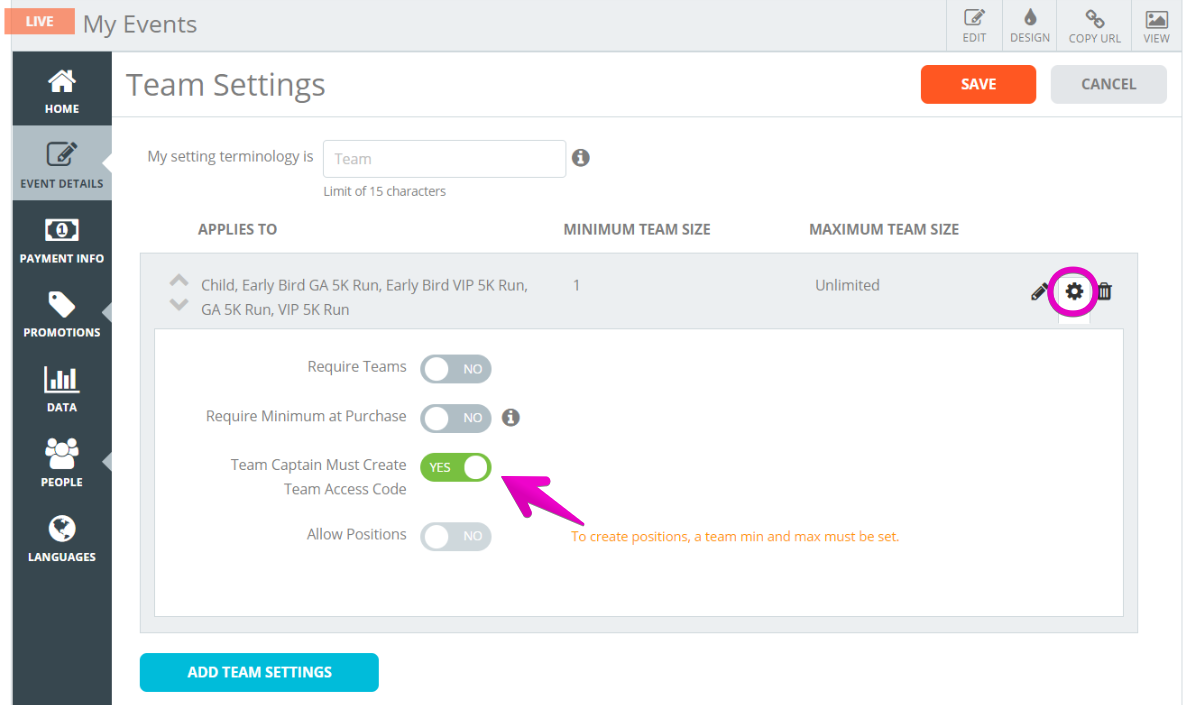
3. When creating your team settings, click on the Settings (gear) icon.
4. Toggle Require Minimum at Purchase to YES.

5. Click SAVE at the top or bottom of the page before navigating to a new page.
Tip: Team minimum requirements will be communicated to attendees on the event page. Once a team maximum has been met, no additional attendees will be able to join the team.
Yes! This will ensure that only team members the captain has approved can join the team.
1. Log In to your Events.com account.
2. While in your event, click EVENT DETAILS in the left side navigation and select Team Settings.
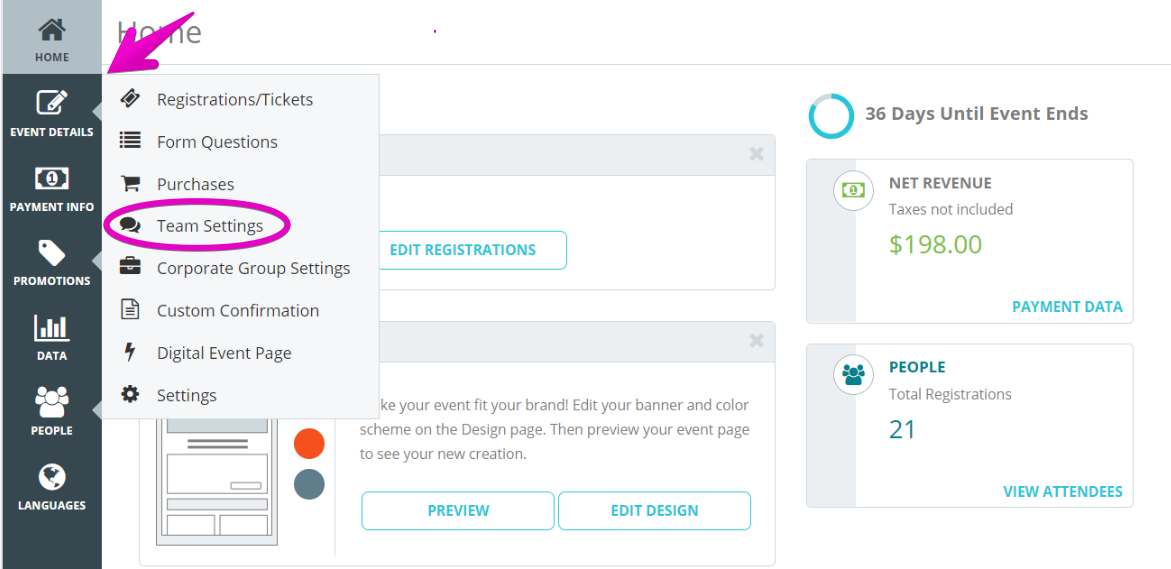
3. When creating your team settings, click on the Settings (gear) icon .
4. Toggle Team Captain Must Create Password to YES.

5. Click SAVE at the top or bottom of the page before navigating to a new page.
Yes. We know that for certain types of events, offering an option to participate as a team can be a great way to increase participation. Events.com allows you to get creative with the way you manage teams for your event. We understand that not all events are the same, so limiting you to a couple of team formats is not fair. We give you full control to decide how your event does teams.
Below are some of the options you can take advantage of:
- Add as many team settings as your event requires
- Enforce a minimum and maximum team size
- Require team participation for a specific category/event type
- Require that the team minimum is purchased at the time of team creation
- Require team captains (team creators) to password protect their team

Tip: Read all about team settings in our article – How can my event goers participate in teams?
As an event organizer, you may have access to editing and maintaining teams for certain events.
1. Log In to your Events.com account.
2. Begin by selecting the event you wish to find the team in
3. Along the left side bar, choose PEOPLE, and from there select Attendees.
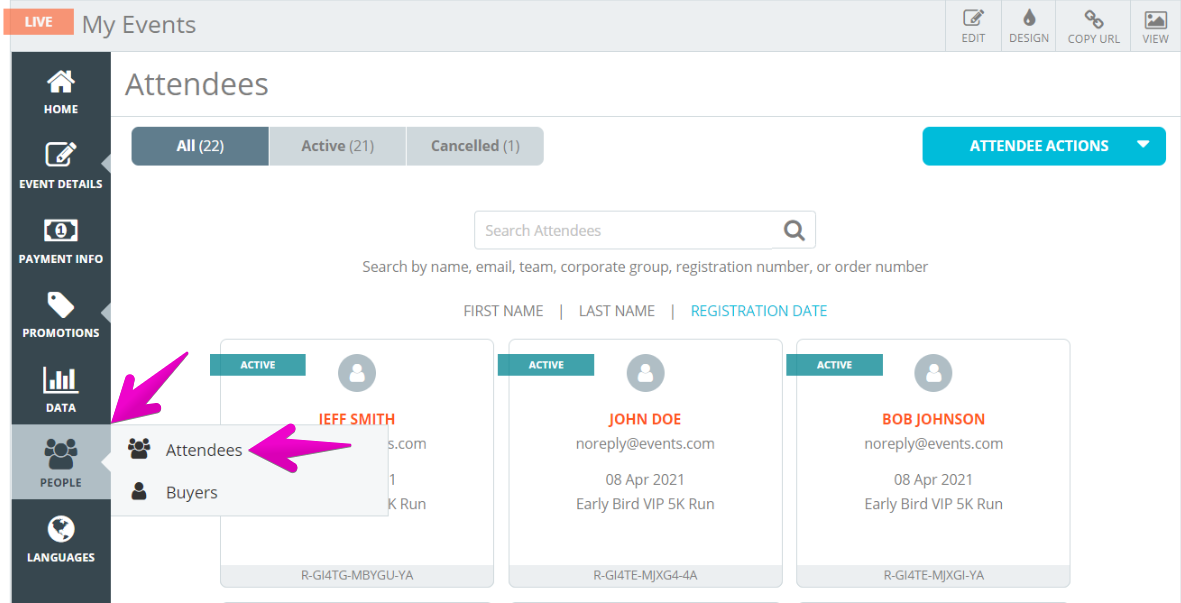
4. From the search bar, you can search first/last names of the attendee, or you can search their team name.
5. Click on a member of the team. Notice how that the team name is in bold under the registrants email.
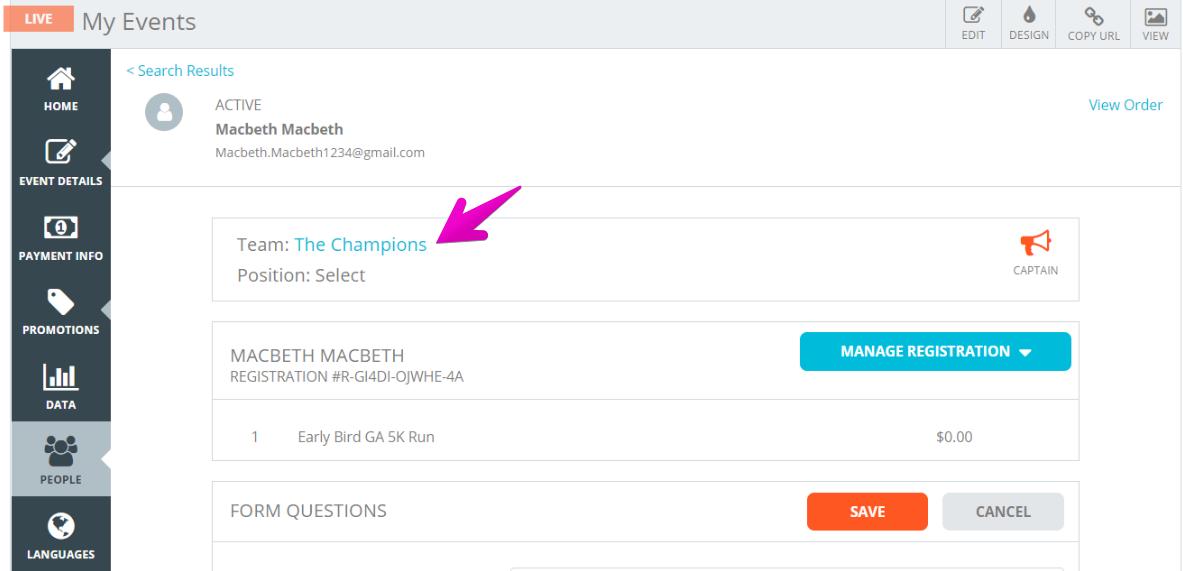
6. From there, select the blue highlighted team name, which will bring you to the team page
7. A new captain can be chosen by clicking the button on the left most option. There can only be 1 captain per team.
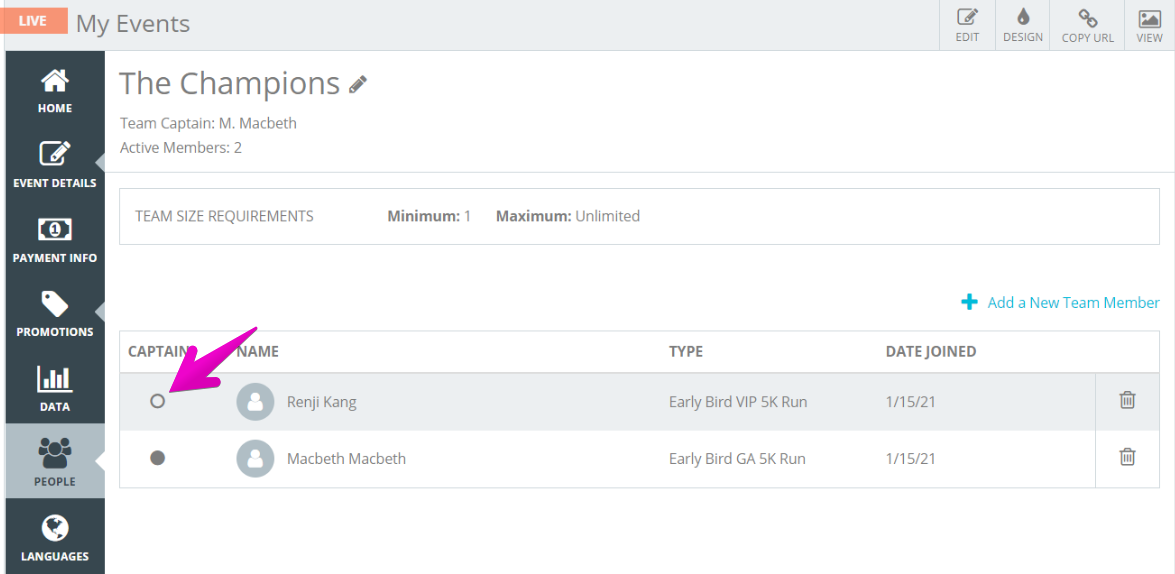
8. A new member can be added by selecting + ADD A NEW TEAM MEMBER. Make sure to search the attendees name or email to locate them in the list.
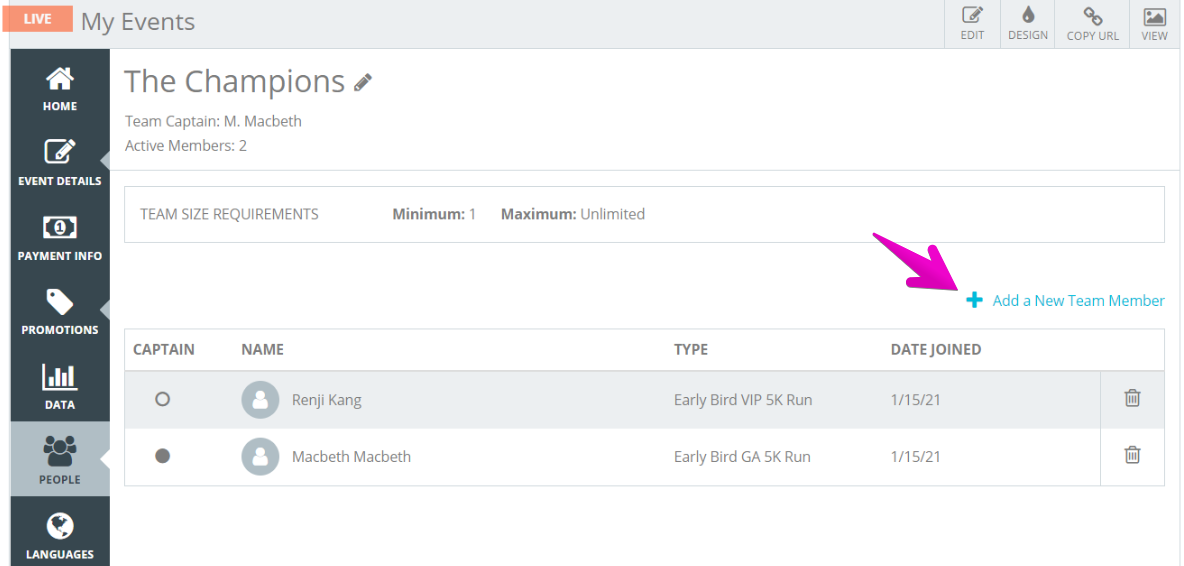
9. Members can be removed from teams by clicking the trash icon on the right most side.
Note: Members can only be a part of 1 team per event, so in order to move a member to a new team they must be removed from a previous team.
Your Orders and Registrations/Tickets (14)
Even when you set up online registration/ticketing, you may need to collect registrations offline. This could be through cash, check, or any other form of payment. With our bulk upload tool, you’ll be able to add all your offline registrants into your database. To enable the Attendee Upload option please start by contacting us at help@events.com. Once enabled, you can use the following steps to add them to your event.
1. Log In to your Events.com account and select the event for which you wish to do the upload.
2. Click on PEOPLE in the left navigation, and then select Attendees
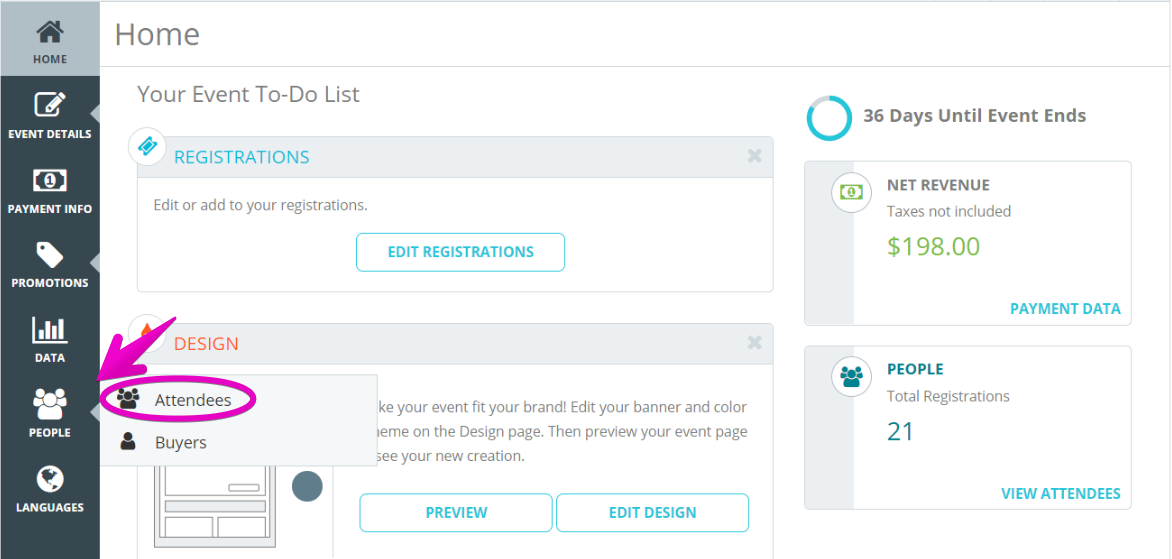
3. From the right, select the ATTENDEE ACTIONS and Attendee Upload

4. Then, Download your custom .CSV template. This ensures that the data you upload will have the same format as all the existing data on Events.com.
Note: Each row is an offline registrant or ticket holder, and will generate a new Registration/Ticket and order for your event.
5. Once you’ve downloaded your template, open it up.
You will see column headers including buyer information, form questions, additional purchases, and any other additional information you’ve added. You can fill out as much or as little as you want, but there are fields you must include – Buyer First Name; Buyer Last Name; Buyer Email: Registration/Ticket Type; Attendee First Name; Attendee Last Name; Attendee Email.
6. After saving the template with all your data, you will need to upload it in the system. Click BROWSE to choose the .CSV file you just created.
7. If you want send each registrant or ticket holder a confirmation email, switch the toggle to YES. The email is the same as though the recipient just completed an order through your page.
8. Click CONTINUE to start the upload. All rows that are entered correctly with the proper formatting will be uploaded successfully. To ensure that your file gets uploaded successfully, check out our Pro Tips!

Pro Tips:
- When you open a .CSV file in Excel, make sure to use the “Import Data as Text” function so that formatting is not lost. Check out this helpful article.
- Date of Birth values must be formatted as MM/DD/YYYY.
- Price paid values are in XXX.XX (with decimal) or XXX (with no decimal) format. (These are not necessary for the upload) *If you added a value it will be added to the org revenue.
- Quantity values are numerical.
- Values in Registration/Ticket Type must match EXACTLY to a Registration Name or Ticket Name in the event.
- Values in Additional Purchase or Form Question columns must match EXACTLY to a corresponding Option Name for the item. Their quantities must be set as 1.
- If a waiver was signed, place “Signed” in the waiver name column for the registrant/ticket holder.
- Values for Country must match EXACTLY one of the Country names in the attached PDF document.
- Values for State/Region/Province must match EXACTLY one of the names in the attached PDF document and be associated to the same Country as listed for the registrant/ticket holder.
- If the value is left blank for Price Paid for a Registration/Ticket or an included Additional Purchase, the Price Paid will be imported as $0.
Note: Review your file before uploading to make sure that all the information is correct. Turn on text wrap (expand the columns to display the full content), to ensure proper importing of data. You cannot remove offline orders.
Absolutely! Registrations/Tickets and any additional purchases can be uploaded regardless of remaining inventory or other restrictions you may have created for your online registrants. This could be through cash, check, or any other form of payment. With our bulk upload tool, you’ll be able to add all your offline registrants into your database. To enable the Attendee Upload option please start by contacting us at help@events.com with this request.
Once enabled, you can use the following steps to add them to your event.
1. Log in to your Events.com account and select the even for which you wish to do the upload.
2. Click on PEOPLE in the left navigation, and then select Attendees

3. From the right, select the ATTENDEE ACTIONS and Attendee Upload

4. Then, Download your custom template. This ensures that the data you upload will have the same format as all the existing data on Events.com.
Note: Each row is an offline registrant or ticket holder, and will generate a new registration/ticket and order for your event.
5. Once you’ve downloaded your template, open it up.
You will see column headers including buyer information, form questions, additional purchases, and any other additional information you’ve added. You can fill out as much or as little as you want, but there are four fields you must include.
6. After saving the template with all your data, you will need to upload it in the system. Click BROWSE to choose the completed file you just created.
7. If you want send each registrant or ticket holder a confirmation email, switch the toggle to YES. The email will look as though the recipient just completed an order through the regular flow.
8. Click CONTINUE to start the upload. All rows that are entered correctly with the proper formatting will be uploaded successfully. To ensure that your file gets uploaded successfully, check out our Pro Tips!

Pro Tips:
- When you open a .CSV file in Excel, make sure to use the “Import Data as Text” function so that formatting is not lost. Check out this helpful article.
- Date of Birth values must be formatted as MM/DD/YYYY.
- Price paid values are in XXX.XX (with decimal) or XXX (with no decimal) format. (These are not necessary for the upload) *If you added a value it will be added to the org revenue.
- Quantity values are numerical.
- Values in Registration/Ticket Type must match EXACTLY to a Registration Name or Ticket Name in the event.
- Values in Additional Purchase or Form Question columns must match EXACTLY to a corresponding Option Name for the item. Their quantities must be set as 1.
- If a waiver was signed, place “Signed” in the waiver name column for the registrant/ticket holder.
- Values for Country must match EXACTLY one of the Country names in the attached PDF document.
- Values for State/Region/Province must match EXACTLY one of the names in the attached PDF document and be associated to the same Country as listed for the registrant/ticket holder.
- If the value is left blank for Price Paid for a Registration/Ticket or an included Additional Purchase, the Price Paid will be imported as $0.
Note: Each row is an offline registrant or ticket holder, and will generate a new registration/ticket and order for your event. Review your file before uploading to make sure that all the information is correct. You cannot remove offline orders.
You may have noticed that some of your people have the word “Buyer” at the top of their car, while others do not. People denoted as “Buyers” are those who processed the order, and may or may not have a separate, non-buyer card.
There are three different scenarios for each “Buyer” card:
1. A person purchased their own registration for an event that did not collect contact information for each event goer, such as a concert. In this scenario, this person will have a “Buyer” card for this order.
2. A person purchased one or more tickets for an event that did not collect contact information for each event goer, such as a concert. In this scenario, this person will only have a “Buyer” card for this order.
3. A person purchase a registration for someone else in an event that collected contact information for the registrant, such as a fun run. All people with a non-buyer card will be attending your event.
Other people may only have one card that is not labeled as “Buyer”, which means that someone else purchase their registration for them. All people with a non-buyer card will be attending your event.
Events.com allows event organizers to process a partial or full refund to one or more items in an order without mandating that the order has to be canceled. This allows you to ensure your customers are happy while making sure that your inventory stays accurate. No need to submit a help ticket to Events.com to process this change – you can manage your event orders via this easy, self-service tool. Follow these steps to process a full or partial refund without canceling any part of the order!
1. Log In to your Events.com account.
2. As an organizer your first screen will be your organization data. You can select between your LIVE and COMPLETED events ans find the event for which you want to provide a refund.
3. Click on PEOPLE on the left side navigation tool bar and select Attendees.

4. In the search bar, type in the name or email address of the attendee whose refund you’d like to process.

5. Within the event goer’s page, select View Order.

6. Select MANAGE ORDER and then select Process Refund. You will now be in the order screen that will allow you to refund one item or several items from the order.

7. Enter the amount you wish to refund for each item in the order that apply – in the column under REFUND. You can refund multiple items at one time by entering multiple line items. You cannot refund more than the amount charged, but you can refund a portion of the amount.
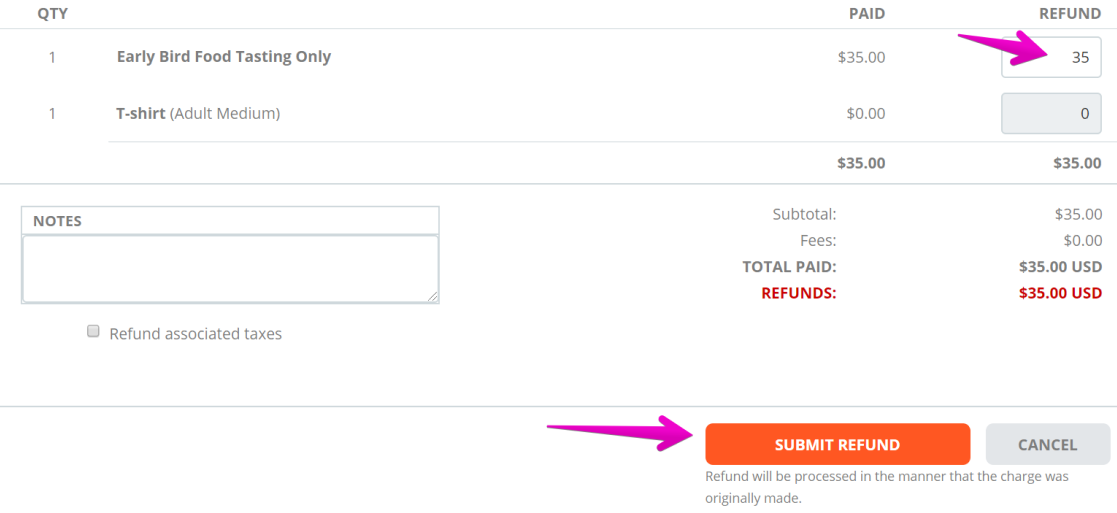
8. Select SUBMIT REFUND and voilà, you’re done! The refunded amount will be processed on the same credit card that was used for the original purchase. An email will be sent to the buyer to summarize the transaction.
Pro Tips: In Step 4, you can use the attendee’s first name, last name or both to narrow down your search! The refunded amount cannot exceed the amount paid for the item in the original purchase. Your event goer will see their refund on the original card used for purchase within 5 – 10 business days, depending on their specific banking institution’s process.
IMPORTANT INFORMATION ON FULL PLATFORM REFUNDS:
Events.com fees are non-refundable by Events.com. These are the order and processing fees for services rendered. As an organizer, you have the option to refund these fees to your attendees directly. Choosing to refund these fees will result in them being refunded from your revenue.
If your fees are added to the cost of your registrations/tickets: To process a full refund including the Events.com fees, you will need to contact us to facilitate. Please contact our help desk at help@events.com.
If your fees are absorbed (part of the registration/ticket cost): You will be able to refund them directly to your attendees within the registration/ticket amount using the steps above.
Please note: Platform refunds are dependent on fund availability.
As an event organizer, you have the option to provide your event goers with a refund through the dashboard. Events.com makes it easy to complete this task. See how do perform this function below!
1. Log In to your Events.com account.
2. As an organizer your first screen will be your organization data. You can select between your LIVE and COMPLETED events and find the event for which you want to provide a refund.
3. Click on PEOPLE on the left side navigation tool bar and select Attendees.

4. In the search bar, type in the name or email address of the attendee whose refund you’d like to process. Select the person you to refund from the results.

5. Within the event goer’s page, select View Order.
6. Select MANAGE ORDER and then select Process Refund. You will now be in the order screen that will allow you to refund one item or several items from the order.
7. Type in the amount you would like to refund in the column under REFUND. You can refund multiple items at one time by entering multiple line items. You cannot refund more the amount charged, but you can refund a portion of the amount.
8. Select SUBMIT REFUND and voilà, you’re done! Your event goer will see their refund on the original card used for purchase within 5 – 10 business days, depending on their specific banking institution’s process.
Pro Tip: In Step 4, you can use the attendee’s first name, last name or both to narrow down your search!
IMPORTANT INFORMATION ON FULL PLATFORM REFUNDS:
Events.com fees are non-refundable by Events.com. These are the order and processing fees for services rendered. As an organizer, you have the option to refund these fees to your attendees directly. Choosing to refund these fees will result in them being refunded from your revenue.
If your fees are added to the cost of your registrations/tickets: To process a full refund including the Events.com fees, you will need to contact us to facilitate. Please contact our help desk at help@events.com.
If your fees are absorbed (part of the registration/ticket cost): You will be able to refund them directly to your attendees within the registration/ticket amount using the steps above.
Please note: Platform refunds are dependent on fund availability.
There are many reasons that an attendee may change their Registration/Ticket type. If you have allowed them to manage their changes themselves there may be times you want to review their order. With the following steps you can review the changes to their registration/ticket type as well as their optional event insurance. If you aren’t currently allowing changes, please refer to this article – How do I allow my event goers to change their registration/ticket type?
1. Log in to your Events.com account and find the event which you would like to view.
2. Go to PEOPLE in the left side menu and select Attendees.

3. Enter in the attendee’s first name or last name in the search bar. Select the person that you want to review the results.
4. Select View Order.

5. On the left select Order History.

6. You can now see how your attendee’s insurance has been changed. This screen displays the dates of the transactions associated with this order. Cancellations will appear as separate lines in red.
Pro Tip: In the search bar, type in the name, email address or team name of the attendee that you would like to review. You can use their first name, last name, or both to narrow down your search.
Changing a buyer’s email address is very easy to do with Events.com. Follow the steps below to find out how to do it!
1. Log in to your Events.com account and go to your event.
2. Once in your event, click on PEOPLE in the left navigation tool bar and select Buyers.
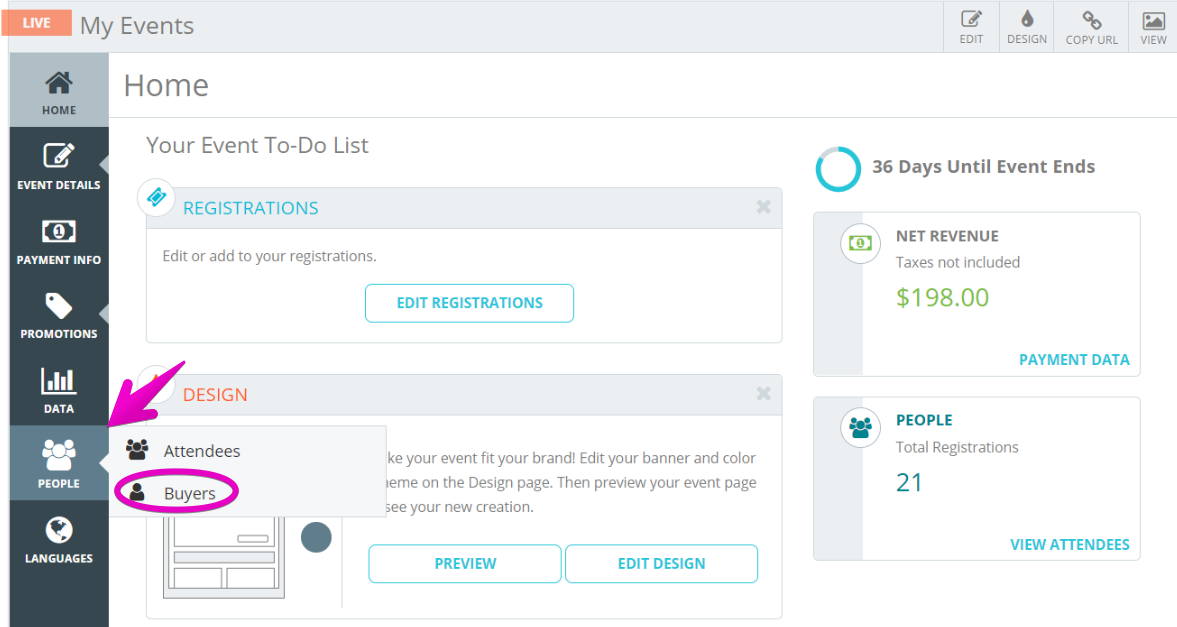
3. In the search bar, enter the buyer’s first name, last name or email.

4. Select the buyer’s card and below their name select the Edit icon next to their email address.

5. Once clicked a pop-module will appear that says Change Buyer Email Address. Here you can enter the email address associated with the order.
6. Before clicking SAVE, please ensure this email is correct, since it will change the buyer’s access to their order. Once changed the buyer will receive an email to be able to access their purchase.

As an event organizer, sometimes you need to cancel an attendee’s order. With Events.com you have the option to cancel the attendee’s order in just a few easy steps. See how to do it below!
1. Log In to your Events.com account.
2. As an organizer, your first screen will be your organization data. Select an event from your LIVE for which you want to cancel an order.
3. Click People on your event card to go straight to your Attendees. If you’re in your event, go to PEOPLE on the left side navigation and select Attendees.
4. In the search bar, type in the name or email address of the attendee whose order you’d like to cancel. Select the person that you want to cancel.
5. Within the event goer’s page, select View Order in the upper right-hand corner.
6. Click on MANAGE ORDER and then select Cancel Items. You will now be in the order screen that will allow you to cancel one item or several items from the order.

7. Select the item(s), that you wish to cancel by checking off each individual box to the left of the item. If it’s the whole order, you can click the CANCEL ENTIRE ORDER option at the top which selects all items to be canceled from the order.

8. Select SUBMIT CANCELLATION and voilà you’re done! Your event goer will see their cancelled items on their Events.com account, and receive an email informing them of the cancellations
Pro Tip: In Step 4, you can use the attendees first name, last name or both to narrow down your search!
As an Event Organizer, you may need to assign identification numbers to your attendees such as bib or badge numbers, and Events.com has a bulk upload tool that makes this process quick and easy!
1. Log In to your Events.com account.
2. As an organizer your first screen will be your organization data. You can select between your LIVE, DRAFT, and COMPLETED events and find the event for which you want to assign attendee numbers.
3. Click PEOPLE on the event card to open your Attendees page.
4. Click the ATTENDEE ACTIONS drop down button on the right side and select Attendee Number Upload

5. You need a document to be uploaded with your attendees and their numbers. Section 1 provides you with a choice of templates. Your attendees are ordered by Last Name within each registration type. If need be, you can sort them differently, move them around or delete some. After finalizing the order of your attendees, use the Attendee Number column to give them all unique numbers and save. The most important parts of the template are the columns – Attendee First Name, Attendee Last Name, Registration/Ticket Type, Registration Number and Attendee Number. If you choose to create your own document, you will need to include only those columns and save it as a .CSV or an Excel Workbook .XLSX
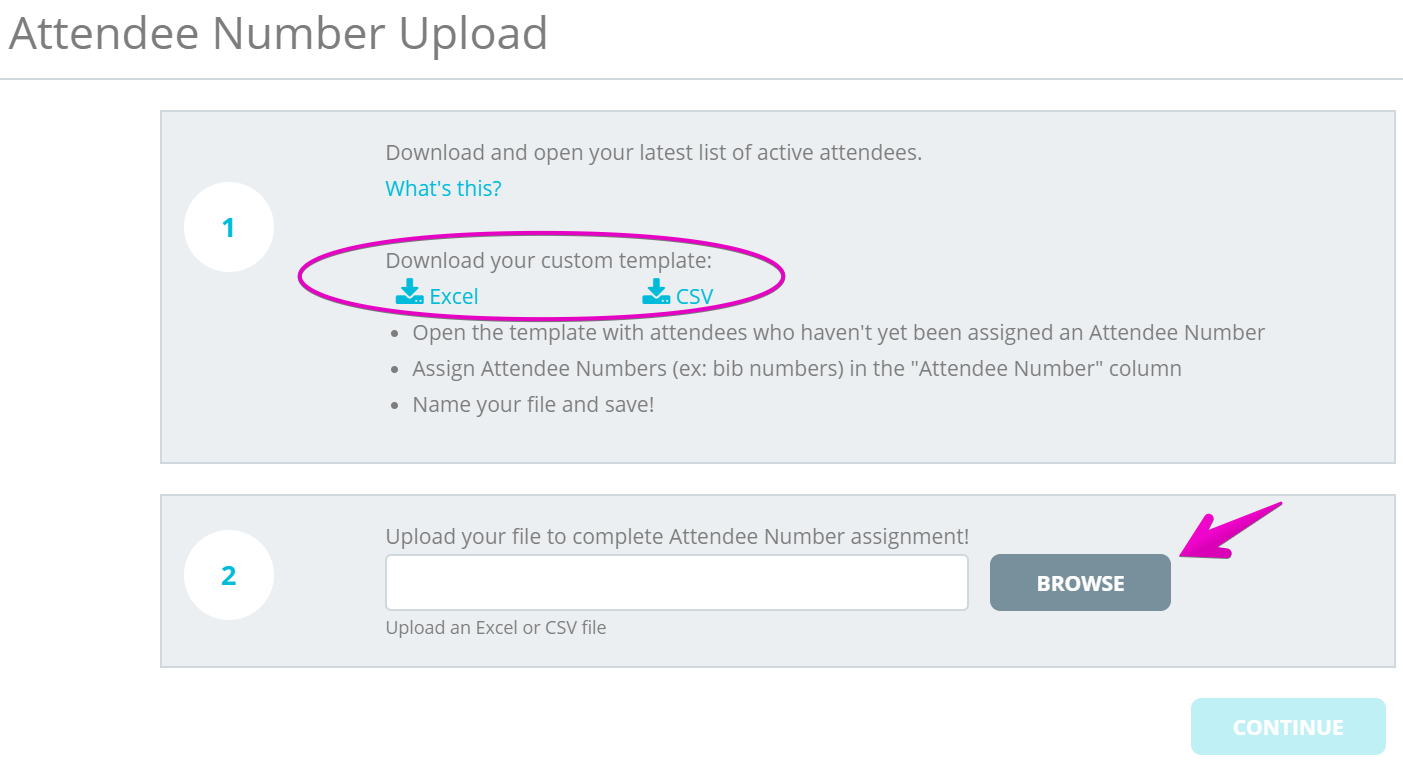
6. Your document is now ready for upload! In Section 2 click BROWSE to choose the completed file you just created and click CONTINUE to start the upload. Once the file has been successfully uploaded, you will see it under Upload History with a status of COMPLETE and the total number of attendees uploaded with identification numbers.
Pro Tips: Should you need to assign attendee numbers to additional registrants in the future, the custom template will only include attendees who have not yet been assigned an id number! If you choose not to use the template, make sure the last columns are included in your document – Attendee First Name, Attendee Last Name, Registration/Ticket Type, Registration Number and Attendee Number.
Want to remind all of your attendees about your event or to send them some new information? No problem! We offer a one time resend of confirmation emails to all your attendees. The subject line will be: Just a reminder…
1. Log in to your Events.com account, and select your event.
2. Click on EVENT DETAILS and go to Custom Confirmation.
3. If you’d like to add a new custom message, enter it into CUSTOM MESSAGES in the CONFIRMATION EMAIL section and click SAVE. This will be the message that all new event goers receive unless you remove it after you’re finished and click SAVE again.
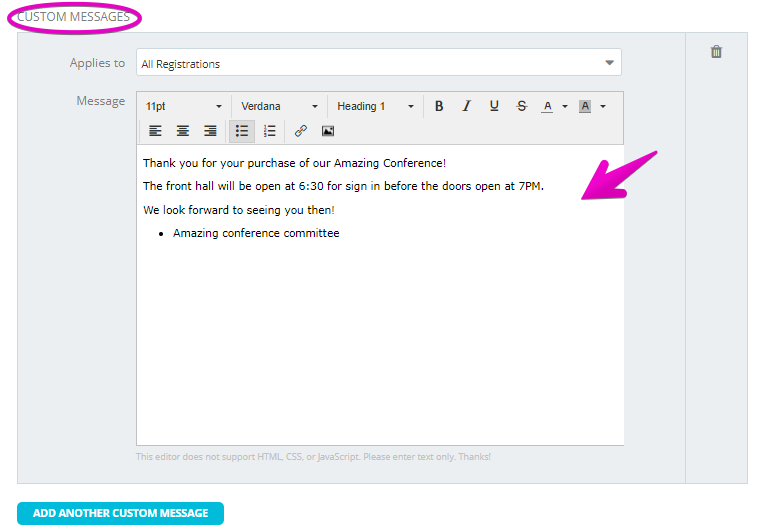
4. Scroll to the bottom to the RESEND CONFIRMATION EMAIL section, where you click the button RESEND CONFIRMATION EMAIL.

5. You will be able to see confirmation that your event goers have been re-sent their confirmation emails, as seen in the image below, and that’s it!

Note: This tool can only be used once, so if you’d like to communicate with your event goers more often we suggest checking out our article – How do I contact my attendees?
Attendee Protection offers attendees’ protection for some of the common personal reasons out of an individual’s control, that people have for cancelling their event attendance. If an attendee makes a successful claim, FanShield will issue a refund for the amount protected. We know that this can be helpful for an organizer, as you aren’t always able to offer refunds. If this is the case, Attendee Protection can be a solution for your attendees.
You can find the full terms and conditions of FanShield’s Standard Attendee Coverage Policy here.
The registration report contains who has accepted and declined Attendee Protection if you’re interested in reviewing your whole event. For help running a report, please visit our article – How do I view reports?
If you need to review an individual’s protection, there is information available in their registration/ ticket.
1. Open People and click Attendees.
2. Search for the individual and click their card to open their registration/ ticket.
3. In the left corner, Attendee Protection will be listed with the summary of the order. A status message will indicate the Protection status.
The example status is Active! which indicates that the Attendee successfully purchased Protection and could initiate a claim if applicable.
Other possible statuses are:
Inactive! – This can indicate there is a new policy associated with another ticket/registration.
Changed or cancelled! – This could indicate that a claim is in progress, or a change was made with their registration/ ticket.
Something went wrong with processing! – This usually indicates that the attendee’s payment was not success and the attendee should look for a FanShield email or email them directly.
4. Clicking View Details will open a pop up containing the Attendee’s Protection Policy ID (this is needed to submit a claim) and a quick reference to FanShield’s support. The article referenced is this article. If you have additional questions for how you can best support your attendee, please contact our support at help@events.com
If at any time, there are additional questions about Attendee Protection, have the attendee contact FanShield at help@fanshield.insure
If a refund has been approved, you can keep your team in the loop by leaving a quick note on the order with these steps:
1. Log In to your Events.com account.
2. Select the event in which you wish to manage attendees and click on PEOPLE on the left hand side tool column and select Buyers.
3. In the search bar, type in the name or email address of the attendee whose refund you’d like to process. Select the person you want to refund from the results.
4. Click Manage Order in the upper right. Then Process Refund to open the refund page.
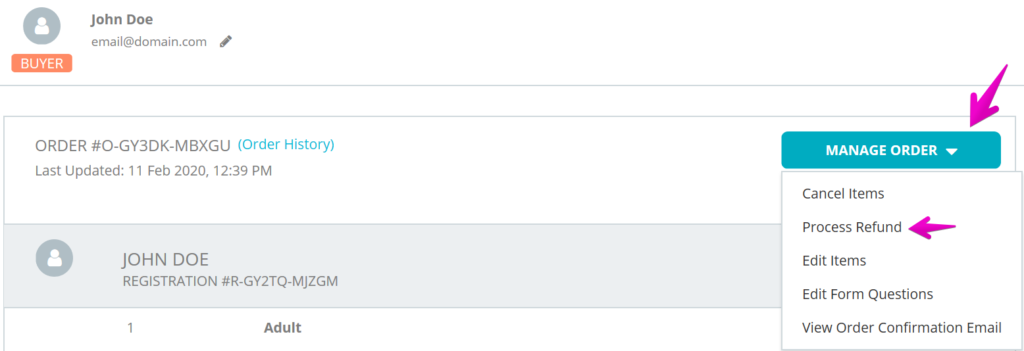
5. Enter in the refund amount next to the paid amount. In the bottom left corner you will see the notes section. Type in the notes section the details you wish to add (Ex: Contacted about personal injury, exception made).
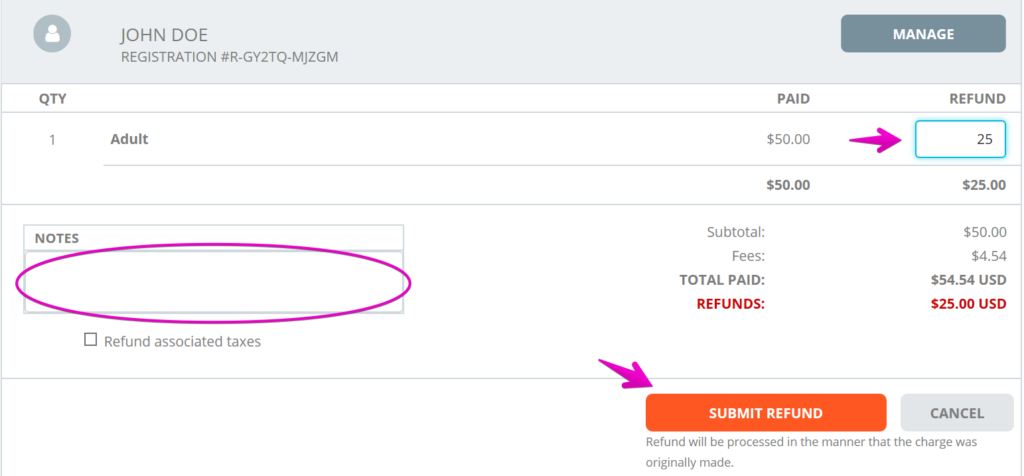
6. Click the SUBMIT REFUND button for your note to be added onto the order while the refund is being processed.
Pro Tip: To view a saved note, you will need to open the Process Refund page. You cannot update a note unless you are processing an additional refund.
IMPORTANT INFORMATION ON FULL PLATFORM REFUNDS:
Events.com fees are non-refundable by Events.com. These are the order and processing fees for services rendered. As an organizer, you have the option to refund these fees to your attendees directly. Choosing to refund these fees will result in them being refunded from your revenue.
If your fees are added to the cost of your registrations/tickets: To process a full refund including the Events.com fees, you will need to contact us to facilitate. Please contact our help desk at help@events.com.
If your fees are absorbed (part of the registration/ticket cost): You will be able to refund them directly to your attendees within the registration/ticket amount using the steps above.
Please note: Platform refunds are dependent on fund availability.
There are a couple different reasons you may want to refund from your own account instead of the admin portal in Events.com. Perhaps your funds have been fully deposited, or you want to make sure you’re including fees. Whatever the reason, you can process the refund with these easy steps!
1. Log into your Stripe dashboard.
2. Search the order you’re intending to refund. You can search by using the order number, name, email address, amount, or last 4 digits of the payment card used.

3. Your search will give you a list of matching transactions, click on the one you want to open. Then you can click the Refund button on the right of the order.

4. The refund box will pop up. The full amount will prefill. You are able to select a reason and make a note that will appear in the charge for future reference. If you want to refund the full amount you can submit. If you want to make a partial refund, you can type in the amount and then click submit.
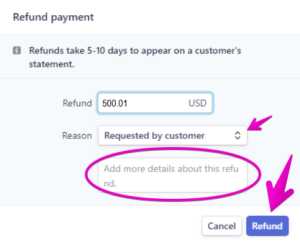
IMPORTANT INFORMATION ON FULL STRIPE REFUNDS:
Events.com fees are non-refundable by Events.com. These are the order and processing fees for services rendered. As an organizer, you have the option to refund these fees to your attendees directly. Choosing to refund these fees will result in them being refunded from your revenue.
If the funds are not in your Stripe account, the amount will be automatically withdrawn from your bank account to cover the balance owing. When finished, please contact our success team at help@events.com and we’ll review with you.
Virtual content has become extremely important and often includes some additional info or links to share after someone has completed their order. We’ve recently added a secure way to share this with your attendees through the new Digital Event Page. This page gives you the space to add in some details and share some links with your participants. After they sign up, they are able to access the page within their Events.com accounts from their order. When you’re ready, you can start customizing your Digital Event Page with these steps:
1. Log In to your Events.com account and navigate to your event.
2. In your event, click EVENT DETAILS and then Digital Event Page.
3. Click CREATE PAGE to get started! The toggle to Make Digital Event page visible to Attendees is defaulted to YES. If you’re not ready to share the page, you’ll want to toggle to NO.
There are three page elements available to help you build your digital event page. Text for adding text or images, with or without hyperlinks in the Text Editor. You can add Video for an optional title and video link (to be embedded for viewing) or Live Stream for an optional title and streaming link. Click Add page element to get started. You can also add a Background Image. If your event page has a banner, you’ll have the option to USE BANNER IMAGE. If you didn’t have one, or would like to use something else, you’ll have the option to SELECT IMAGE. Click Preview Page to see how your page will appear to your attendees. Use the arrows on the left to move your page elements around, or the trash cans on the right to remove an element completely. You can add as many of each page element as you’d like for your Digital Event Page.
4. When finished, click SAVE. This page will now appear within your attendees’ Events.com accounts! (If your toggle was set to NO, your progress will be saved for later)
Attendees can access the Digital Event Page from within their Events.com accounts.
Or by clicking the link within their confirmation emails (attendees will need to Sign Up if they haven’t already created an account).
Pro Tip: If you have added another language to your event, you will also be able to offer your Digital Event Page in that language as well.