Explore Topics for Event Goers
Event Policies and Procedures (2)
Events.com is a self serve event management platform designed to assist event organizers. Event organizers handle all aspects of their events, including questions. Here are the best ways to find an event organizer’s contact so you can message them your questions directly.
Please note: Many organizers only provide an email as their contact. You may need to wait for a response but most organizers are working diligently to stay connected with their attendees!
1. Your order confirmation email
When you open your confirmation email there is a section near the top providing you with the contact for the event you registered for. You can use the email listed to reach out to the organizer directly.

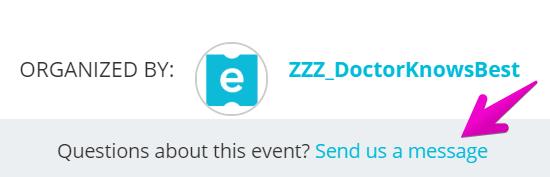
2. Using the Event Page contact form
As soon as you’re on the Event Page, scroll down to the bottom to the ORGANIZED BY box and click Send us a message
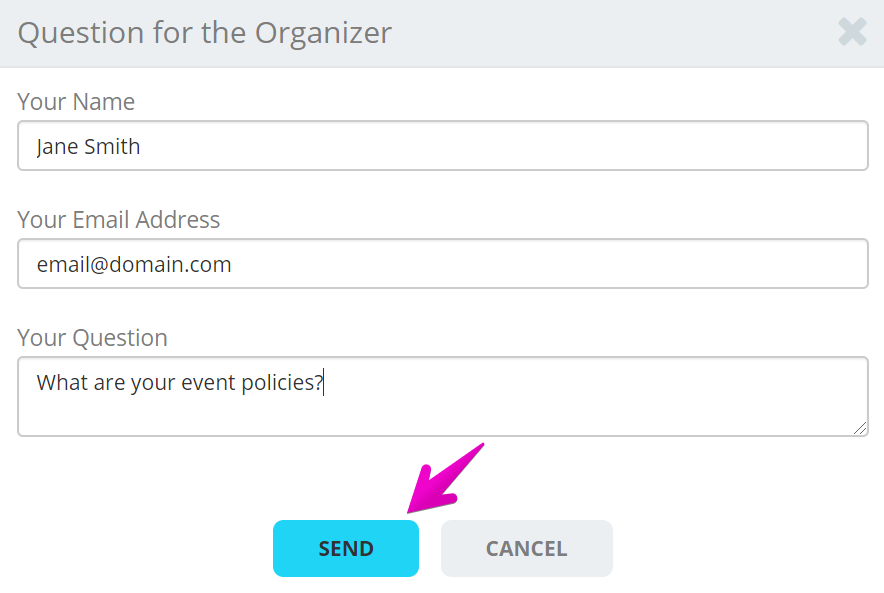
This will open a pop up contact form for you to fill in your information and it will be sent to the organizer directly on your behalf.
3. Contact Events.com
While we are not directly associated with the event, we can help you locate their contact information. Please email our help desk at help@events.com, we’ll do our best to connect you with your event organizer. Please include:
The event name
Your name and email (if emailing from a different email address then you registered with)
Your order number
Event Planning as it relates to Coronavirus (COVID-19)
We understand the concern and uncertainty you are likely experiencing surrounding the coronavirus (COVID-19) outbreak. We are closely monitoring information from government agencies, medical professionals, the Centers for Disease Control (CDC) and the World Health Organization (WHO) to keep a pulse on the evolving situation. We are working hard to ensure that our organizers are having access to the best information that will affect your event experience. Each event organizer is responsible for their own event, and is prioritizing the health and safety of everyone involved.
Health & Safety
Your event’s organizers are doing their best to be as mindful of your community’s health as possible. This includes reviewing CDC recommendations for coronavirus (COVID-19); checking with provincial, federal, state and local authorities for any current or potential event restrictions; and being aware they may need to make difficult decisions to maximize the safety of all their participants and partners.
Emergency Plan Options
There are different considerations being made by each event. We encourage you to follow your events on social media, visit their website and keep an eye on your email inbox for any announcements. If at any point you have questions for the event organizer, we suggest contacting them directly.
Additional Resources
When your event does occur, even after the restrictions are removed and we’ve all overcome the current challenges, consider measures you can take in the future to help prevent the spread of this and any other illness. Some examples include:
- Wash your hands frequently
- Avoid touching your eyes, nose, and mouth.
- Stay home when you are sick.
- Cover your cough or sneeze with a tissue, then throw the tissue in the trash.
- Clean and disinfect frequently touched objects and surfaces
- Be prepared for potential changes at your child’s school or childcare facility, or your workplace.
- Review the information provided by the CDC for what you should know about Coronavirus Disease.
In Closing
Perhaps the most important thing to remember is that these precautions are for the health and safety of everyone. We encourage everyone to stay positive and extend our sympathies to everyone who has been impacted.
Events.com Team
My Account (10)
Creating your account is super easy and it only takes a few seconds!
1. From the Events.com menu above click My Tickets to open the Events.com Experience account Log In. You can select a social platform to continue or click Sign Up.
![]()

2. Enter your information
- First Name (optional)
- Last Name (optional)
- Email (this will be your username)
- Password
3. Click the orange SIGN UP button.

People who are browsing or registering for events are not required to create an account, but there are many benefits.
- Personalized experience – we’ll make it easy for you to find and sign up for events that you want to attend.
- Faster checkout – since we know who you are, we’ll get you through the process quicker.
- Team Management – Change your team name, team access code or invite teammates to join your team.
- Profile management – update your personal information, add a photo, manage your tickets and registrations, and lots more!
If you are only looking to purchase entry to an event, you don’t have to create an account… it’s just way better if you do!
Here are some of the benefits you can enjoy if you have an account:
- Personalized experience – we’ll make it easy for you to find and sign up for events that you want to attend.
- Faster checkout – since we know who you are, we’ll get you through the process quicker.
- Team Management – Change your team name, team access code or invite teammates to join your team.
- Profile management – update your personal information, add a photo, manage your tickets and registrations, and lots more!
Learn how to create an Events.com account here.
Don’t worry, we’ve got your back! Emails get lost or deleted all the time. Follow the steps below to get a new email and activate your account.
1. From the Events.com menu above click My Tickets to open the Events.com Experience account Log In.
2. Click Forgot your Password at the bottom of the Log in box.

3. Enter your email address.
4. Click RESET PASSWORD.
An email with instructions will be sent to you to reset your password and log into your account.
When an inactive account is created, you will receive an email letting you know. This email will contain a link to Activate Your Account, and create a password to protect your new account.
Note: This link is only active for 24 hours after you receive it. If you didn’t see it in time, click on the link anyway and follow the same process. You’ll just have to confirm your email address so the system can find your inactive account again.
There are a couple of reasons why you may have an inactive account:
- You registered or purchased a ticket for an event through Events.com and didn’t create an account.
- Someone was nice enough to register or purchase a ticket for you.
- Someone invited you to help manage their organization on Events.com.
When one of these happens, we create an inactive account for you so that when you are ready to activate your user account you can access all your events. Who knows – you may have forgotten about an amazing event you participated in. We can help you re-live that awesome experience!
Yes. Events.com makes it super simple for you to log in or create an account using your existing social media accounts.
1. From the Events.com menu above click My Tickets to open your Events.com Experience account. If you don’t have an account, select Sign Up using the same email as on your registration or ticket.
2. Select one of the social media options on the left you would like to use to create your Events.com account.

3. You will need to grant Events.com access to some information in the selected social media account, and may need to confirm the password for the account.
4. Once granted, this will create an Events.com account for you with the same email address and name used on the selected social media platform. You will also need to confirm your Events.com password the first time you log in with a social media account.
Note: The email address used for the social media account will need to match your Events.com account. You may need to confirm the password for the account and grant Events.com with some public information in your account.
Yes. If you choose to use one of these social media logins to create an account in Events.com, you are allowing Events.com to access some of your public data from these sites.
Not to worry, Events.com has the highest level of data security and will not sell or distribute any of this data to third party organizations. Below is a quick view of the info we would have access to for each social media platform.
Facebook:
- Public profile (name, profile picture, age range, gender, language, country, and other public info)
- Email address
Google:
- Email address
- Basic profile info (Your full name, profile picture and profile URL, and any publicly available information currently on your Google profile or added in the future)
LinkedIn:
- Email address
- Profile overview (name, photo, headline, and current positions)
Please visit our Privacy Policy for more info.
For whatever the reason, we’ve all needed to reset a password at one time or another. Good news – it’s super easy to Reset Your Password! Below are the steps you’ll need to take.
1. From the Events.com menu above click My Tickets to open the Events.com Experience account Log In.
2. Click Forgot your Password at the bottom of the Log In box.
3. Enter your email address.
4. Click RESET PASSWORD.
5. An email with instructions will be sent to you to reset your password and log into your account.
1. From the Events.com menu above click My Tickets to open your Events.com Experience account. If you don’t have an account, select Sign Up using the same email as on your registration or ticket.
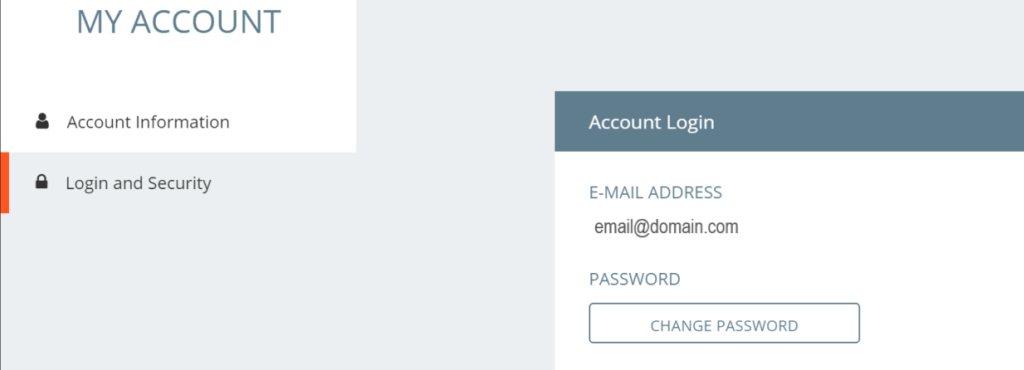
2. In your Attendee Menu, click MY ACCOUNT.

3. Click Login and Security to update your password. Select CHANGE PASSWORD and then SAVE.


Please note: You’ll receive an email notifying you of your password change to ensure this was you. If this was not you, you can reset your password again following these steps – How do I reset my password?
1. From the Events.com menu above click My Tickets to open your Events.com Experience account. If you don’t have an account, select Sign Up using the same email as on your registration or ticket.
2. In your Attendee Menu, click MY ACCOUNT.

3. This will open up Account Information where you can update your First Name and Last Name. Click EDIT, and SAVE.


4. Click Login and Security to update your password. Select CHANGE PASSWORD and then SAVE.
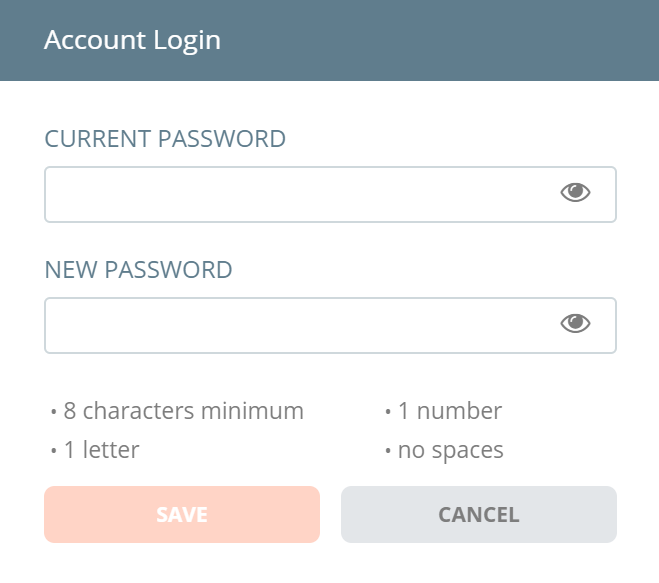
Please note: You’ll receive an email notifying you of your password change to ensure this was you. If this was not you, you can reset your password again following these steps – How do I reset my password?
My Corporate Group (Buyers and Members) (4)
Now that you have purchased all your corporate group registrations /tickets it’s time to fill those spots! Each registration /ticket type you purchased formulates a unique link to provide to people to sign up with. You can copy your special link(s) from your Corporate Group Center and then it’s up to you how you’d like to share. *Members are more likely to read a personalize invitation from a known source.
1. From the Events.com menu above click My Tickets to open your Events.com Experience account. If you don’t have an account, select Sign Up using the same email as on your registration or ticket.
2. Find the event you wish to complete your corporate group in, select MANAGE EVENT, and then Manage Corporate Group.

3. Now that you have entered the Corporate Group Center, you will see the ticket option(s) you PURCHASED, you can copy the invite link beside them to share to individuals wishing to join your corporate group. You’ll start to see your list of REGISTERED MEMBERS grow as they start joining. The OPEN column keeps track of how many spots still need to be filled.

4. Next, your awaiting member can click their link to open the prepaid registration /ticket form. Once they are done filling in their info, they’ll click Submit Order to finalize their registration/ ticket.
Easy peasy! And you’ll all be on your way to having a good time, in no time!
We are excited to hear your corporation is interested in purchasing a Corporate Group order. Your company can pre-purchase spots by following these steps:
1. Start off by visiting the event page you wish to register your corporation for. *Please note that the event organizer must have the setting turned on for corporate buying, if it is not available feel free to reach out to them directly.
2. On the event page, you will see the Corporate Group option (under Individual and/or Team) selecting it will start the order process.

3. Name your group, and click CREATE

4. Select how many of each registration or ticket type you would like to purchase by clicking into the box and typing the number you want. Then scroll down and click PURCHASE NOW.

5. We made sure to keep the purchasing page quick and easy for you to fill out. It will only ask for your info as the buyer and payment details to submit the order.
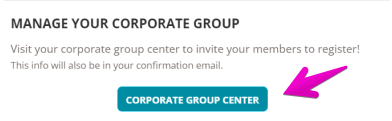
6. After submitting your order, you will be brought to the order confirmation page. It will confirm that your Corporate Group has been created and provide an option to visit your group by clicking Manage Corporate Group. Your confirmation email also has a link to access it, or you can log into Events.com Experience directly to visit it later. Your Corporate Group Center has links to provide to the members you’d like to join your group, and lets you keep track of who has signed up.
For more on managing your Corporate Group check out – How do I manage my corporate group?
Are you all ready to have people join your group? Or wondering where you’ll be able to keep an eye on who has filled their spots? Or how many you have left to fill? The Corporate Group Buyer has full access to their group’s Corporate Group Center. Here is where, you can access your unique link(s) to share with your attendees, stay updated on how many are registered, and view the list of who has registered with just a few clicks!
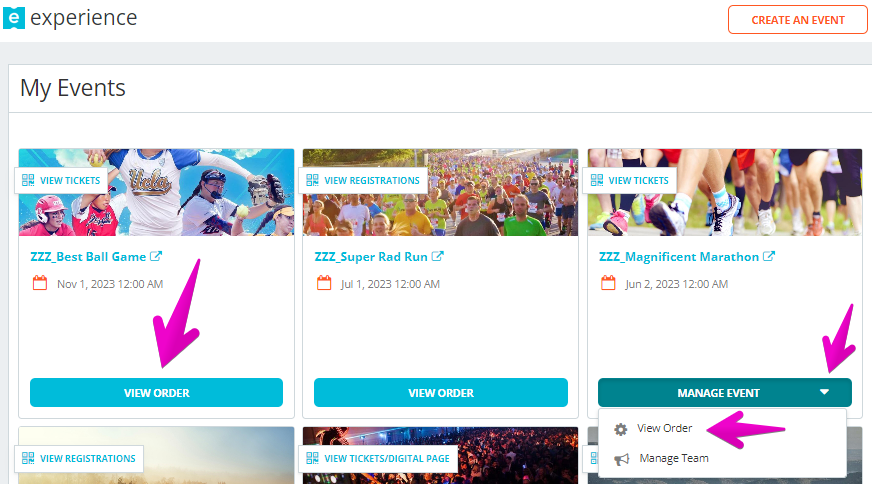
1. After you have bought all your corporate spots, from the Events.com menu above, click My Tickets to open your Events.com Experience account. If you don’t have an account, select Sign Up using the same email as on your registration or ticket.
2. Find the event you want to manage, select MANAGE EVENT, and then Manage Corporate Group.

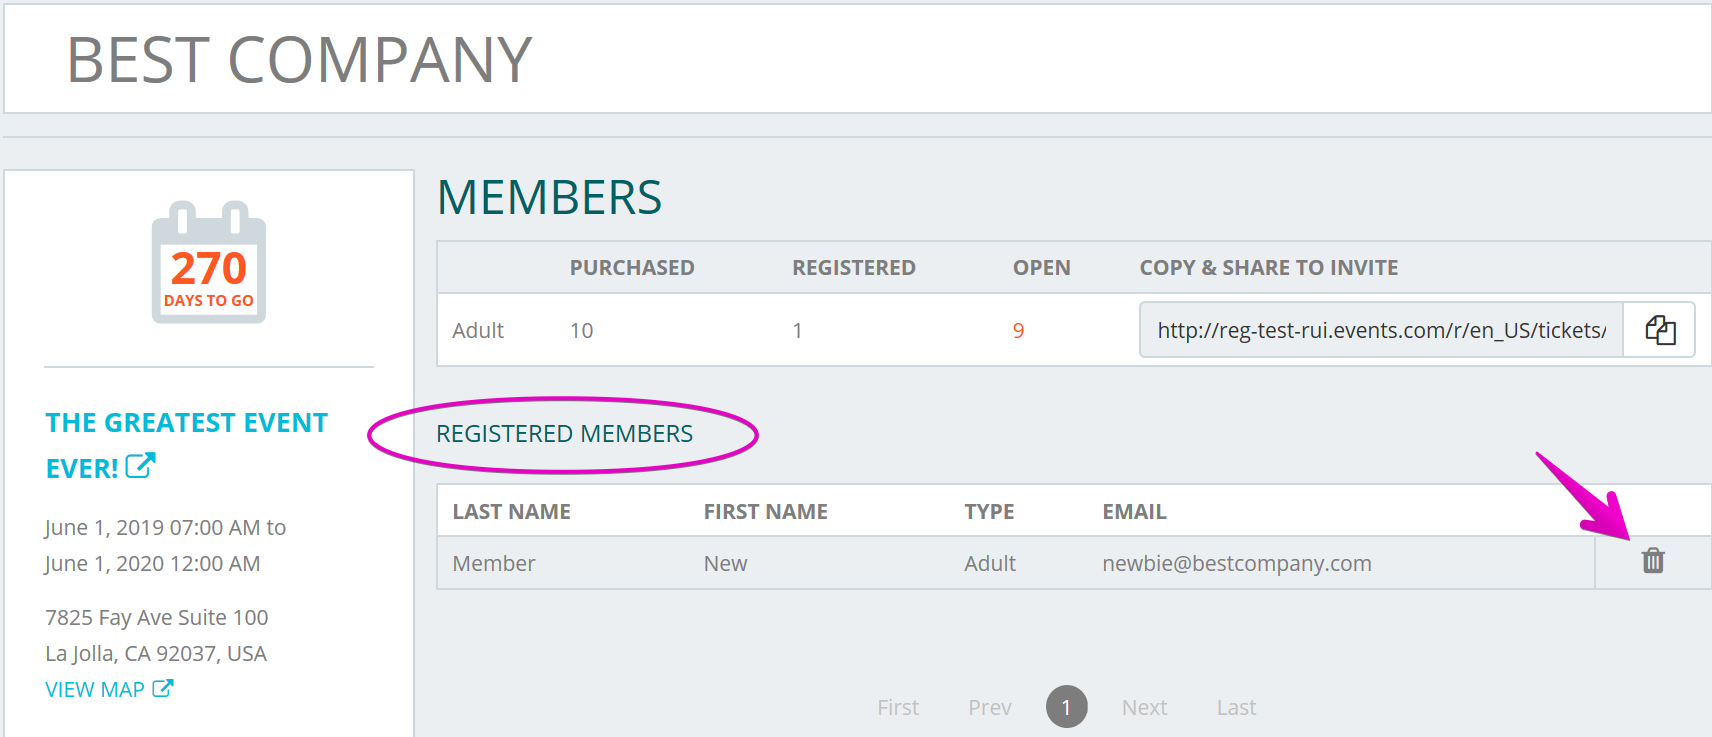
3. Now that you are in the Corporate Group Center, you will have access to the following:
- Purchased inventory, registered, and open spots.
- Special invitation links to be copied and sent out to joining members.
- Event day count down, date and location/map (if applicable).
- List of registered members (Name, Registration /Ticket Type and Email).

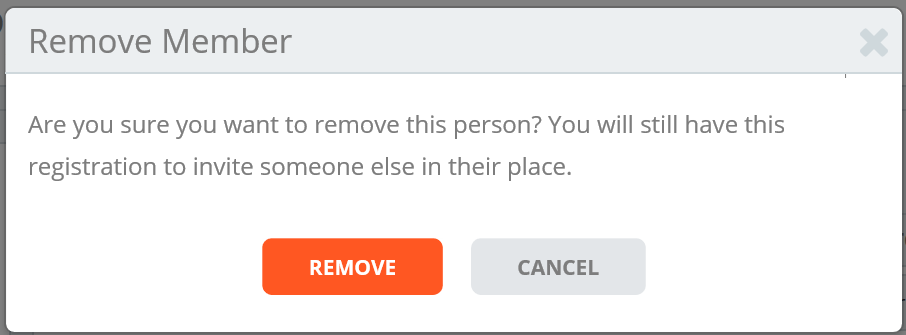
If you need to remove a member, this can be done in the REGISTERED MEMBERS section. Find the name of the person you would like to remove and select the Trash can icon next to their name.
In the pop up box, select REMOVE to complete. This team member has now been removed, and the spot is available again to be sent to someone else!
Has your company generously arranged for you to participate in an exciting upcoming event? You’ll need to use a special link to sign yourself up to officially join the group.
The purchaser of the corporate group will have links for the number of spots they’ve ordered. Please reach out to them to send you an invite link or wait for them to do a shout out to you. If you are the representative, please check out this helpful article for tips on inviting members – How do I invite people to join my corporate group?
Then you can click the link given to you by your company to open your registration form or ticket for the event. Fill in your information and Submit Order! You’ll be signed up and ready to go!
Please note: Your Corporate Group registration/ ticket was prepaid and will not prompt you to pay. However, you may have the option of purchasing add ons which will require an additional payment.
My FanShield Attendee Protection (3)
So you purchased Attendee Protection. Good decision! Unfortunately if you’re here, you likely can’t attend the event but you can file a claim for a refund. Here are the steps you need below:
(If you have your Policy ID handy, skip to step 4)
1. From the Events.com menu above click My Tickets to open your Events.com Experience account. If you don’t have an account, select Sign Up using the same email as on your registration or ticket.
2. Find the event you want to file a claim for, select VIEW ORDER or if you’re part of a team, MANAGE EVENT then View Order.
3. In your order, you will see that you purchased Attendee Protection. Click View Details.
![]()
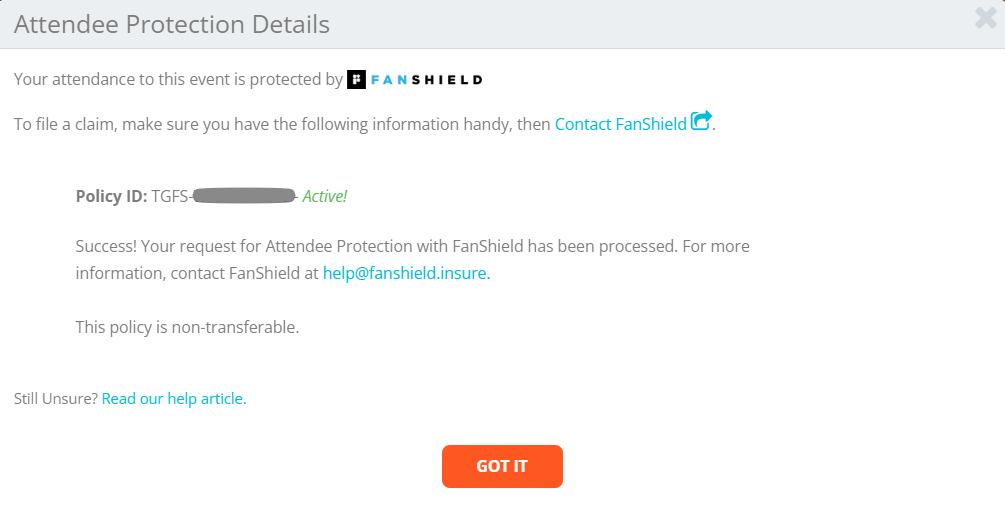
4. In your Attendee Protection Details, you will see a link to Contact Fanshield and also your Policy ID, which you will need to file your claim.
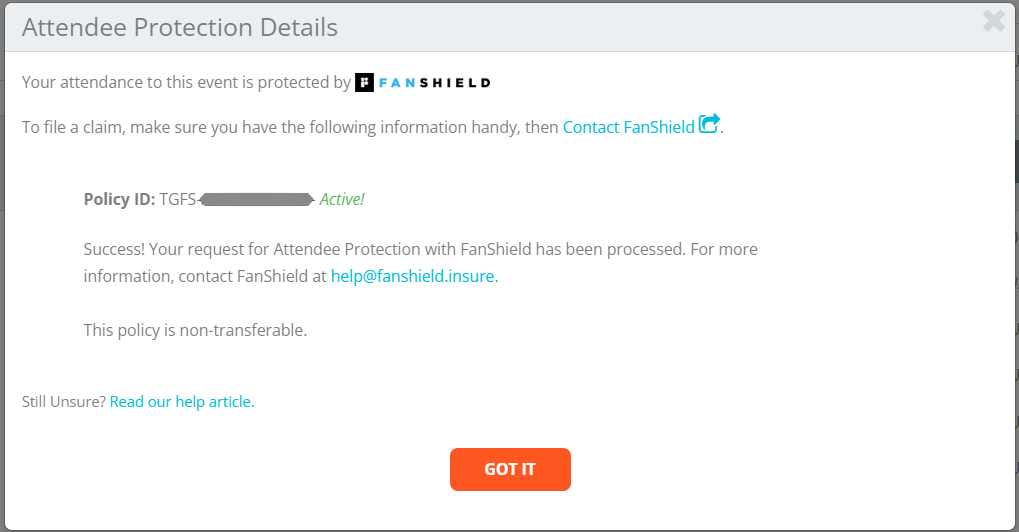
5. Click on Contact Fanshield to be taken to FanShield to start your claim.
6. Enter your Policy ID and click Search
7. Fill out the form FanShield provides and one of their claim agents will be in touch within 48 hours and they will walk you through the rest of the process.
If you have more questions, please contact Fanshield by email – help@fanshield.insure
The full terms and conditions of FanShield’s Standard Attendee Coverage Policy for your coverage is available in your FanShield policy confirmation email. If you need help finding it, or would like it resent, please contact the FanShield team – help@fanshield.insure
Some events will provide their attendees with the option of purchasing Attendee Protection with FanShield for their registrations /tickets. If the event organizer is offering this option you will be able to purchase Attendee Protection at the same time as you purchase your registration/ticket.
You can find the full terms and conditions of FanShield’s Standard Attendee Coverage Policy here.
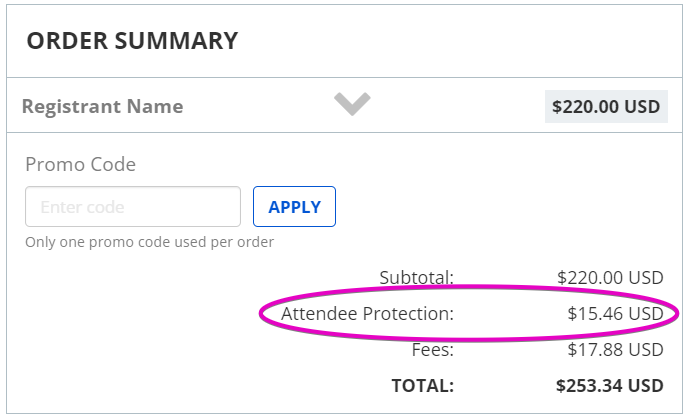
1. The FanShield widget lists the cost that will be charged if you choose to protect your purchase. This is calculated based on the price of your registrations/tickets. If you have decided to purchase Attendee Protection, select Protect your purchase. The displayed cost, will be added to your Order Summary before checkout (selecting Decline protection will decline the Attendee Protection).
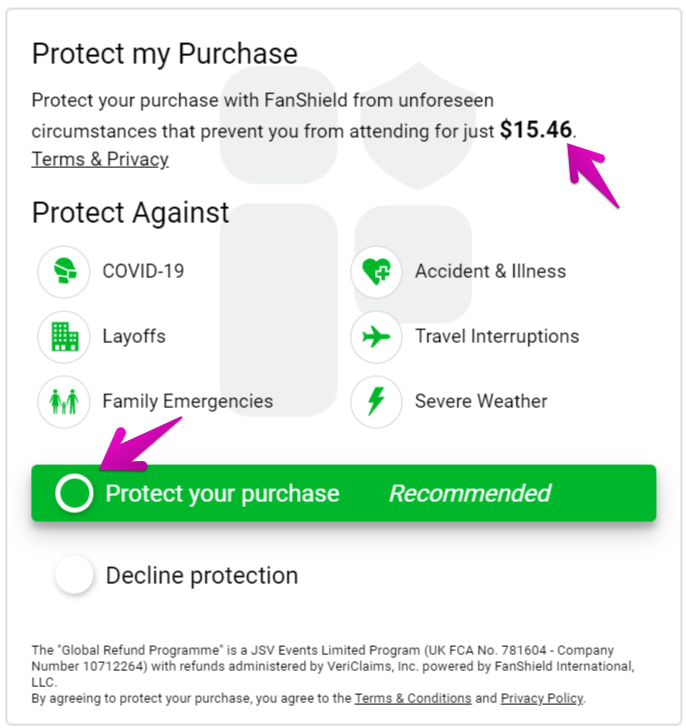
2. After you have reviewed your order (with Attendee Protection), and entered in your payment information, click SUBMIT ORDER to complete your purchase. FanShield will appear as a unique charge, separate from your event purchase (which will appear as all or part of the event’s name).
Note: To see more information on your claim or how to file a claim please refer to our help article – How do I make a FanShield Attendee Protection claim?
If the event allows changes, here are the steps for you to make a change to your registration/ticket – How do I change my registration/ticket type?
If you upgrade your ticket (change to a higher priced registration/ticket), you will be able to pay the additional Attendee Protection to upgrade your policy as well, we’ll add these steps below.
If you downgrade (select a new registration/ticket of equal or lesser price), you need to Contact Events.com in order to update your Attendee Protection. Please note, no refunds are issued for downgrades.
How to upgrade your registration/ticket and your FanShield Attendee Protection:
1. From the Events.com menu above click My Tickets to open your Events.com Experience account. If you don’t have an account, select Sign Up using the same email as on your registration or ticket.
2. Find the event that you would like to change your registration/ticket type select VIEW ORDER or if you’re part of a team, MANAGE EVENT then View Order.
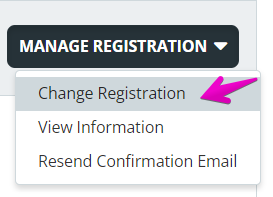
3. Click MANAGE REGISTRATION or MANAGE TICKET, select Change Registration (or Change Ticket).
4. Select the registration/ticket you would like to change to and select CONTINUE.
5. This next screen opens the order form for your new registration or ticket. Here is where you will be able to scroll down and see options for Attendee Protection. Make the selection to ensure your registration/ticket is protected and complete your new order!
If you are upgrading, your existing event Attendee Protection purchase will act as a credit towards the new total based on your new registration/ticket. You will need to view the Attendee Protection widget and accept the additional cost.
6. To view your new policy, open your order again (Step 2). Scroll to your Attendee Protection. Click View Details to see your policy ID.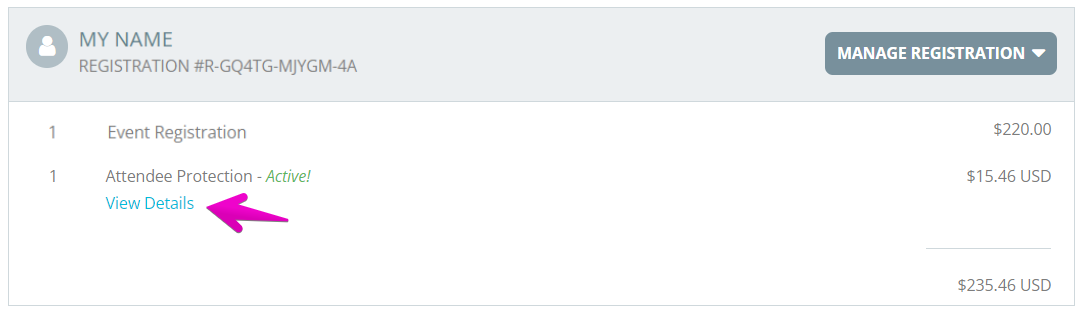
My Installments (5)
If your event organizer enabled payment installments here’s what to expect!
You’ll visit the event page, select your registration/ticket, and then after filling out your order, the CHECKOUT will give you the option of selecting to PAY DOWN PAYMENT.
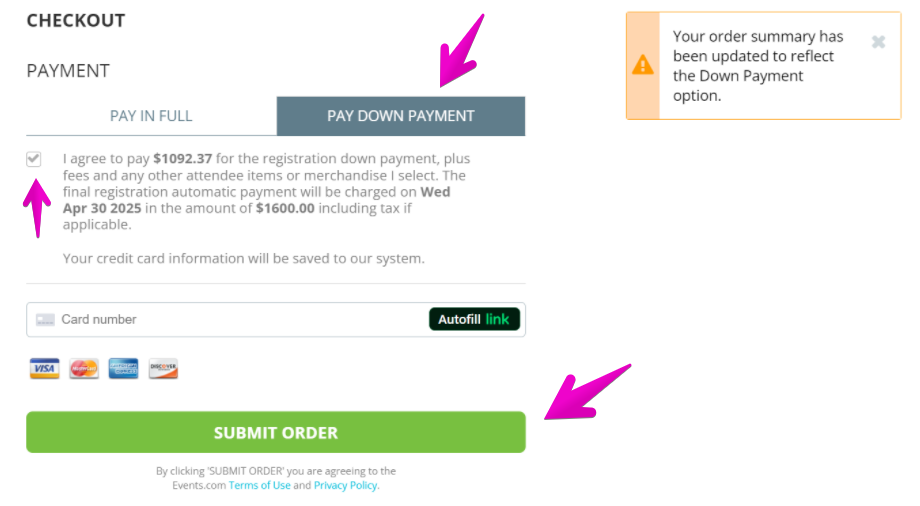
Check the agreement box to accept what you will be paying now and what will be charged at the later date specified. Enter your card number, and select SUBMIT ORDER to complete your purchase.
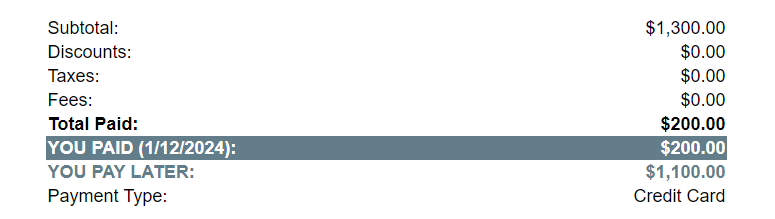
Note: Your confirmation email will display what you paid and what you will need to pay for your final installment. You can also log into your Events.com account to view your order at any time.
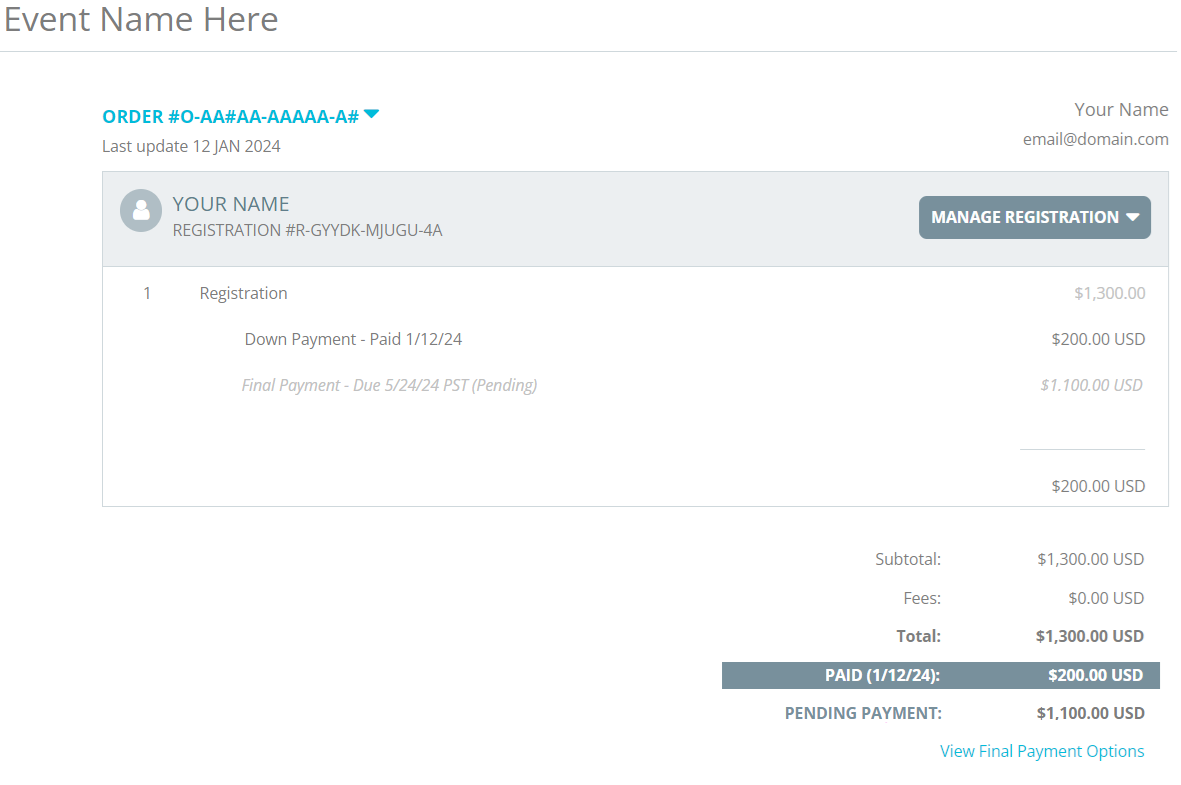
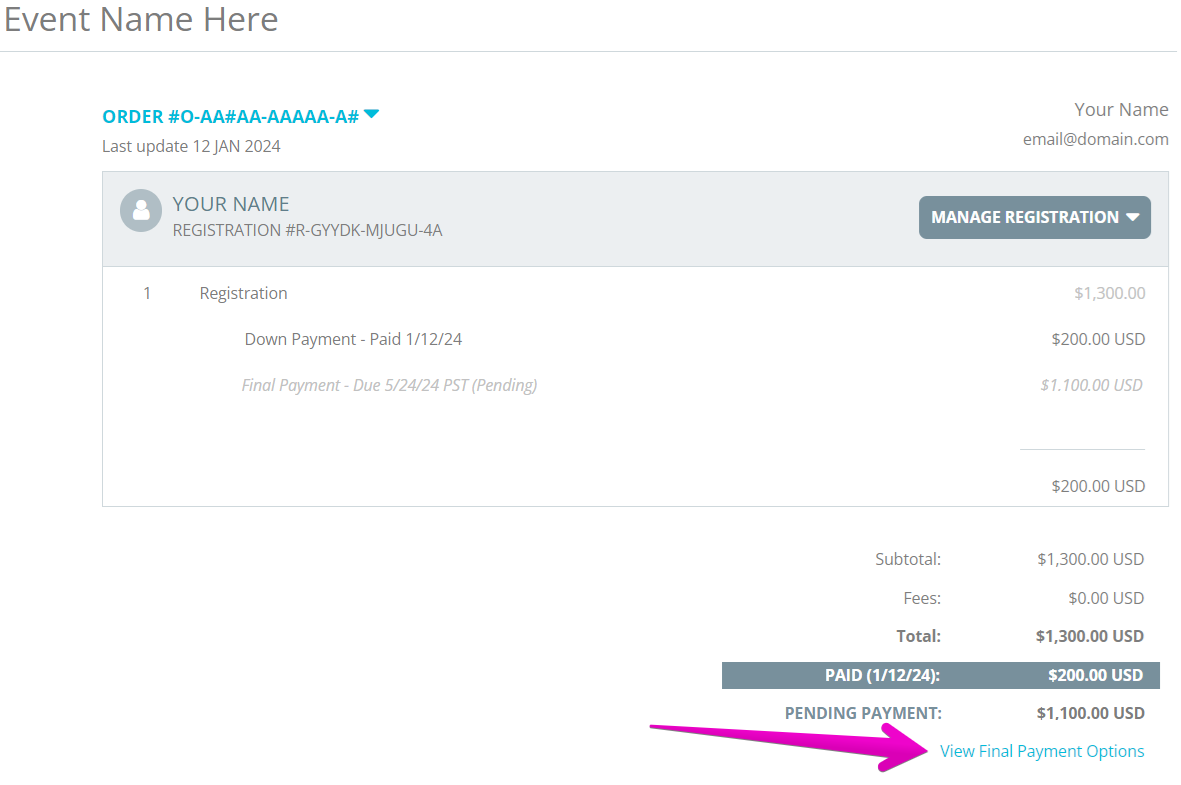
If you have paid for a registration or ticket in installments, There are a couple ways you can check your remaining installment payment total.
If you have your confirmation email handy, your Order Summary shows what you have paid, and what payment will be made later.
Or you can log into your Events.com account to view your order with the following steps.
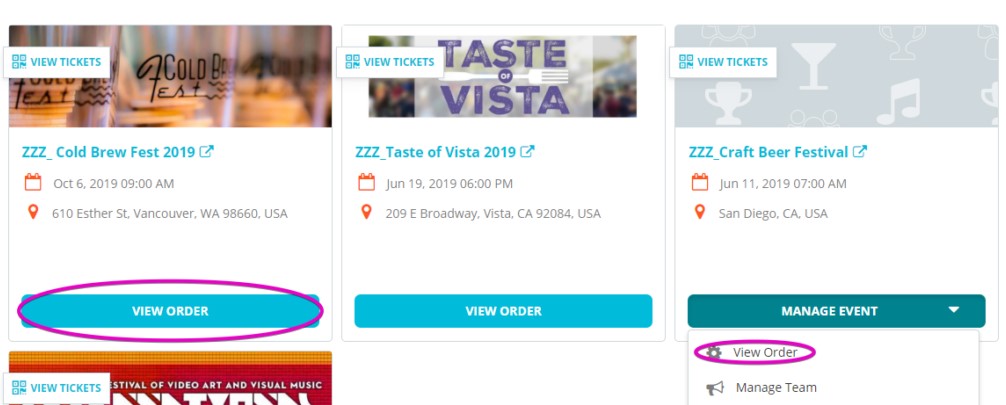
1. From the Events.com menu above click My Tickets to open your Events.com Experience account. If you don’t have an account, select Sign Up using the same email as on your registration or ticket.
2. Find the event you wish to complete your installment payment for, click on VIEW ORDER. Or MANAGE EVENT, then VIEW ORDER.

3. Your order will display your pending installment amount. If you want to pay it early or change your payment information you have these options when you click View Final Payment Options.
Please note: If you make any additional purchases, you must pay for them when added to your order. Your installment is due on its payment date and cannot be increased.
With Events.com we make it easy to pay your installment balance. If your payment is past due, you can follow these steps to complete your final installment payment!
1. From the Events.com menu above click My Tickets to open your Events.com Experience account. If you don’t have an account, select Sign Up using the same email as on your registration or ticket.
2. Find the event you wish to complete your installment payment for, click on VIEW ORDER. Or MANAGE EVENT, then VIEW ORDER.
3. Scroll to the bottom of your order and click View Final Payment Options.
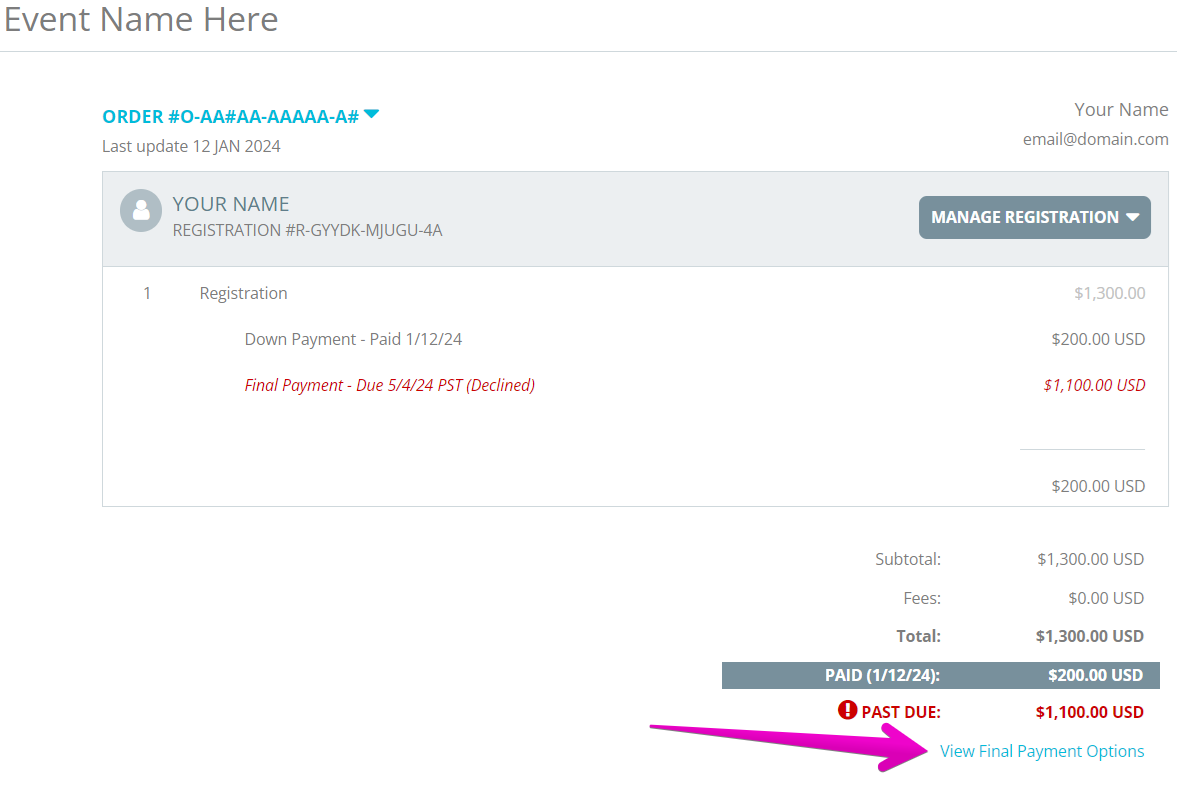
4. If you’d like to use your original payment info, you can click PAY NOW to process your final payment.
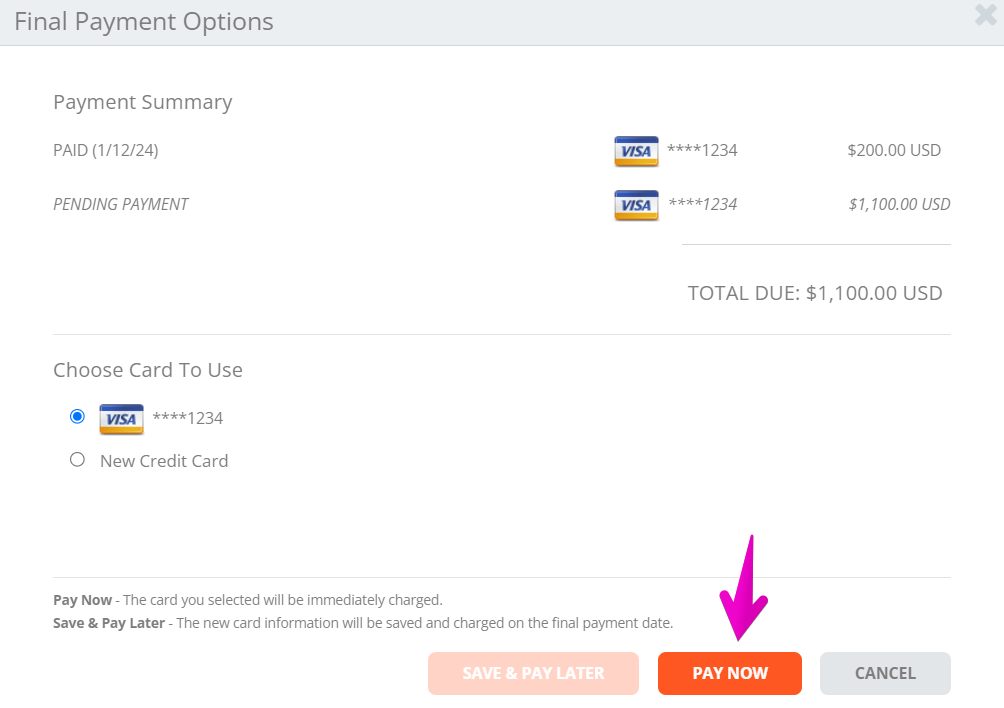
5. If you’d like to use new payment info, select New Credit Card. The Credit Card Information field will appear for you to enter your payment info. When finished click PAY NOW. Your payment will be processed and you’ll receive a confirmation email confirming your order has been paid in full!
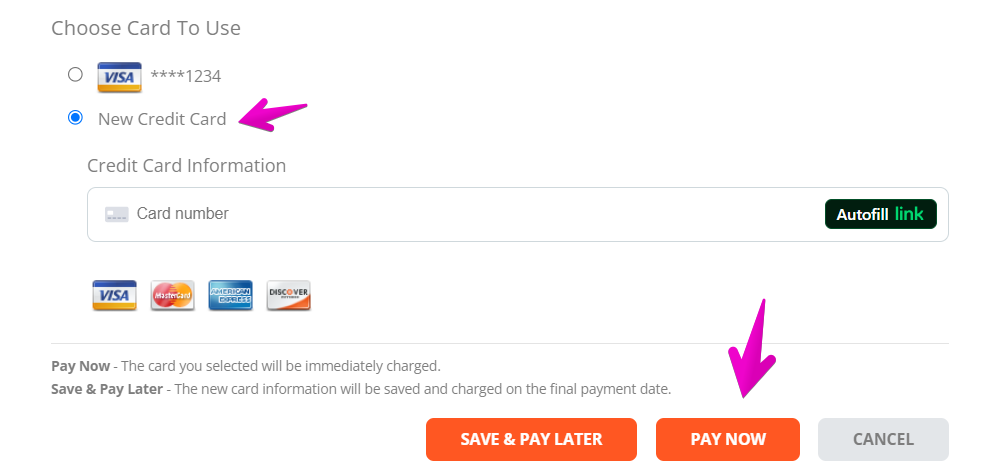
Events.com makes it easy to update your payment information for your final installment payment. You can add a new credit card directly to your order in your Events.com account with the following steps!
1. From the Events.com menu above click My Tickets to open your Events.com Experience account. If you don’t have an account, select Sign Up using the same email as on your registration or ticket.
2. Find the event you wish to complete your installment payment for, click on VIEW ORDER. Or MANAGE EVENT, then VIEW ORDER.
3. Scroll to the bottom of your order and click View Final Payment Options.
4. To update your payment info, select New Credit Card. The Credit Card Information field will appear for you to enter your payment info. When finished click SAVE & PAY LATER. Your new payment information will be used automatically on your final installment payment date.
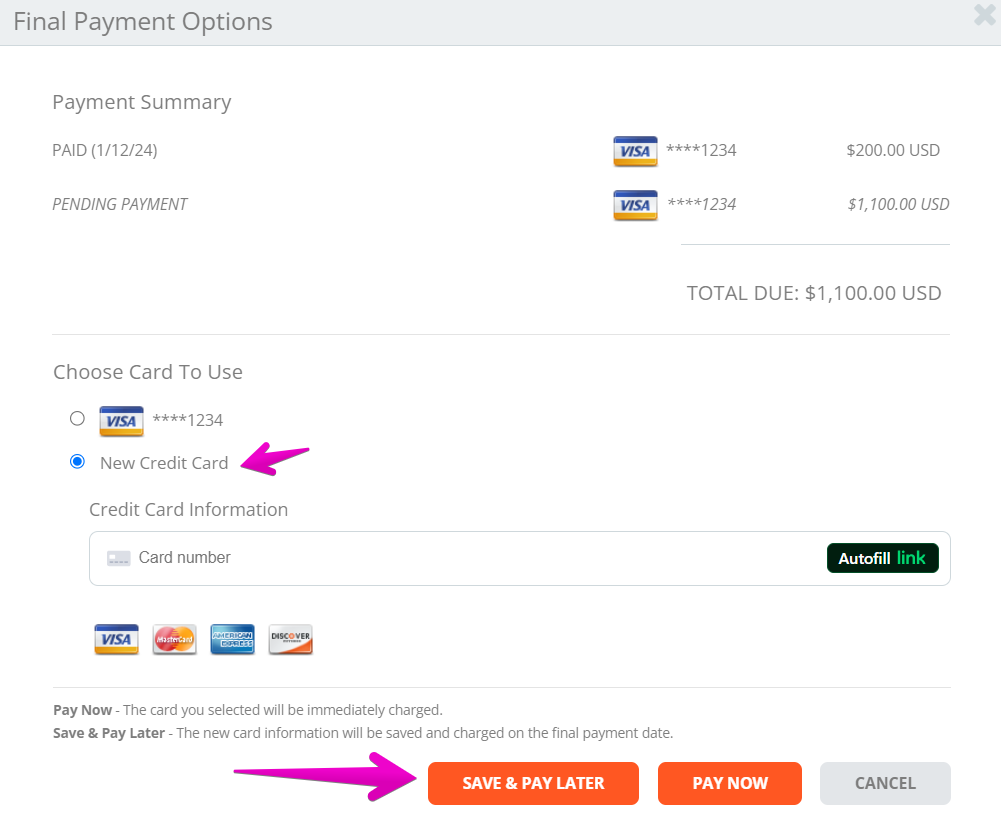
Please note: PAY NOW will process your payment immediately, if you want to wait for your installment due date click SAVE & PAY LATER.
Events.com makes it easy to pay your final installment early. You can pay your installment before the due date, in your Events.com account with the following steps!
1. From the Events.com menu above click My Tickets to open your Events.com Experience account. If you don’t have an account, select Sign Up using the same email as on your registration or ticket.
2. Find the event you wish to complete your installment payment for, click on VIEW ORDER. Or MANAGE EVENT, then VIEW ORDER.
3. Scroll to the bottom of your order and click View Final Payment Options.
4. If you’d like to use your original payment info, you can click PAY NOW to process your final payment.
5. If you’d like to use new payment info, select New Credit Card. The Credit Card Information field will appear for you to enter your payment info. When finished click PAY NOW. Your payment will be processed and you’ll receive a confirmation email confirming your order has been paid in full!
My Order (16)
Note: The organizer needs to enable this feature in order for you to make changes to answers submitted in your order.
If the organizer has turned this feature on, you can log into Events.com and easily update your order information with the following steps:
1. Log In to your Events.com account. If you don’t have an account, select SIGN UP and use the same email as listed on your registration or ticket.
2. As a participant your account will start by loading all of your events under MY EVENTS.
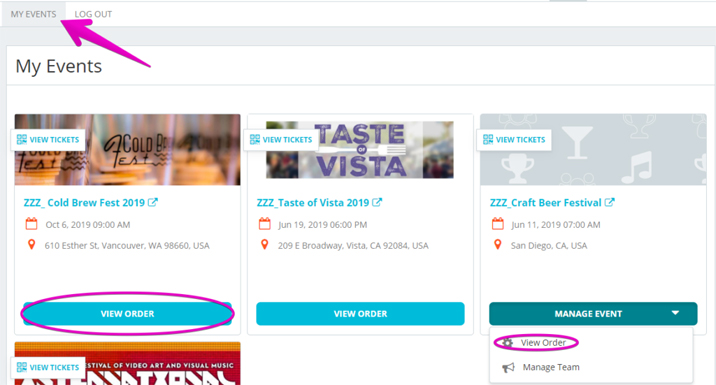
3. Find the event you are attending and click on VIEW ORDER.

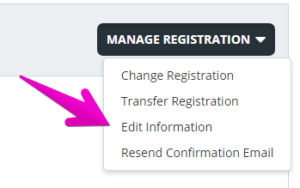
4. Click on the MANAGE REGISTRATION or MANAGE TICKET button and select Edit Information.

5. Please update the information you would like to change in the fields.
6. Click SAVE at the bottom of the screen. This updates your order in real time.
Tip: If any information you need is unavailable for editing, please contact the event directly as that would indicate it has not been turned on. If you need help locating their contact info please email us at help@events.com , we’d be happy to help you find it!
What better way to ensure you have a good time at your event than to invite your friends along? Simply add your friends’ email addresses, or post to Facebook page, and they can follow the link to join you in the fun. There’s a possibility you may even get a discount!
1. Select the registration or ticket type you want to purchase and start filling out the order form.
2. Near the bottom, just before checking out, you will see the Refer-A-Friend offer(s). (One the other or both can be made available by the organizer)
3. Click on either SHARE WITH EMAIL or GENERATE LINK.


4. If inviting friends by email, make sure to separate each address with a comma.

When sharing to social media, ensure your popups are enabled and that you share it before finishing your order.

5. Congratulations, your friends are invited and if applicable, your discount has been applied automatically!
Tip: Discounts are subject to the event organizer’s discretion. Events.com is not responsible for, nor has authorization to discount registrations or tickets.
Can’t find your confirmation email? No Problem! You can easily log into Events.com and send yourself another email.
1. Log In to your Events.com account.
2. Click on your username in the top right-hand corner of the page and select MY EVENTS from the drop-down menu.
3. Find the event you are attending and click on VIEW ORDER or MANAGE EVENT and then VIEW ORDER (if you’re a team captain).

4. If you are an Attendee, click on the MANAGE REGISTRATION or MANAGE TICKET button and select Resend Confirmation Email from the drop-down menu.

If you are the Buyer you can resend the original order information by clicking on the ORDER # (highlighted in blue) and selecting Resend Order Email.

5. Both selections will send an email automatically to the email address on file (be sure to check your junk folder if you don’t receive it in your inbox within a couple minutes).
Note: The organizer needs to enable this feature in order for you to be able to update your information.
If the organizer has enabled this feature, you can make updates or add new answers to the information in your original order. Please keep in mind this may include answers to new questions (that weren’t there when you originally submitted your order), changing an attendee item (commonly t-shirt size or wave time), or acceptance of a new waiver. Follow the steps below to access your order and edit & save the updated content!
1. From the Events.com menu above click My Tickets to open your Events.com Experience account. If you don’t have an account, select Sign Up using the same email as on your registration or ticket.
2. Find the event you are attending and click on VIEW ORDER. If you are on a team, you must first click on MANAGE EVENT and then select VIEW ORDER.
3. Click on the MANAGE REGISTRATION (or TICKET) button and select Edit Information.

4. Update or add any necessary answers, or attendee items. If there are multiple Attendee Items you may need to click See More. Select a new response and press Save at the bottom of the screen. This updates your registration in real time.
5. A new waiver will be at the very bottom. Scroll down, and after you’ve read the waiver, click the check box agreeing that you have read and agree.
6. Click SAVE.
*There are no refunds for a decrease in price. If there is an increase in price associated with the change, the credit card fields will appear and you will need to enter in your payment info and click ‘Submit Order’. You will receive an email reflecting your change.
Need to change your t-shirt size because you’ve gotten into such great shape? Want to go back to your registration and add in that awesome headband?
Events.com makes it easy to change or add attendee items to your order,
1. Log In to your Events.com account.
2. Once logged in, in the top left corner select MY EVENTS.
3. Find your event and click on VIEW ORDER.

4. Click on the MANAGE REGISTRATION button and select Edit Information.

5. Scroll down and click on Select Additional Items.

6. You can now make changes to your earlier answers, or choose new items to add to your registration.
7. If the item(s) you added have a cost associated to them, please proceed with checkout. If not, make sure to Save and you are done!
*There are no refunds for a decrease in price. If there is an increase in price associated with the change, the credit card fields will appear and you will need to enter in your payment info and click ‘Submit Order’. You will receive an email reflecting your change.
Note: Your ability to transfer your registration or ticket is up to the event. The event may or may not allow for this, so be sure to check with the event’s policies, before attempting to transfer your entry.
For those events that do allow transfers, you will be able to initiate this through your My Events profile. It’s important to note that only those that actually bought a registration or ticket will be able to start a transfer. If someone registered you or bought your ticket for you, please contact them, the Buyer, to make any transfers. If you are the original buyer, please follow the steps below to transfer your entry to someone else!
1. Log In to your Events.com account.
2. Find the event you want in your MY EVENTS section. Click VIEW ORDER on the event you want to transfer.

3. Find the registration or ticket that you want to transfer. Select MANAGE REGISTRATION ( or MANAGE TICKET) then Transfer Registration (or Transfer Ticket).
4. Enter the new person’s Email Address you would like to transfer the registration/ticket to and click SEND TRANSFER. If there is a transfer expiration or fee there will be a notice under the email field – “The transfer recipient will be charged an additional fee for the transfer.”
5. You will see that under the person’s Registration/Ticket number, it will now read, PENDING TRANSFER in the order. This will confirm that your transfer request was sent out.
An email has been sent to the person you are transferring the registration/ticket to, and you will also receive a copy of the email. Once the person has accepted the transfer you will see a CANCELLED date and the text TRANSFERRED.
Please note: Any additional items purchased (like Attendee Protection, Attendee Items or Other Stuff), are not included in a transfer. The new attendee can purchase their own add ons (if inventory and availability allow) when they accept the transfer. We suggest contacting the event organizer before initiating a transfer if you have any questions about your purchase.
Safety Tip: Before transferring, we suggest verifying with the event organizer that the ticket is active and transferable. Ticket buyers and sellers are responsible for any payment arrangements. Events.com and the event organizer are not liable for any settlement issues.
Note: The organizer needs to enable this feature in order for you to add purchases to your order after registering for an event.
If the organizer has turned this feature on you will be able to add a purchase to your order. Follow the steps bellow to access you order, add an item and pay for it.
1. Log In to your Events.com account.
2. Click on your username in the top right-hand corner of the page and select MY EVENTS from the left menu.
3. Find the event you are attending and click on VIEW ORDER.

4. Click on the MANAGE REGISTRATION (or TICKET) button and select Edit Information.
5. If your item is not visible, click SELECT ADDITIONAL ITEMS. Make your selection. When there is a cost associated with the option, the credit card fields will populate. Enter in your payment info and SUBMIT ORDER. You will receive an email to confirm you’ve added the purchase.
Pro Tip: If you are downgrading an item (the original item costs more), a refund will not be issued by the system. Please contact the organizer to inquire about their refund policy.
Note: The event organizer will need to turn this feature on for their event. We suggest reaching out to them directly if it does not appear that they offer this option.
So you decided you want to buy that hat after all? Or shuttle, or shirt, or that special thing the event is selling… As the Buyer, you can easily access your order to add Other Stuff after you have completed your order with these simple steps!
1. From the Events.com menu above click My Tickets to open your Events.com Experience account. If you don’t have an account, select Sign Up and use the same email as on your order.
2. Find the event that you are going to, and click VIEW ORDER

3. If you have not already purchased some Other Stuff, you will see an ADD OTHER STUFF button that will lead you to the purchase page.
If you had already purchased Other Stuff, you will see an ADD OTHER STUFF button on the top right corner of the Other Stuff section, that will take you to the purchase page.

4. Select your items, enter in your payment information and click SUBMIT ORDER to complete your purchase.

Your order is now complete and you will be able to see your purchases on your MANAGE EVENT page!
Note: The event organizer needs to have enabled this feature in order for you to be able to change your Registration/Ticket type. Be sure to check the organizer’s website to see if changes are allowed for your Registration/Ticket type. If this feature has been turned on, you must also be listed as the Buyer of the Registration/Ticket type to make this change (you are the person who made the purchase).
As an event goer there are times when you may want to change the type of Registration or Ticket that you have purchased. You signed up for the half marathon, but are now ready to tackle the full marathon. Or, maybe you bought a regular ticket but now want to upgrade to the VIP package. Events.com makes the process easy and seamless. Here’s how to make the change in just a few steps!
1. From the Events.com menu above click My Tickets to open your Events.com Experience account. If you don’t have an account, select Sign Up and use the same email as on your order.
2. Find the Event Card for which you wish to manage and select VIEW ORDER.

3. Find the registration/ticket that you would like to change. Select MANAGE REGISTRATION or MANAGE TICKET and Change Registration (or Ticket).

4. Next, you will be able to select the new category you want. Note: You will only be able to select categories that have space available, are open for registration/purchase and that have been permitted by the organizer. Select the one you want and Continue.
5. You will now need to complete the information required by the organizer for the new category. Any Required Items from your previous entry will also be cancelled and will be required additions to your new order.
6. To finalize the change, the amount previously paid will be reflected in the order summary, if there is a balance owing, you will need to complete payment.
7. Submit Order and voilà you’re all set! You will receive a confirmation email and be able to manage the new registration category.
Pro Tip: Downgrades will not result in a refund. All refund requests should be made directly to the event organizer in accordance to their policies.
Getting all ready for your upcoming event, and want your QR code set to go? With Events.com you can open it up with just a few easy steps!
1. From the Events.com menu above click My Tickets to open your Events.com Experience account. If you don’t have an account, select Sign Up and use the same email as on your order.
2. In the top left corner, click on MY EVENTS.

3. Select the View Registrations/Tickets Button on the top left of the event you want the QR code from.

4. Just like that, you have your QR code for your event!
Note: Some organizers will ask their attendees to present this upon arrival either by printing it, or presenting it on a mobile device. But be sure to check what the organizer of your event tells you to bring as it can differ between events.
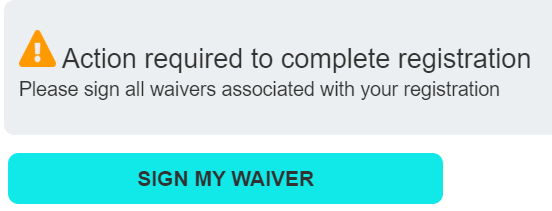
There are many reasons why a new waiver is a good idea. There could be a change in logistics, or new circumstances to include. Waivers can be really informative for attendees. If the event you’ve signed up for has added a required Electronic Signature you will need to finish this step. There are two different ways that you can open your waiver and add your Electronic Signature:
First Way:
1. You can start by clicking the link in your reminder email. You will need to either Log In or Sign Up (with the email used on your registration)
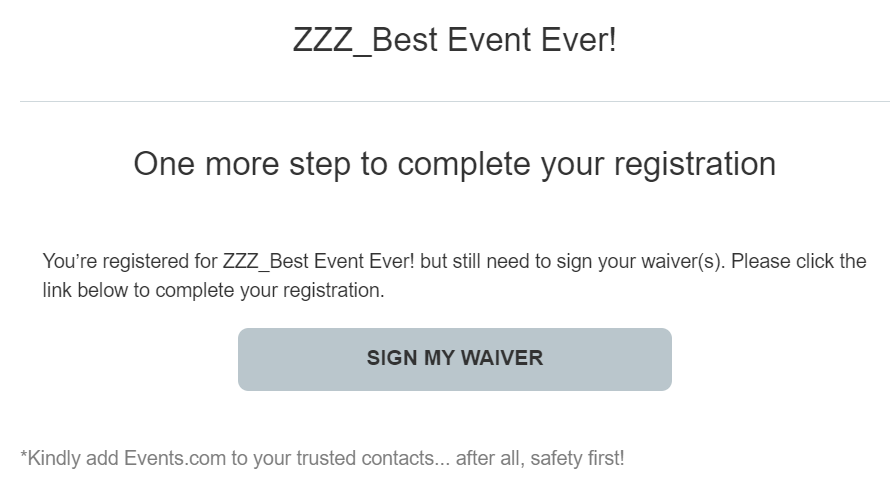
2. Your order will open right to the spot where your signature is needed. Click the name of the waiver to read the waiver. Then enter your full name and click SAVE. You’ll see a pop up confirming your info is saved. And the page will refresh and show you your waiver confirmation.
Second Way:
1. Log In to your Events.com account. If this is your first time, click Sign Up and create an account with the same email used on your registration.
2. Find the event you are attending and click on VIEW ORDER. If you are on a team, you must first click on MANAGE EVENT and then select VIEW ORDER.
3. Click on the MANAGE REGISTRATION (or TICKET) button and select Edit Information or View Information.
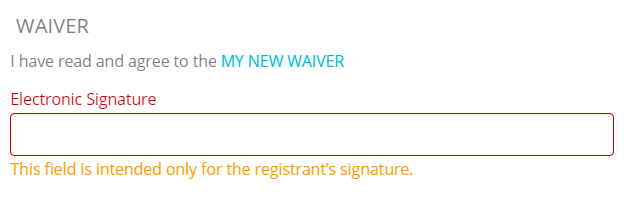
4. Your waiver will be at the very bottom. Scroll down, and after you’ve read the waiver, type in your full name as your Electronic Signature.
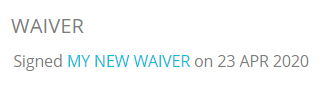
5. Click SAVE. You’ll see a pop up confirming your save and then the page will refresh to show the signed waiver confirmation.
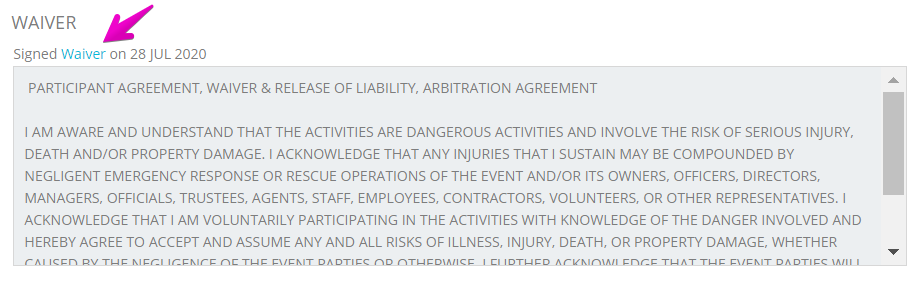
Most events have a waiver, polices, terms and conditions or a release of some kind for their attendees to agree to while purchasing. If you need to go back and review this information at any time you can do so in your Events.com account!
1. Log In to your Events.com account. If you don’t have an account, select SIGN UP and use the same email as listed on your registration or ticket.
2. As a participant your account will start by loading all of your events under MY EVENTS.
3. Find the event you are attending and click on VIEW ORDER.
4. Click on the MANAGE REGISTRATION or MANAGE TICKET button and select Edit Information or View Information (Depending on the event organizer’s settings).
5. Scroll to the waiver section. If you click the name of the waiver it’ll open up a window for you to read the content.
If you have any questions about the content, please contact the event organizer directly.
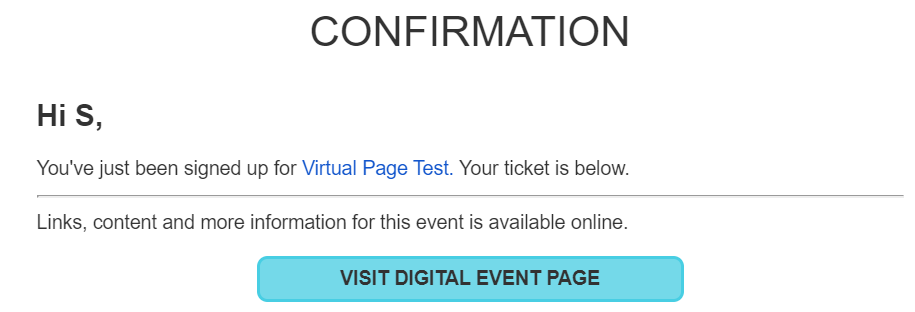
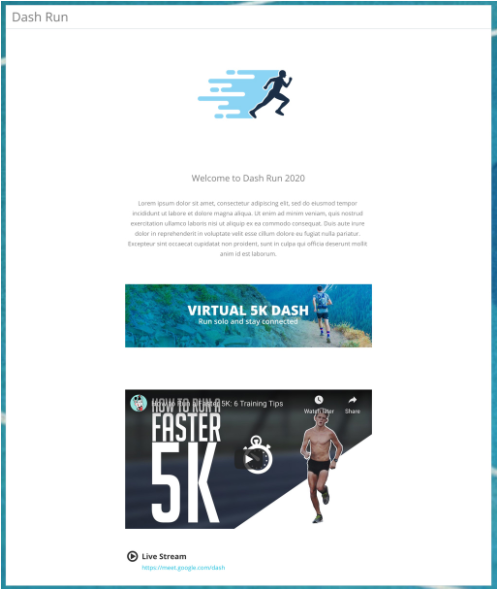
On Events.com organizers have the option of creating a Digital Event Page for their attendees. This page is used to share further information and useful links about their upcoming event. If the event you’re attending has one, you can view it two different ways in your Events.com account!
Way 1: You can click the link within your confirmation email (you will need to Sign Up if you haven’t already created an account). Clicking the button will load the Log In pop up and take you straight to the Digital Event Page.
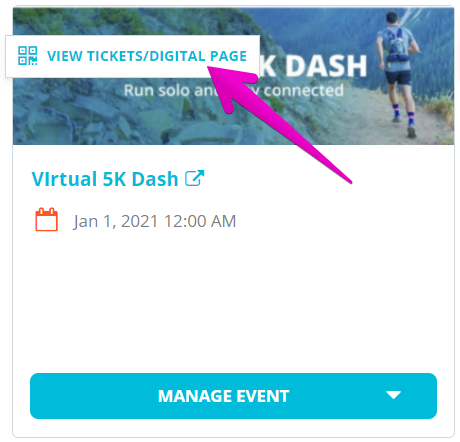
Way 2: View your Digital Event Page by logging directly into Events.com.
1. From the Events.com menu above click My Tickets to open your Events.com Experience account. If you don’t have an account, select Sign Up and use the same email as on your registration or ticket.
2. As an attendee your account will start by loading all of your events under MY EVENTS. Find the event you are attending and click on VIEW TICKETS (or REGISTRATIONS)/DIGITAL PAGE.
3. Click Access Digital Event Page and voilà!
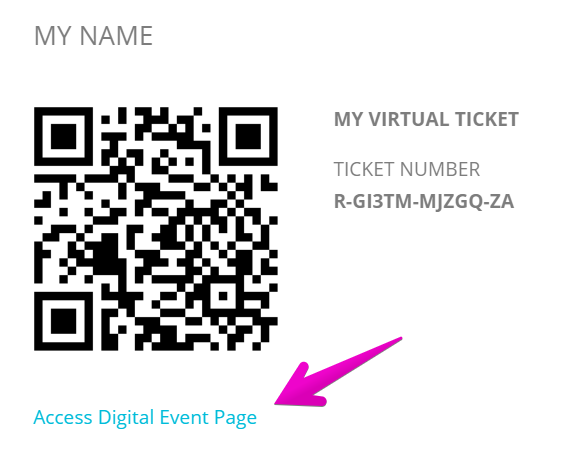
If you have any questions about the content, please contact the event organizer directly.
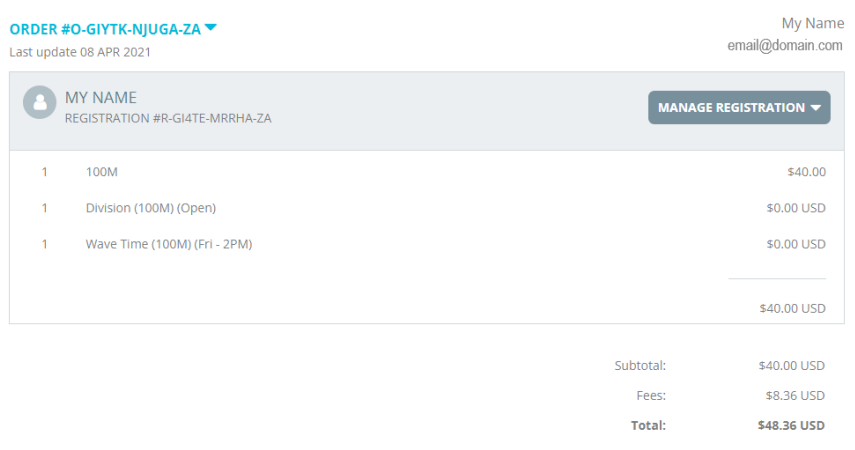
If you need to go back and review your order information at any time you can do so in your Events.com account!
1. From the Events.com menu above click My Tickets to open your Events.com Experience account. If you don’t have an account, select Sign Up and use the same email as on your registration or ticket.
2. As a participant your account will start by loading all of your events under MY EVENTS.
3. Find the event you are attending and click on VIEW ORDER or (for Teams) MANAGE EVENT – VIEW ORDER .


Note: The event organizer needs to have enabled this feature in order for you to be able to change your Registration/Ticket type. And you must be listed as the Buyer of the Registration/Ticket type to make this change (the person who’s information was used to make the purchase).
In these uncertain times organizers are doing their best to keep their event goers safe and ensure an amazing experience. For many, these means offering a deferral registration/ ticket. To accept this option, please use the following steps:
1. Log In to your Events.com account. (Click Sign Up if it’s your first time, and use the email you used for your order).
2. Find the Event Card for which you wish to change and select VIEW ORDER.
3. Find the registration/ticket that you would like to change. Select MANAGE REGISTRATION or MANAGE TICKET and Change Registration (or Ticket).
4. Next, you will be able to select the deferral category you want and click CONTINUE.
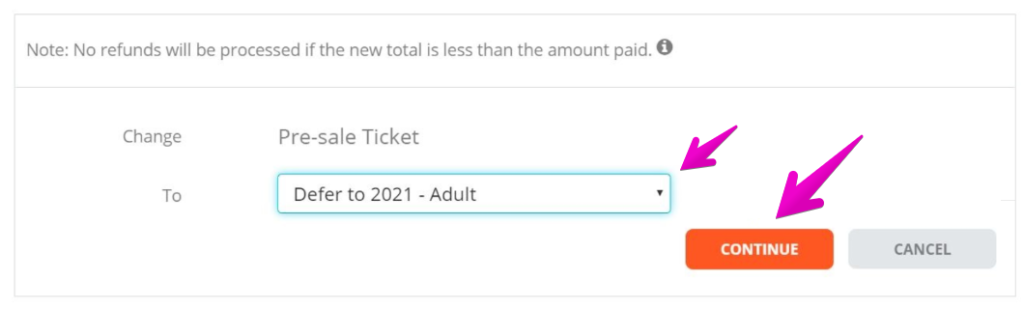
5. Confirm all your information on the next screen and select Submit Order. Voilà! You’re all set! You will receive a confirmation email that you’ve been changed to a deferred registration/ ticket.

Events are always more fun with friends! If your friend signed you up and there was a required Electronic Signature you will need to finish this step on your own. There are two different ways that you can open your waiver and add your Electronic Signature:
First Way:
1. You can start by clicking the link in your confirmation email. You will need to either Log In or Sign Up (with the email used on your registration)
2. Your order will open right to the spot where your signature is needed. Click the name of the waiver to read the waiver, then enter your full name and click SAVE. You’ll see a pop up confirming your info is saved, the page will then refresh and show you your waiver confirmation.
Second Way:
1. From the Events.com menu above click My Tickets to open your Events.com Experience account. If you don’t have an account, select Sign Up and use the same email as on your registration.
2. Find the event you are attending and click on VIEW ORDER. If you are on a team, you must first click on MANAGE EVENT and then select VIEW ORDER.
3. Click on the MANAGE REGISTRATION (or TICKET) button and select Edit Information or View Information.
4. Your waiver will be at the very bottom. Scroll down, and after you’ve read the waiver, type in your full name as your Electronic Signature.
5. Click SAVE. You’ll see a pop up confirming your save and then the page will refresh to show the signed waiver confirmation.
My Team (for Team Captains) (8)
Found a new exciting name to call your team after signing up? As team captain, you can update your team name for all to see with just a few easy steps:
1. Log In to your Events.com account (Click Sign Up if it’s your first time, and use the email you used for your order).
2. Click on YOU at the top right-hand corner of your screen and select MY EVENTS on the left of your page.
3. Find the event you want to change your team name in. Click the MANAGE EVENT button under the event. Then select Manage Team.

4. Once on the team page, press the pencil icon next to your team name to update the name, and you may also change or set an access code if you wish.
5. Press SAVE to save the new name for everyone to enjoy!
Nobody likes being on a team alone! If you are a team captain, you can invite your friends to join your team.
1. Log In to your Events.com account (Click Sign Up if it’s your first time, and use the email you used for your order).
2. Click on YOU at the top right-hand corner of your screen and select MY EVENTS on the left of your page.
3. Find the event you want to invite your friends to. Click the MANAGE EVENT button under the event. Then select Manage Team.
4. Once on the team page, click the orange INVITE TEAMMATES button.
5. Here, you can enter email addresses to invite people to your team. If you are entering multiple addresses, separate them by commas (e.g. shutuplegs@gmail.com, runner123@gmail.com). You can enter a personal message (e.g. Get your sneakers ready!) and send yourself a copy!
Note: Your invitees will receive a link that sends them directly to the team registration page, overriding any passcode you may have created for your team.
Creating a team is quick and easy! Start by going to the event’s registration page and complete the following steps.
1. On the registration page click Teams.

2. Then select Create a Team.

2. Enter in a name for your team and select CREATE.

3. Select the registration type and click REGISTER NOW.
Note: Requirements may vary based on event settings. For example, some events may require that all members of a relay team be registered at one time by the team creator.
4. Voilà! You are now ready to fill out the information form!
Pro Tip: Once you have successfully registered your team, you can manage your team by going to My Events.
Note: The event organizer will need to have enabled this feature to allow for you to switch teams. If you do not see this option, you will need to contact the organizer directly.
As long as changing teams is allowed, each member of the team can do this for themselves. Read below to find out how to do this!
1. Log In to your Events.com account.
2. Click on YOU in the top right-hand corner of the screen and select MY EVENTS on the left of the page.
3. Click on MANAGE EVENT in the appropriate event box and VIEW ORDER. NOTE: You do not want to click on Manage Team.

4. Scroll down to your registration and click on the team switch icon to the immediate right of your team name.

5. A Switch Teams pop-up will appear. Please type in the new team name you wish to join. If the new team requires an access code you will need to get this from the new team’s captain. Once you have the new team name and, if needed, the access code entered please click on SWITCH TEAMS.
6. You will be brought back to the MANAGE EVENT screen and your new team name will be listed. You will also receive an email confirming your team switch. Congrats, you’re done!
Did you set a team access code and forget? Or maybe you thought of a new awesome one to give your team a laugh. As team captain, you can view, add, or change your access code with these easy steps:
1. Log In to your Events.com account (Click Sign Up if it’s your first time, and use the email you used for your order).
2. Click on YOU at the top right-hand corner of your screen and select MY EVENTS on the left of your page.
3. Find the event you want to change your team access code in. Click the MANAGE EVENT button under the event. Then select Manage Team.

4. Once on the team page, your team name and access code will display. If you want to add or edit the code, press the pencil icon next to it.
5. Press SAVE if you need to update your team access code. And make sure you tell all your future teammates!
As team captain, we know you’ve got a lot on your plate! We offer some fun team management tools to let you oversee your team on Events.com.
1. Log In to your Events.com account (Click Sign Up if it’s your first time, and use the email you used for your order).
2. Click on YOU at the top right-hand corner of your screen and select MY EVENTS on the left of your page.
3. Find the event you want to view your team in. Click the MANAGE EVENT button under the event. Then select Manage Team.

4. This is your team page. You can view or change your team name and access code, invite teammates, see the list of your teammates who have signed up and download the list.

As team captain, we know you’ve got a lot on your plate! We offer some fun team management tools to let you oversee your team on Events.com.
1. From the Events.com menu above click My Tickets to log into your Events.com Experience account. If you don’t have an account, select Sign Up using the same email as on your registration or ticket.
2. Find the event you want to manage your team in. Click the MANAGE EVENT button under the event. Then select Manage Team.

3. This is your team page. You can change your team name and access code, invite teammates, see the list of your teammates who have signed up or download the team list.
Note: The event organizer will need to have enabled this feature to allow for you to create/join teams. If you do not see this option, you will need to contact the organizer directly.
As long as it’s allowed, you can create/ join a team with the following steps!
1. Log In to your Events.com account.
2. Click on YOU in the top right-hand corner of the screen and select MY EVENTS on the left of the page.
3. Click on VIEW ORDER in the appropriate event box.
4. Scroll to your registration and click on Create/Join a Team just below your name.
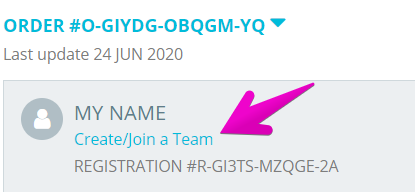
5. A team pop-up will appear giving you the choice between Create Team or Join Team.

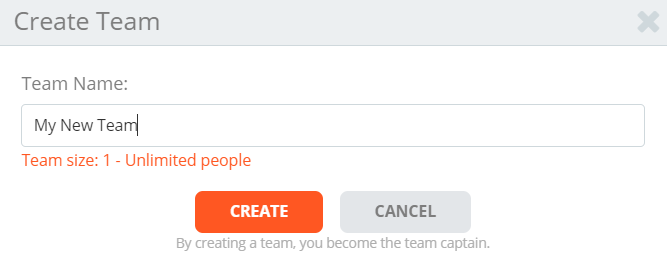
If you select Create Team, you will be prompted to enter a team name and click CREATE to finish.
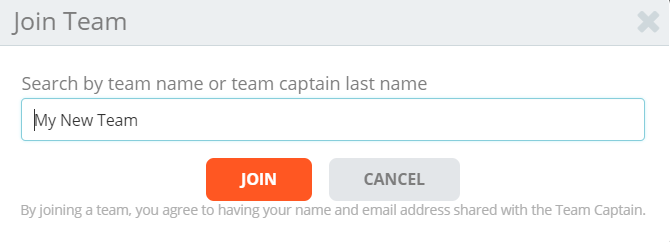
If you select Join Team, you will be prompted to enter in the last name of the team captain or team name you wish to join. If the new team requires an access code you will need to get this from the new team’s captain. Once you have the new team name and, if needed, the access code entered please click JOIN.
6. Your page will refresh and your registration will update with the team name. You will also receive an email confirming your team membership. Congrats, you’re done!
My USA Triathlon® Membership (1)
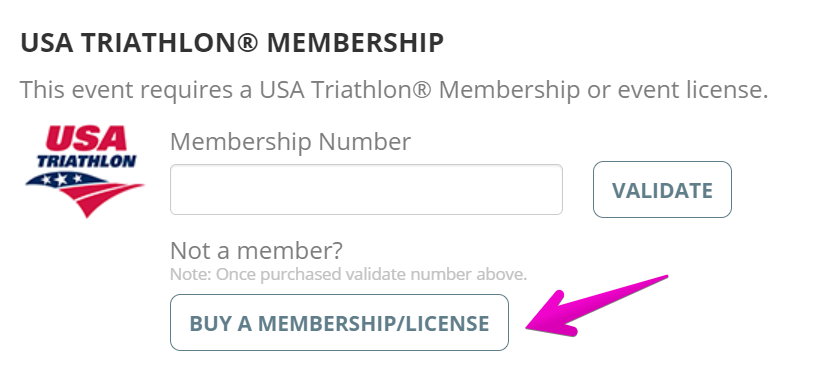
If you’re planning on participating in a USA Triathlon sanctioned event, a membership or event license may be required. You will see a notation in the registration description before you open your registration form letting you know.

Click the + on the registration you want to register to, then REGISTER NOW to open the registration form. Fill out the questions until you get to the USA TRIATHLON® MEMBERSHIP validation. If you need to purchase membership or an event license, click BUY A MEMBERSHIP/LICENSE.
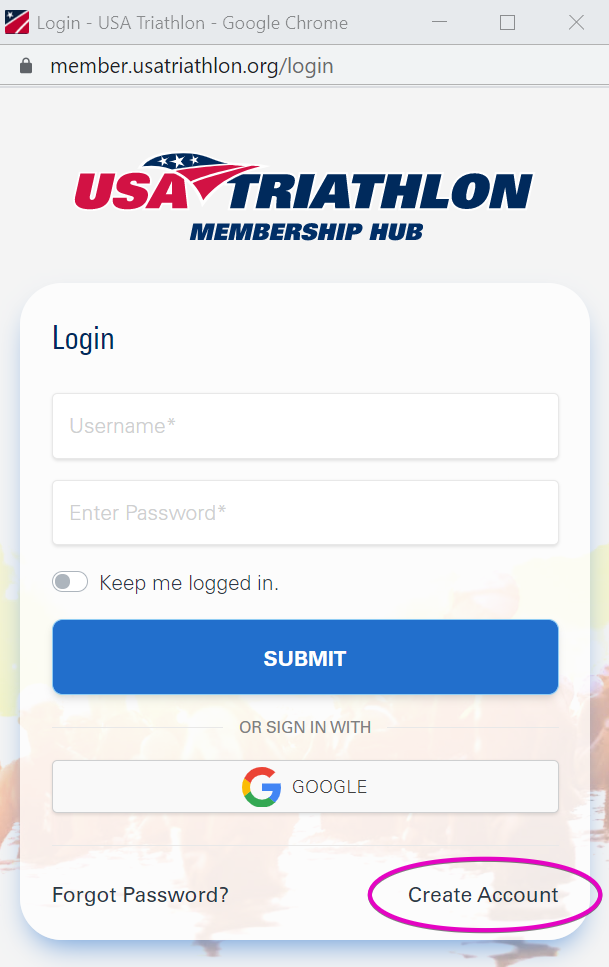
The USAT Membership Hub will open as a pop up, you can either Login, or Create Account. Ensure that the information you enter to create your USAT profile is the same (Name, Date Birth) as you will use to complete your registration.
After setting up your profile you’ll be walked through 5 steps.
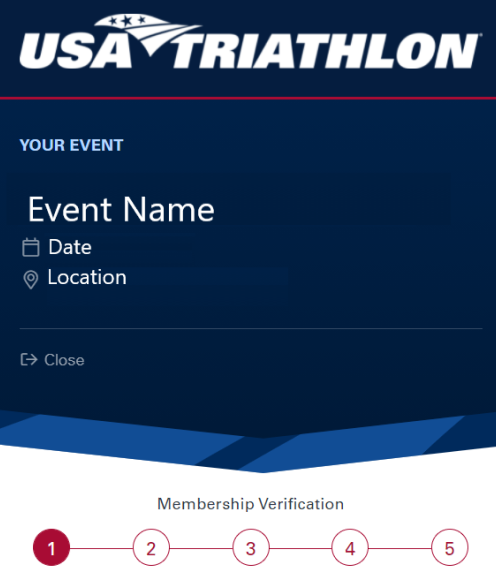
Step 1: Select a User Profile
Step 2: Select a Membership Type
Step 3: Edit Membership Application
Step 4: Waiver Signatures
Step 5: Billing
After payment, you’ll be shown your USAT membership number. You can now add that into the field in the registration form for verification and finish your registration. Hope you enjoy the event!